Ignition push button modification

Tiny
BENEDWARDSPI
  • MEMBER
  • 1977 JEEP CJ5
  • 5.0L
  • V8
  • 4WD
  • MANUAL
  • 100,000 MILES
Hi, this will be my first (properly submitted) question on this forum. In a similar thread, CJ MEDEVAC has helped others with info on a "how-to" when wiring in a few toggle switches and a push button start. I'd appreciate any help from folks - with pics and/or docs of your mod.

My 1977. CJ5 has a 304 V8 and a 3-speed manual trans in the floor. The problem I have is that the key and ignition cylinder in the steering column are stuck in the "ON" position and will not turn back to "off" or forward to "start." It's definitely jammed because I've tired many things, from simple wiggling to vice-grips, and no luck. This is no big deal, as I would like to replace the factory straight column with a tilt column, but until I can find a suitable used (and era-correct) tilt column, I'm looking for a temporary fix. Other projects are consuming my paycheck, so my toys (Jeep and the Harley) and their related expenses are on the back burner.

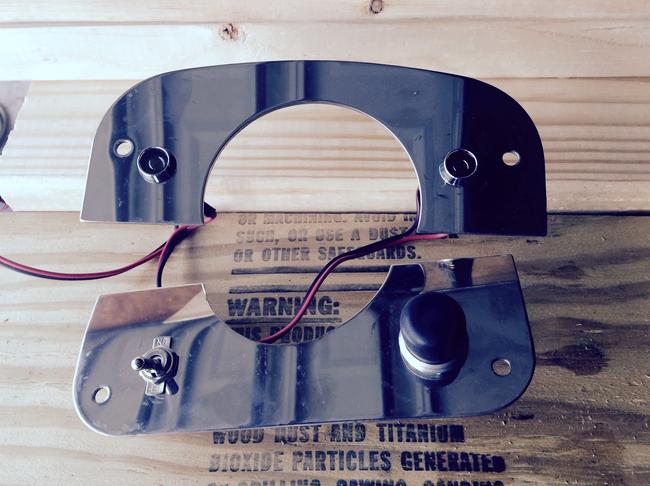
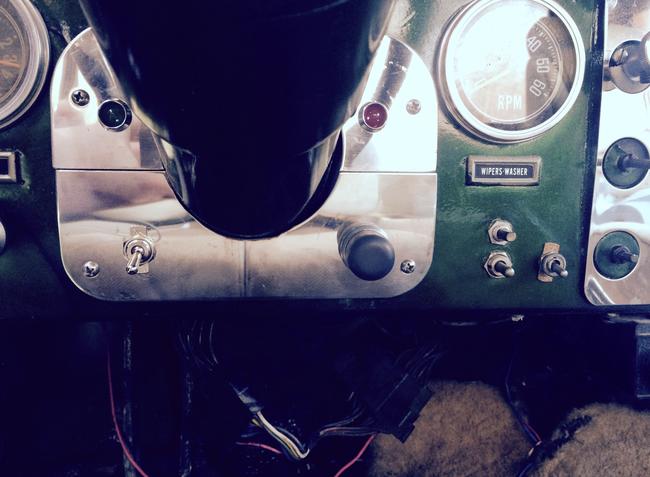
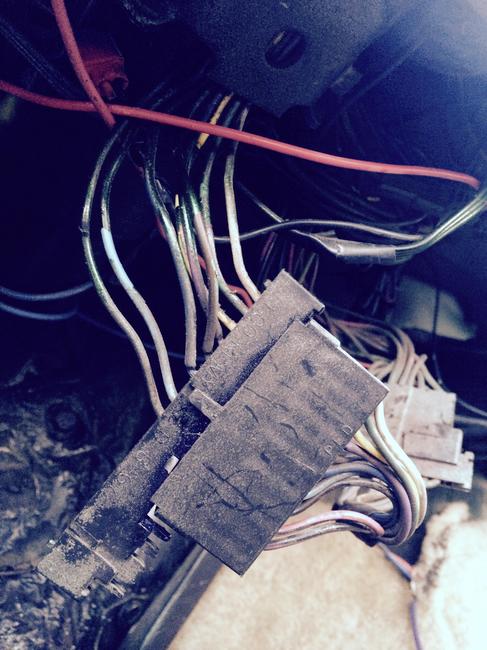
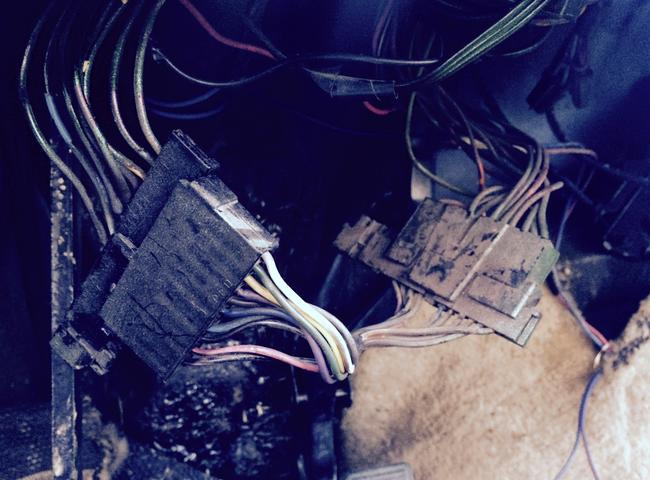
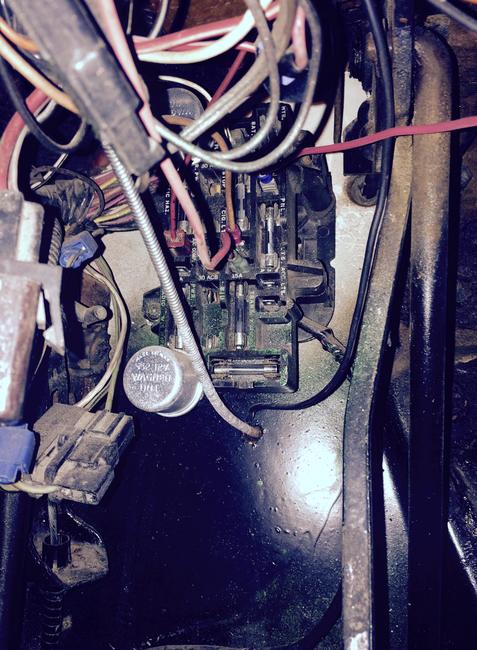
The wiring is all OE and the fuse box has glass-type fuses. With the key stuck in the "ON" position, I have to jump across the solenoid to start it up and clutch / stall the engine to stop. I also have to disconnect the battery to stop electrical drain when parked - this is no good. I've pored over electrical diagrams that I found online, but I'd really like some real-world direction from those who have crawled under the dash and tapped into the wiring for main, accessories, and starting. I've already begun my mod by installing 2 metal SPST toggles into the metal trim pieces on the dash; above and below the column. One toggle will be for accessory; the other for power. I've also installed a couple of indicator lights that will illuminate when the toggles are in the "ON" position. Lastly, I've mounted a heavy-duty metal push-button for starting. What I need help with is to know which wires (preferably color or number L to R) on the plastic connector at the underside of the column are being fed power to the ignition key. In my initial tinkering, I find 3 of the wires are hot that are headed up the column. This may be due to its current "jammed" condition. Additionally, which wires feed power to the gauges and accessories and which ones are used for starting. Once I've taken the ignition key cylinder out of the equation, I believe I can run with the rest of the modification from that point.

All help is appreciated and many thanks in advance,
Ben
Sunday, March 29th, 2015 AT 6:17 AM

19 Replies

Tiny
CJ MEDEVAC
  • MECHANIC
  • 11,004 POSTS
Now that you are off the other post, other folks might be able to search and find your specific problem and solution!

On the other post, I supose you saw the pics of my toggle switch set up (like?)

Anyway, let's maybe look at the possibilities that's got you in this bind to begin with

I can think of three right off the bat

1) the lock cylinder is muffed, if this is the case, removing the steering wheel and other pain inn the butt goodies out to access the hole that you depress the tab "in" to remove the cylinder will only work if the key is at the "perfect" position in the "on" mode- so if its not "right exactly there" the tab won't depress. The other option is drilling out the key hole and attempting to "pick" at the tab over so that it releases out of the column housing (without drilling into stuff you shouldn't). Once you have seen all of this stuff disassembled you have a better understanding of how it all works and how to approach the matter!

Unfortunately, all you have to go on is me right now! We are hoping #3 will be the ez fix! Bear with me!

2) inside the column, the lock cylinder turn a gear (or pinion) this gear meshes with a "rack". This "rack", or in plain terms, roughly a 3/8 x 3/8 square bar 6 inches or so long has gear teeth made into it. When you turn the key, the gear moves the rack. The upper end of the rack has a pin that will lock the steering, if the rack moves towards you (ccw key)

The other end, towards the firewall, has a long rod, with an "l" bent on the end, it hooks into the actual ignition switch on the other side of the dash. Here's the possible #2 problem. The gears or teeth are broke/ worn/ chewed up and will not allow the lock cylinder to turn (this is not a good situation, and may require hard to get parts)

3) the easiest thing to check and maybe fix!

Maybe the actual switch is jammed (it happens!)

You will need a 5/16 wrench, and be capable of some contortion moves!

Snatch the negative cable off of the battery. Remember we have "real and manly" vehicles, this will never hurt a computer or make your accessories go wild, all you will have to do is preset your radio stations and set the clock!

Take the switch loose, remove the "l rod", see if the key will turn?

Unfortunately, you cannot drop the column as with a ford truck to make access easier

Since it's hard to see, a mirror might help

I'm gonna include some ford truck pics I took of my buddy's stuff (with the column dropped), just so you will "know and understand" the mission you must sorta blindly perform crouched down beside your door opening

If this turns out to be the problem, buy nothing yet (i may can help with the price), i'll talk you thru installation/ adjustment

If this don't work, we will go with your intended "push button" route, or try to fix the other stuff

Looks like my diagrams will work for you too, if need be, if you can understand them. Here's the pics. Notice the rod in the 1st two pics

Your turn

The medic
Was this
answer
helpful?
Yes
No
+1
Sunday, March 29th, 2015 AT 11:35 AM
Tiny
BENEDWARDSPI
  • MEMBER
  • 9 POSTS
Medevac,

Alrighty then; some good info here! I'll be saving this in a document for future reference. For the time being, I'm not going to bother with troubleshooting the cylinder - I'd rather wait and replace the column with a tilt and fix the key issue at that time. But, I greatly appreciate all you have provided so far. Plus, I mentioned using vice-grips. Yeah. An, I was upset when it jammed. Let's just say it's really broke. Haha!

With my time constraints to actually work on things, this is the simplest fix for me at this point - toggle and push button. Besides, like others who have mentioned, I live in a very rural area and have no real concerns of theft. For some reason, the black SUV with half a dozen antennas in the driveway is a dead giveaway of my 20 years of law enforcement.

So, shall we move forward with my project? I believe you're going to be a great help!

Thanks,
Ben
Was this
answer
helpful?
Yes
No
Sunday, March 29th, 2015 AT 1:44 PM
Tiny
CJ MEDEVAC
  • MECHANIC
  • 11,004 POSTS
Roger!

I must return to the mother ship w/ all of my pics

(i'm now on the lap top, wife is on the mother ship doin' bills)

I began to write you an explanation novel of the diagrams, when I went to find the pics I wanted, I realized I had not transferred like the last 2 years onto the laptop.

I'll be on there soon, and you will get all I have w/ explanations on how to de-cipher my attempt to record my methods

See you real soon

The medic
Was this
answer
helpful?
Yes
No
Sunday, March 29th, 2015 AT 2:00 PM
Tiny
BENEDWARDSPI
  • MEMBER
  • 9 POSTS
Sounds good to me sir.
See ya after while.
Ben
Was this
answer
helpful?
Yes
No
Sunday, March 29th, 2015 AT 2:19 PM
Tiny
CJ MEDEVAC
  • MECHANIC
  • 11,004 POSTS
This maybe being your 1st visit here, I really am spot do all of the fixing on here (to benefit others who may follow your tracks)

In case you ain't noticed, I love answering the cjs the most-us!

I can and will send you the info you desire, but after I post it on here

I'm sorry, i'm an airborne ranger ('82-'87), I go above and beyond for what I believe in and love!

So there's info and pics you could probably not want sent via email (i'll know what to send and not to send!)

I made all of them pics and did all of the research hoping I could "throw it all" on somebody on here. I really wanna help to the fullest extent (see the other cj 5 and cj 7 forums here on 2car)

So, I really wanna get it all out! (As I seemingly have contracted "sometimers") (that is, sometimes I remember, sometimes I don't)

This is what i'm gonna do, so it want be so long and boring, and I won't lose the whole novel if the power glitches!

I'm gonna give you multiple posts with info and pics (keepers and not)

Please do not reply back, till I take a break, whereas I will prompt you to respond at the end of a post (even if I ain't done yet)

This will give you time for any questions before I resume!

I will email the meat and potato stuff to you

I'm going in now!

One after the other

The medic
Was this
answer
helpful?
Yes
No
Sunday, March 29th, 2015 AT 4:26 PM
Tiny
BENEDWARDSPI
  • MEMBER
  • 9 POSTS
Medevac,

I think that's a great idea to post them here for others to benefit and I love the Jeeps, too. " 'Mmerica! " I have a '64 CJ5 6-banger sittin in the weeds. It's seen better days and I'll tackle it someday, but this '77 belongs to the lady, so I gotta get it going for our weekend puttering around the backroads. Feel free to post and email your project stories whatever suits you best. I'm just glad you've taken time to put it all together for others, so however you get the info out there is fine by me. I really appreciate it. In the meantime, you may send anything to my email as well. The good, bad, and ugly. No holds barred.

While you are gathering your stuff. I want to compliment your install. I like the setup you have. Here are a few pics of what I have done so far and what I am dealing with under the dash. The previous owner did not mask anything off when he painted. I think he was a few drinks in when he let the metallic green flow. There's overspray everywhere. Also, there are red wires haphazardly run here and there to a stereo and other switches the guy used for lights, etc. Once I get my project completed, it's into the garage for some proper "cleaning up" of the existing wiring.

Ok, with that said, here's some pic info. The first pic should be the two decorative plates for above and below the column with my switches and lights. The next is with them fitted in the dash. Next is a pic of the plug and wiring coming from the inside of the column. Again, disregard the red wire. Next is the steering column wiring and connector which connects to a larger harness connector of wires. Lastly is a pic of the fuse box and the rats nest of spaghetti (wires) and oversprayed labels. That's all for now.

Thanks,
Ben
Was this
answer
helpful?
Yes
No
Sunday, March 29th, 2015 AT 4:58 PM
Tiny
CJ MEDEVAC
  • MECHANIC
  • 11,004 POSTS
Tilt vs no tilt

1st pic) the one on the left is for a fixed column, on the back here, it's almost a mirror image of the other. At the top is closest to the dash

2nd pic) is the terminal side- notice they are different, the one at the bottom is the straight column, right is closest to the dash

At the top is the tilt, left is closest to the dash

Reason for this info is when you do obtain that tilt column, cut the connectors out of the harness too! You will need to play musical wires with some stake-on connectors to make your harness match up to a tilt harness!

3rd pic) this is a straight ign switch torn down, ready for sanding so I can solder

I strongly recommend not cutting your wires (till you splice in for a tilt column) it will be confusing, and harder to put back if you somehow "have to"

So you can do it my way (old switch modified).-.-.-.-.-.-.-.-.-Or you can simply use "female" stake-ons to the original connectors in the jeep

I also recommend if you do it with the female connectors, use the ones that have full insulation all the way down the tip (may be more expensive) reason being, if one comes loose by accident, it will not ground out on anything

4th pic) after all of my researching, this is how it sorta all got started, on the side opposite the male terminals

Remember, I tried to mimic the wire sizes (gauge) to the adjoining wire harness connector or go overkill with my wire gauges to my "now" remote ignition system

Goody stuff on next post

The medic
Was this
answer
helpful?
Yes
No
+1
Sunday, March 29th, 2015 AT 5:07 PM
Tiny
CJ MEDEVAC
  • MECHANIC
  • 11,004 POSTS
Just read you last one, I have good pics of the fuse block I can send, and other stuff too.

Here's a pic of where the where the wire holder is on the column, the ign switch is on the opposite side, just to tidy you up a bit!

Back to my mission!

The medic
Was this
answer
helpful?
Yes
No
Sunday, March 29th, 2015 AT 5:16 PM
Tiny
CJ MEDEVAC
  • MECHANIC
  • 11,004 POSTS
I colored and blew up a '79 diagram in microsoft paint(2 halves in the computer) made big at office max, I assembled them (one side overlaps better than the other) then they laminated it. It's been a big help, surrounding years are mostly the same. This was my main way of tracing stuff (yes, i'll send 'em, you have to email 'em to your local office max, and pay the bill!) I used the same diagram 24 years ago as a guide when I revamped my '46 willys, 'cept I had to trace all of the wires the hard way in a chilton's repair manual

1st pic) finished product for the 1979

2nd pic) I double checked stuff with the '77 diagram, I did not blow this one up, except on my computer monitor (32" flat screen "the mother ship"!)

3rd pic) this is the side opposite the male spades (depending on your approach, you may have to x-ray vision thru the plastic to the appropriate metal to solder to) left is closest to the dash

In this pic the 2 silver spades on the left verify the brake proportioning valve is in the correct position for "safe brakes"- when you use your key or hook up exactly like my set up, the speedo cluster "brake light" sorta flashes during cranking, verifying "all is good". Not to be confused this is the same light being on (w/ the switch on) when your emergency brake is on. 'Cept the verify-er light is only during "start"

Pins 3 & 4 are accessories, like the wipers/ heater/ gauges/ etc.-.-.-.-.-.-Without further investigation one of 'em controls some or all of the fuse box spades for add-on accessories and the lighter (which you might wanna leave on all of the time for charging stuff)

I just tied both together on one switch- you may want to add a switch to segregate the functions

Some places demand this verification during annual inspections- though it is not like how other vehicles do it/ you "might" would have to explain it to the inspectors

4th, 5th, 6th pic) more pin info and some wiring - i'll explain "security" via email

This is the most of it, have more pics to post later

Taking a break

Pipe in if you want

How'm I doin"?

The medic
Was this
answer
helpful?
Yes
No
+3
Sunday, March 29th, 2015 AT 6:00 PM
Tiny
CJ MEDEVAC
  • MECHANIC
  • 11,004 POSTS
I got ahead of myself with the 3 and 4 pins

Above that I discussed the brake failure light, the part about explaining to the inspector about the light and during "start"

"sometimers" kicked in and I got ahead of myself

This is a piggy back below and one I used elsewhere, this will make wiring ezier to do when 2 wires go to the same terminal

THE MEDIC
Was this
answer
helpful?
Yes
No
+1
Sunday, March 29th, 2015 AT 7:06 PM
Tiny
BENEDWARDSPI
  • MEMBER
  • 9 POSTS
You're doing great - much better than a manual! The email is lower-case. FYI, most email servers limit attachment size between 10-20 MB. I can't remember if it's 10 or 20; just wanted to throw that in just case your original pics are sizable.

Keep the hits comin!
Was this
answer
helpful?
Yes
No
+1
Sunday, March 29th, 2015 AT 7:18 PM
Tiny
CJ MEDEVAC
  • MECHANIC
  • 11,004 POSTS
3 and 4 are the same spade- leave 3 and 4 wires on it (that's where they normally live)

It is "2" that is the other accessory spade

You can segregate "2" to another 3rd flip top toggle if you want

I had no need to separate them, so I put 'em all thru the one switch

I have an "accessories" switch/ an "ignition" switch/ and a momentary "start" switch (which center is "off", I wired it so that both "up or down" would start it)

The medic
Was this
answer
helpful?
Yes
No
+1
Sunday, March 29th, 2015 AT 7:18 PM
Tiny
CJ MEDEVAC
  • MECHANIC
  • 11,004 POSTS
Last pic- hose clamp around the column (other side of dash) squeezing the "l" shaped ignition rod (not in use now). This keeps the "now loose" key cylinder from rotating backwards and locking my steering wheel while driving

The medic
Was this
answer
helpful?
Yes
No
+1
Monday, March 30th, 2015 AT 5:42 PM
Tiny
CJ MEDEVAC
  • MECHANIC
  • 11,004 POSTS
So like are you a push button jeep kinda guy now?

The medic
Was this
answer
helpful?
Yes
No
+1
Monday, April 6th, 2015 AT 6:09 PM
Tiny
CJ MEDEVAC
  • MECHANIC
  • 11,004 POSTS
I reckon this woulda been the simplest thing for you

I just thought of it and had to make it by transferring the info from my other pic to this pic I also took during my modification

All you need now is a few off/ on toggles and a momentary push button

Snatch the connectors off of the ignition switch and insert male spades into the connector slots

Feed everything off of the one labeled "hot"

Sorry that I was so tunnel visioned with my set-up

The medic
Was this
answer
helpful?
Yes
No
+1
Monday, April 6th, 2015 AT 8:44 PM
Tiny
BENEDWARDSPI
  • MEMBER
  • 9 POSTS
Ok, I like this and agree that it would be simpler for now. But. The other info you have provided hasn't been in vain. It has helped me gain a better understanding of what's involved in the whole ignition system. And it will be valuable when I get ready to swap the straight column for a tilt one. Once I get started on this, I'll take and add pics so you can critique as I progress.

Thanks!
Was this
answer
helpful?
Yes
No
+1
Tuesday, April 7th, 2015 AT 6:49 PM
Tiny
CJ MEDEVAC
  • MECHANIC
  • 11,004 POSTS
As long as you continue to use this post (forever)

I'll get a knock at my garage door!

I'll be glad to help/ aid/ assist you from now on

The main things you gotta remember

1) love your jeep(s)

2) take care of your jeep(s)

3) never-ever get rid of your jeep(s)-females can be replaced (don't let 'em talk you into being jeepless!)

The medic
Was this
answer
helpful?
Yes
No
+1
Tuesday, April 7th, 2015 AT 7:14 PM
Tiny
BENEDWARDSPI
  • MEMBER
  • 9 POSTS
Hi - I'm back this weekend from a busy month. I am totally digging the tool cart. Everything you need right there and no back and forth to the toolbox. That must be patented for sure.

Lately, there has been no time to work on the ignition switch. Until this evening. So, I'm reviewing your replies and pictures and most likely going with the latter info you provided. All of the pictures are great, so definitely leave them here.

I'll take some pics along the way and share my findings and progress.

Talk soon.

Ben
Was this
answer
helpful?
Yes
No
+1
Saturday, April 25th, 2015 AT 5:59 PM
Tiny
CJ MEDEVAC
  • MECHANIC
  • 11,004 POSTS
Remember to move "spades" into the females of the connectors

Don't chop up the wires!

Still in my garage waiting or post-op news!

Well, over in my friends garage working on his '48

The medic
Was this
answer
helpful?
Yes
No
+1
Sunday, April 26th, 2015 AT 5:20 PM

Please login or register to post a reply.

Sponsored links