Upper third brake light not working

Tiny
7031870
  • MEMBER
  • 2008 JEEP LIBERTY
  • 3.7L
  • V6
  • 4WD
  • AUTOMATIC
  • 154,000 MILES
Right and left brake lights and taillights work properly, but the upper brake light is not working in the led brake light assembly.
Ordered new upper led style brake light assembly because old unit no longer lit up.
New assembly also did not work.
Checked fuse, but could not tell if it was blown. Swapped 15amp fuse with another 15amp fuse but no success.
Is there a way to use a light tester to check if back wiring harness is getting power to the back assembly?
Tuesday, May 26th, 2020 AT 3:40 PM

3 Replies

Tiny
JACOBANDNICKOLAS
  • MECHANIC
  • 108,289 POSTS
Hi,

Yes, you can test it with a test light. To help you better understand, the vehicle has a totally integrated power module (TIPM). The power for all three of the brake lights comes from a different pin on the TIPM. If you look at pic 1, you will see three wires highlighted. The two on the right are for the left and right brake light. The one I circled powers the third brake light. Since two of the three lights are working, the fuse isn't the problem. So, either we have a bad ground, the splice in pic 2 is bad and the wire isn't making connection, or the pin in the TIPM that powers that light is bad.

If it is a ground issue, the license plate won't be working either. So check that.

Here is what I need you to do. Remove the third brake light. The connector should have two wires, one is black with a light blue tracer and the other is white with a dark green tracer.

Using your test light, provide a ground for the light and then probe the white/dark green wire for power. Have a helper have his foot on the brake when doing this.

Here is a link that will help you with testing wiring. Although in the link a multi meter is being used, the same principals apply.

https://www.2carpros.com/articles/how-to-check-wiring

Let me know what you find or if you have other questions.

Take care,
Joe

Was this
answer
helpful?
Yes
No
+1
Tuesday, May 26th, 2020 AT 8:42 PM
Tiny
7031870
  • MEMBER
  • 2 POSTS
I was able to get the upper light to work, but intermittently using the original assembly. I am attaching a photo of what I think is wrong, but don't know how to fix. In attached photo I circled the contact point that I believe (can't confirm because can't see behind where contact is made) but is it possible that where the circular piece connected to the break arm that makes contact with the switch has some type of corrosion that makes the light work sometimes, and flicker or not work other times? How can I check the contact point to verify my assumption? How is the switch connected to the metal piece that the brake arm makes contact to make the light turn on in?
The arrow on the left side of the photo is pointing toward the red item on the switch. That piece was popped out all the way to the left when I first looked at it. Does this work like a breaker switch. Meaning if it gets an overloaded current it kicks out the switch until it is reset? Or is it just coincidental that after I pushed that red tab back to the right I was able to get the light to work intermittently?
Was this
answer
helpful?
Yes
No
Wednesday, May 27th, 2020 AT 7:50 AM
Tiny
JACOBANDNICKOLAS
  • MECHANIC
  • 108,289 POSTS
Hi,

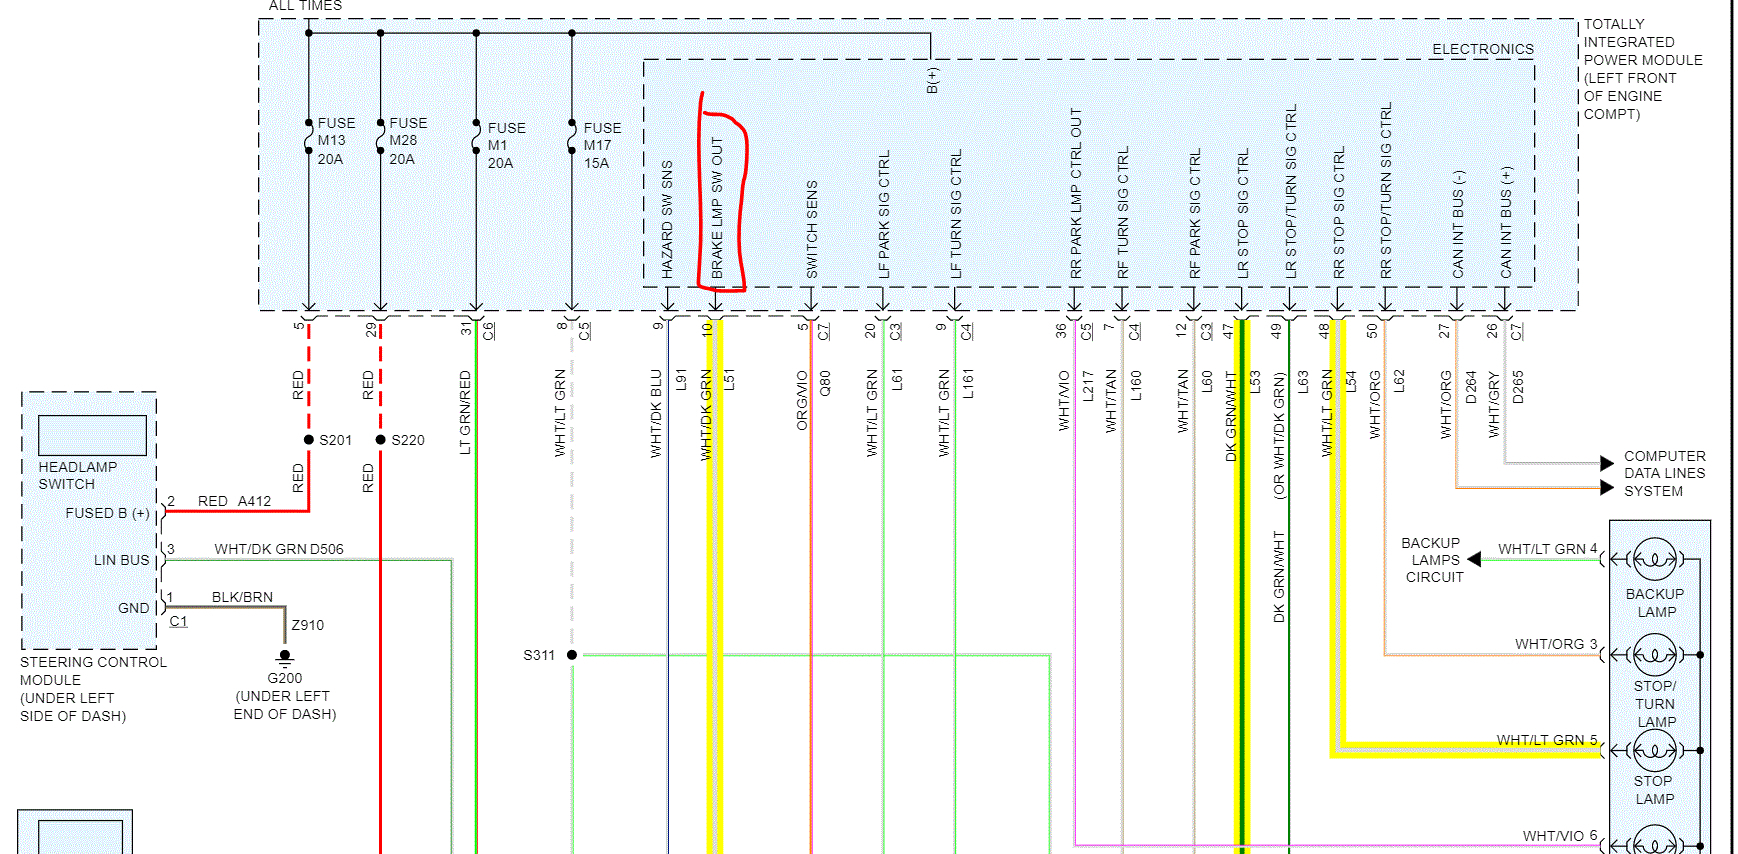
That is the brake light switch. Interestingly, if you can get it to work when moving the connector, that must be where the problem is. However, I wouldn't have guessed that. The part you circled is the actuator for the switch. Basically, when you depress the brake pedal, that closes a circuit in the switch and turns the lights on. Basically the same thing as a light switch at home does when you turn the light on and off.

Did you disconnect the connector to inspect it?

Here is the test procedure for the switch itself. It will require the use of a multi meter to check for continuity.

_________________________________

2008 Jeep Truck Liberty 2WD V6-3.7L
Brake Lamp Switch
Vehicle Sensors and Switches Sensors and Switches - Lighting and Horns Brake Light Switch Testing and Inspection Component Tests and General Diagnostics Brake Lamp Switch Diagnosis and Testing Brake Lamp Switch
BRAKE LAMP SWITCH
BRAKE LAMP SWITCH

WARNING: To avoid serious or fatal injury on vehicles equipped with airbags, disable the Supplemental Restraint System (SRS) before attempting any steering wheel, steering column, airbag, Occupant Classification System (OCS), seat belt tensioner, impact sensor, or instrument panel component diagnosis or service. Disconnect and isolate the battery negative (ground) cable, then wait two minutes for the system capacitor to discharge before performing further diagnosis or service. This is the only sure way to disable the SRS. Failure to take the proper precautions could result in accidental airbag deployment.

CAUTION: Do not remove the brake lamp switch from the mounting bracket. The self-adjusting switch plunger is a one time only feature. If the switch is removed from the mounting bracket, it MUST be replaced with a new switch.

Pic 1

1. Disconnect and isolate the battery negative cable.
2. Disconnect the wire harness connector from the brake lamp switch.
3. Using an ohmmeter, perform the continuity tests at the terminal pins (1) in the brake lamp switch connector receptacle as shown in the Brake Lamp Switch Tests table.

Pic 2

4. If the switch fails any of the continuity tests, replace the ineffective brake lamp switch as required.

________________

Let me know if you are comfortable performing that test.

Joe
Was this
answer
helpful?
Yes
No
Wednesday, May 27th, 2020 AT 8:44 PM

Please login or register to post a reply.

Sponsored links