Hello Mike
The info you requested for a 2000 Toyota Truck, Tacoma Extra Cab, 4WD, V6-3.4L (5VZ-FE)
Removal
HINT: PreRunner is the model described below.
RZN191L-TRPDKAB, RZN196L-CRPDKAB, VZN195L-CRPDKAB
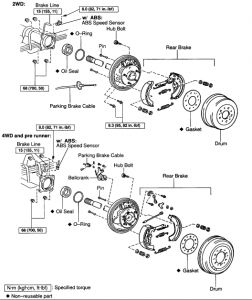
REMOVE REAR WHEEL AND BRAKE DRUM Torque: 110 Nm (1,150 kgf-cm, 83 ft. lbs.)
CHECK BEARING BACKLASH AND AXLE SHAFT DEVIATION
Using a dial indicator, check the backlash in the bearing shaft direction. Maximum: 0.7 mm (0.028 inch) If the backlash exceeds the maximum, replace the bearing.
Using a dial indicator, check the deviation at the surface of the axle shaft outside the hub bolt. Maximum: 0.1 mm (0.0039 inch) If the deviation exceeds the maximum, replace the axle shaft.
w/ ABS: REMOVE ABS SPEED SENSOR FROM REAR AXLE HOUSING Remove the bolt and ABS speed sensor. Torque: 8.0 Nm (82 kgf-cm, 71 inch lbs.)
REMOVE REAR BRAKE ASSEMBLY
DISCONNECT BRAKE LINE AND PARKING BRAKE CABLE
Using SST, disconnect the brake line from the wheel cylinder. SST 09751-36011 Torque: 15 Nm (155 kgf-cm, 11 ft. lbs.)
2WD: Remove the 2 bolts and disconnect the parking brake cable. Torque: 9.3 Nm (95 kgf-cm, 82 inch lbs.)
REMOVE REAR AXLE SHAFT ASSEMBLY
Remove the 4 backing plate mounting nuts. Torque: 68 Nm (700 kgf-cm, 50 ft. lbs.)
Pull out the rear axle shaft assembly from the rear axle housing. NOTICE: Be careful not to damage the oil seal.
REMOVE O-RING FROM REAR AXLE HOUSING
INSPECTION
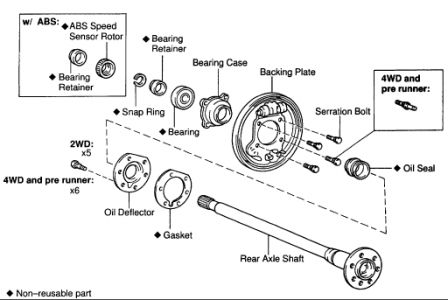
w/ ABS: REMOVE BEARING RETAINER (DIFFERENTIAL SIDE) AND ABS SPEED SENSOR ROTOR
Attach 4 nuts to the serration bolts and remove the serration bolts from the backing plate using a hammer. NOTICE: Do not reuse the nuts previously removed from the vehicle.
Grind the retainer and sensor rotor surfaces using a grinder, then chisel them out with a chisel.
Attach washers and nuts to the serration bolts, then torque the nuts to install the serration bolts to the backing plate.
Remove the 4 nuts and washers from the serration bolts.
REMOVE SNAP RING FROM AXLE SHAFT Using a snap ring expander, remove the snap ring.
REMOVE REAR AXLE SHAFT FROM BACKING PLATE
Position SST on the backing plate with the 4 nuts. SST 09521-25011
Using a press, remove the rear axle shaft and bearing retainer from the backing plate.
Remove the SST.

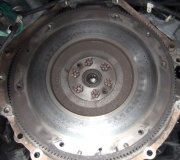
INSPECT AXLE SHAFT Using a dial indicator, measure the runout of the shaft and flange. Maximum shaft runout: 2.0 mm (0.079 inch) Maximum flange runout: 0.1 mm (0.004 inch) If the rear axle shaft or flange are damaged or worn, or if runout is greater than the maximum, replace the rear axle shaft.
REMOVE OUTER OIL SEAL Using SST, remove the oil seal. SST 09308-00010
REPLACE REAR AXLE BEARING
Using SST and a press, remove the bearing. SST 09223-56010, 09950-60010 (09951-00560)
Using SST and a press, install a new bearing. SST 09515-30010, 09950-60020 (09951-00890)
INSTALL NEW OUTER OIL SEAL Using SST and a hammer, install a new oil seal. SST 09950-60010 (09951-00610), 09950-70010 (09951-07150)
REPLACE BEARING CASE
Remove the oil seal (outer side) and bearing.
Install 4 nuts to the serration bolts.
Using a hammer, remove the serration bolts and bearing case.
Position the backing plate on a new bearing case and using 2 socket wrenches, install the serration bolts.
Install a new bearing and oil seal (outer side).
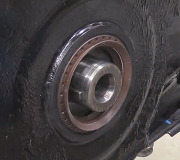
REPLACE OIL DEFLECTOR
Using a brass bar and hammer, remove the hub bolts, oil deflector and gasket.
Position a new gasket on the axle shaft and install a washer and nut to a new hub bolt, as shown in the illustration, and install the hub bolt by torquing the nut.

INSTALL REAR AXLE SHAFT IN BACKING PLATE
Coat a new oil seal lip with MP grease.
Install the backing plate and bearing retainer on the rear axle shaft.
Using SST and a press, install the rear axle shaft into the backing plate. SST 09316-60011 (09316-00051)
Using snap ring expander, install a new snap ring.
w/ ABS: INSTALL ABS SPEED SENSOR ROTOR AND BEARING RETAINER (DIFFERENTIAL SIDE) Using SST and a press, install a new sensor rotor and new bearing retainer to the axle shaft. SST 09316-60011 (09316-00051) Standard length: 122.2 ±1.0 mm (4.811 ±0.039 inch)
REPLACE OIL SEAL (INNER SIDE)
Using SST, remove the oil seal. SST 09308-00010
Using SST and a hammer, install a new oil seal. SST 09950-60020 (09951-00710), 09950-70010 (09951-07150)
Coat a new oil seal lip with MP grease.
INSTALLATION
Installation is in the reverse order of removal.
HINT: After installation, bleed the brake system and check the ABS speed sensor signal.
SPONSORED LINKS
Monday, November 10th, 2008 AT 4:13 PM