Hi,
It's really hard to tell from the pics / video. There are several bushings, pins, springs and so on that can be an issue. I don't know if will help, but I will attache the entire break down of the system. It is a lot. The attached pics will correlate with directions and descriptions. Take a look through it and see if you can identify anything that looks worn, out of place, or broken with your vehicle.
I did note that the one shifter lever on the transmission is aftermarket. I'm not sure if other things were replaced as well. As you go through this overview, you will find areas that are recommended to be lubricated.
______________________________
Here is all the info / overview. Please don't be overwhelmed.
_____________________________
2008 Volkswagen GTI (1K1) L4-2.0L Turbo (CCTA)
Shift Mechanism Overview
Vehicle Transmission and Drivetrain Manual Transmission/Transaxle Shifter M/T Service and Repair Removal and Replacement 02Q Transmission Shift Mechanism Overview
SHIFT MECHANISM OVERVIEW
Shift Mechanism Overview
Note the radio code on vehicles with a coded radio.
When working on the shift mechanism in the engine compartment, disconnect the Ground (GND) cable from the battery.
If the battery is to be reconnected, observe the work sequence after connecting the battery.
When working on the shift mechanism in the engine compartment, remove the complete air filter housing, if it is located above the shift mechanism. Refer to one of the following:
Diesel engine.
Gas engine.
To replace the operating cables, remove the shift mechanism. Refer to => [ Shift Mechanism ] See: Shifter M/T > Removal and Replacement > Shift Mechanism.
Do not bend the operating cables.
Pic 1
I - => [ Shift Knob and Cover ]
II - => [ Shift Lever and Housing, through 10.06 ]
II - => [ Shift Lever and Housing, from 11.06 ]
III - => [ Shift and Selector Cables ]
Shift mechanism, removing and installing. Refer to => [ Shift Mechanism ] See: Shifter M/T > Removal and Replacement > Shift Mechanism.
Shift mechanism, adjusting. Refer to => [ Shift Mechanism, Adjusting ] See: Shifter M/T > Adjustments > Shift Mechanism, Adjusting.
Shift Knob and Cover
pic 2
1 Emblem
Can be carefully pried off a plastic or leather shift knob.
2 Shift Lever Knob
With boot
The shift knob and boot cannot be separated from each other.
Always replace together
Removing and installing, refer to one of the following:
Eos, GTI through 2009, Golf/GTI from 2010, refer to => [ Shift Knob, Boot and Noise Insulation ] See: Shifter M/T > Removal and Replacement > Shift Knob, Boot and Noise Insulation.
3 Clamp
Always replace
For securing the shift knob to the shift lever.
Secure on the shift knob using the hose clamp pliers (V.A.G 1275).
4 Cover for Center Console
Combined in one piece with the center console on some versions.
5 Noise Insulation
Not equipped on all vehicles.
Arrow on noise insulation points in direction of travel.
Catches are arranged in varying intervals.
Therefore, installation is only possible in one position.
Shift Lever and Housing, through 10.06
Lubricate the bearing areas and the sliding surfaces.
Allocate the grease, refer to the parts catalog.
Pic 3
1 Retaining Washer
Removing and installing, refer to.
2 Bushing
3 Spring
4 Bushing
5 TORX Bolt
5 Nm
6 Cover
7 Damper
8 Damper
9 Bearing Shell
10 Shift Lever Guide
11 Damping Washer
12 Gasket
Between the shift housing and floor.
Self-adhesive.
Adheres to the shift housing.
13 Shift Lever
14 Shift Housing
15 Bushing
16 Pivot Pin
17 Guide Bushing
18 Spring
Installing, refer to.
19 Selector Bracket
20 TORX Bolt
5 Nm
21 Gasket
Always replace
22 Base Plate
Always replace
Bend open the tabs to remove.
23 Selector Cable
On the selector bracket
Removing and installing, refer to.
24 Shift Cable
Removing and installing from/to shift lever guide. Refer to.
25 Retaining Washer
Always replace
26 Nut
M6 = 8 Nm
M8 = 25 Nm
Quantity: 4
27 Bushing
Only fits in one position.
28 Retaining Washer
Always replace
Selector and Shift Cable, Removing and Installing
pic 4
- Remove the retaining disc from the shift cable - A - and the selector cable - B -.
To do this, lift up the retainer using a screwdriver - arrow 1 - and press off the locking washer - arrow 2 -.
- Remove the shift cable - A - from the shift lever mount.
- Remove the selector cable - B - from the selector elbow mount.
Spring Installing
pic 5
- Insert the spring so that the leg - A - contacts the upper part of the pin - arrow -.
- Then pull the leg - B - far enough downward so that it rests on the underside of the pin - arrow -.
Shift Lever and Housing, from 11.06
Lubricate the bearing areas and the sliding surfaces.
Allocate the grease, refer to the parts catalog.
Shift mechanism, disassembling and assembling. Refer to => [ Shift Mechanism, from 11.06 ] See: Manual Transmission/Transaxle > Overhaul > Shift Mechanism, from 11.06.
Pic 6
1 Base Plate
Bend open the tabs to remove.
Always replace
2 Gasket
Always replace
3 Shift Lever
Can be removed and installed with the shift lever guide - item 15 - installed.
4 Damping Washer
Slide out of the shift lever as far as the stop - arrow -.
5 Retaining Washer
Do not damage the cables when removing.
Always replace
6 Selector Cable
Pry off of the selector bracket.
Press onto the selector bracket inside the shift mechanism.
Installed positions, refer to => [ Shift and Selector Cables, Installed Positions ] See: Shift Cable, M/T > Removal and Replacement > Shift and Selector Cables, Installed Positions.
7 Bushing
8 Shift Cable
Pry off of the shift lever guide.
Press onto the shift lever guide inside the shift mechanism.
Installed position, refer to => [ Shift and Selector Cables, Installed Positions ] See: Shift Cable, M/T > Removal and Replacement > Shift and Selector Cables, Installed Positions.
9 Damper
10 Bearing Shell
Is damaged during removal.
Always replace
11 Bushing
12 Retaining Washer
Removing and installing, refer to.
13 Spring
14 Bushing
15 Shift Lever Guide
16 Nut
M6 = 8 Nm
M8 = 25 Nm
Quantity: 4
17 Gasket
Between the shift housing and floor.
Self-adhesive.
Adheres to the shift housing.
18 Shift Housing
With spring and selector bracket.
Spring and selector bracket cannot be removed.
Lock Washer, Removing and Installing
pic 7
- To remove and install the lock washer - arrow A -, push the spacer bushing - arrow B - to the stop using a screwdriver in - direction of arrow C - and pull off the lock washer.
Do not tilt the bushing when pushing down.
The groove in the shift lever for the lock washer must be visible.
Carefully release the tension on the spring.
Shift and Selector Cables
Lubricate the bearing areas and the sliding surfaces.
Allocate the grease, refer to the parts catalog.
Pic 8
1 Shift Cable
Connects with cable retainer - item 18 -.
Installed position, refer to => [ Shift and Selector Cables, Installed Positions ] See: Shift Cable, M/T > Removal and Replacement > Shift and Selector Cables, Installed Positions.
From 11.06 changed fastener on shift lever inside shift mechanism.
2 Selector Cable
Connect with cable retainer - item 11 -.
Installed position, refer to => [ Shift and Selector Cables, Installed Positions ] See: Shift Cable, M/T > Removal and Replacement > Shift and Selector Cables, Installed Positions.
From 11.06 changed fastener on selector bracket inside shift mechanism.
3 Retaining Washer
Always replace
Discontinued on shift mechanisms from 11.06. Refer to => [ Shift Lever and Housing, from 11.06 ].
4 Retaining Washer
Always replace
Do not damage cables when removing.
5 Shift Housing
6 Bolt
20 Nm
For the cable bracket
Quantity 2
The nut - item 10 - is then deleted.
7 Cable Mounting Bracket
Can be made of plastic or metal
Passat, Passat CC, CC, and Golf/GTI from 2010: made of plastic.
8 Grommet
Cable mounting bracket to transmission.
9 Spacer
10 Nuts
20 Nm
For the cable mounting bracket.
11 Cable Retainer
Adjust the shift mechanism after installation, refer to => [ Shift Mechanism, Adjusting ] See: Shifter M/T > Adjustments > Shift Mechanism, Adjusting.
For the selector cable to relay lever.
Do not interchange, the cable locking mechanism for the selector cable to the linkage lever and the shift cable to the transmission shift lever are different.
From 03.07 installed with a plastic relay lever, refer to => [ Plastic Relay Lever ] See: Shift Cable, M/T > Components > Plastic Relay Lever.
Removing and installing to a plastic relay lever, refer to => [ Plastic Relay Lever ] See: Shift Cable, M/T > Components > Plastic Relay Lever.
Allocation, refer to.
12 Relay Lever
Installed position, refer to.
Adjust the shift mechanism after installation. Refer to => [ Shift Mechanism, Adjusting ] See: Shifter M/T > Adjustments > Shift Mechanism, Adjusting.
Can be made of plastic or metal.
The metal relay lever is placed in the bushings - item 13 - and secured with a retaining washer - item 14 -.
From 03.07 the relay lever is made of plastic. Refer to => [ Plastic Relay Lever ] See: Shift Cable, M/T > Components > Plastic Relay Lever.
Plastic relay lever, removing and installing with cable retainer. Refer to => [ Plastic Relay Lever ] See: Shift Cable, M/T > Components > Plastic Relay Lever.
The bushings and retaining washers are not needed with the plastic relay lever.
13 Bushing
Not needed with a plastic relay lever.
14 Retaining Washer
Always replace
Not needed with a plastic relay lever.
15 Slide Shoe
16 Transmission Shift Lever
Installing, refer to.
Installed position, refer to.
Adjust the shift mechanism after installation. Refer to => [ Shift Mechanism, Adjusting ] See: Shifter M/T > Adjustments > Shift Mechanism, Adjusting.
Starting in 06.06 there is a smaller pin diameter for the cable retainer.
17 Self Locking Nut
23 Nm
Always replace
18 Cable Retainer
Adjust the shift mechanism after installation. Refer to => [ Shift Mechanism, Adjusting ] See: Shifter M/T > Adjustments > Shift Mechanism, Adjusting.
For the shift cable to transmission shift lever.
Do not interchange, the cable locking mechanism for the selector cable to the linkage lever and the shift cable to the transmission shift lever are different.
Allocation, refer to.
Allocation of Cable Retainers
pic 9
The holes in the cable retainers have various diameters.
Pic 10
Smaller Pin Diameter for the Shift Cable Retainer, Starting in 02.06
pic 11
pic 12
Transmission Shift Lever, Installing
pic 13
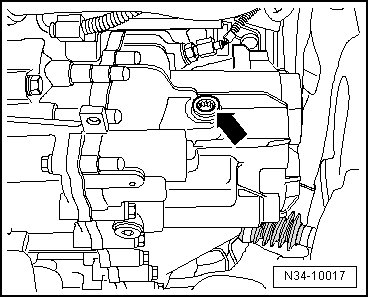
- When positioning the transmission shift lever, make sure the gap - arrow A - is placed over the missing selector shaft teeth - arrow B -.
Transmission Shift Lever/Relay Lever, Installed Position
pic 14
1 Transmission shift lever
2 The relay lever engages into the guide rail of the transmission shift lever, via the guide shoe - arrow -.
Cable Retainer, Replacing
pic 15
- Pull the securing mechanism forward at the cable retainer on the shift and selector cables as far as the stop - 1 arrows - and then release it to the left - 2 arrows -.
- Remove the shift cable lock washer - 3 - from the transmission selector lever - 1 -.
- Remove the shift cable from the pin.
Pic 16
Metal Relay Lever
- Remove the retaining washer - 4 - for the selector cable from the relay lever - 2 -.
- Remove the selector cable from the pin.
Plastic Relay Lever
- Remove the relay lever with the cable retainer, refer to => [ Plastic Relay Lever
from 03.07 ] See: Shift Cable, M/T > Components > Plastic Relay Lever.
- Pry the cable retainer off, refer to => [ Plastic Relay Lever
from 03.07 ] See: Shift Cable, M/T > Components > Plastic Relay Lever.
Continuation For All Shift Mechanisms
- Apply a small amount of grease onto the pin on the transmission shift lever - arrows - and on the relay lever - 2 -.
Allocate the grease, refer to the parts catalog.
- Replace the lock washer - 3 - and, with the metal relay lever, the retaining washer - 4 - after each disassembly.
- Secure the shift cable with the lock washer - 3 - and, with the metal relay lever, selector cable with retaining washer - 4 -.
If a plastic relay lever is installed, it must be installed together with the cable retainer. Refer to => [ Plastic Relay Lever
from 03.07 ] See: Shift Cable, M/T > Components > Plastic Relay Lever.
Adjust the shift mechanism. Refer to => [ Shift Mechanism, Adjusting ] See: Shifter M/T > Adjustments > Shift Mechanism, Adjusting.
______________________________
Let me know if any of that helps.
Take care,
Joe
Images (Click to make bigger)
Tuesday, April 21st, 2020 AT 6:25 PM