Hello again my friend,
I attached the procedure below for you. You have a big job ahead of you as this is a tough one.
https://www.2carpros.com/articles/air-conditioner-leak-detection
Roy
AIR CONDITIONING: FRONT COOLING UNIT: REMOVAL
1. PRECAUTION
See: Dashboard / Instrument Panel > Vehicle Damage Warnings > Instrument Panel Safety Pad
2. RECOVER REFRIGERANT FROM REFRIGERATION SYSTEM See: Heating and Air Conditioning > Removal and Replacement > Replacement
3. POSITION FRONT WHEELS STRAIGHT AHEAD
4. REMOVE FRONT WHEEL LH
5. DISCONNECT CABLE FROM NEGATIVE BATTERY TERMINAL
CAUTION:
Wait for 90 seconds after disconnecting the cable to prevent the airbag from deploying See: Air Bag Systems > Vehicle Damage Warnings
NOTICE:
When disconnecting the cable, some systems need to be initialized after the cable is reconnected See: Vehicle > Programming and Relearning > Repair Instruction - Initialization
6. REMOVE FRONT WIPER ARM AND BLADE ASSEMBLY LH See: Wiper Motor > Removal and Replacement > Removal
7. REMOVE FRONT WIPER ARM AND BLADE ASSEMBLY RH See: Wiper Motor > Removal and Replacement > Removal
8. REMOVE COWL TOP VENTILATOR LOUVER SUB-ASSEMBLY See: Wiper Motor > Removal and Replacement > Removal
9. REMOVE WINDSHIELD WIPER MOTOR AND LINK ASSEMBLY See: Wiper Motor > Removal and Replacement > Removal
10. REMOVE COWL TOP OUTER PANEL SUB-ASSEMBLY See: Suspension Strut / Shock Absorber > Removal and Replacement > Removal
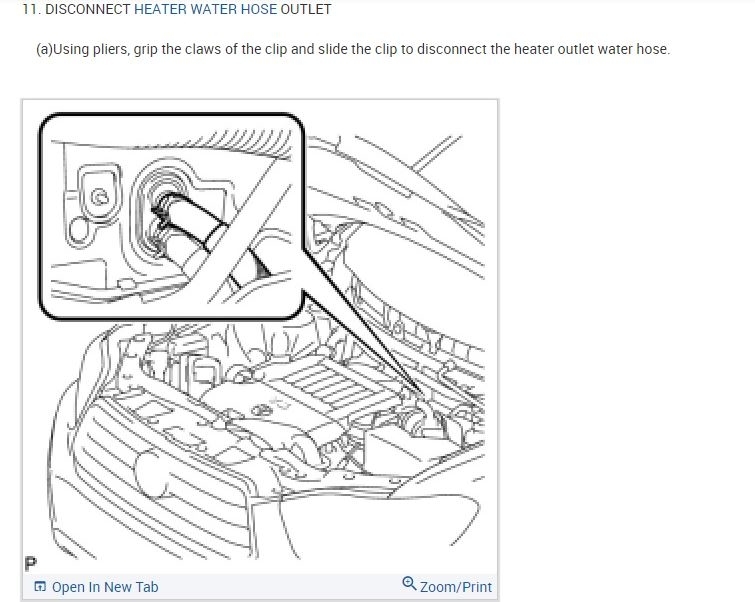
11. DISCONNECT HEATER WATER HOSE OUTLET
(a)Using pliers, grip the claws of the clip and slide the clip to disconnect the heater outlet water hose.
imageOpen In New TabZoom/Print
NOTICE:
* Do not apply excessive force to the heater outlet water hose.
* Prepare a drain pan or cloth in case the coolant leaks.
12. DISCONNECT HEATER WATER HOSE INLET
(a)Using pliers, grip the claws of the clip and slide the clip to disconnect the heater inlet water hose.
imageOpen In New TabZoom/Print
NOTICE:
* Do not apply excessive force to the heater inlet water hose.
* Prepare a drain pan or cloth in case the coolant leaks.
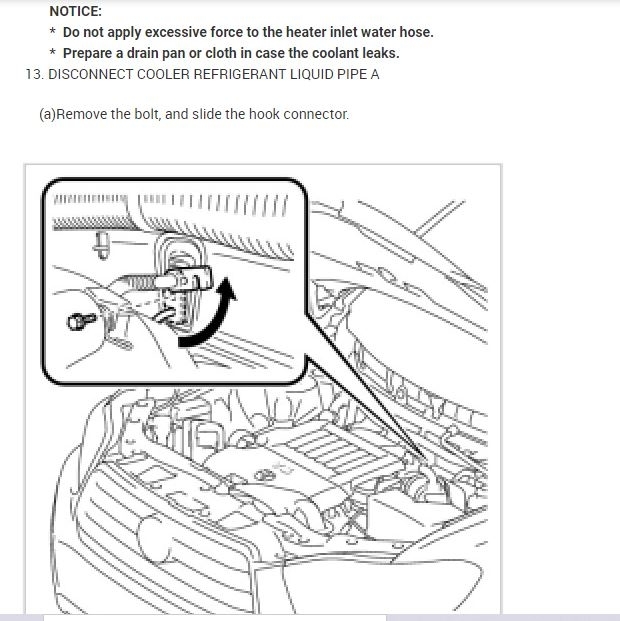
13. DISCONNECT COOLER REFRIGERANT LIQUID PIPE A
(a)Remove the bolt, and slide the hook connector.
imageOpen In New TabZoom/Print
(b)Disconnect the cooler refrigerant liquid pipe A.
(c)Remove the O-ring from the cooler refrigerant liquid pipe A.
NOTICE:
Seal the openings of the disconnected parts using vinyl tape to prevent entry of moisture and foreign matter.
14. DISCONNECT NO. 1 COOLER REFRIGERANT SUCTION PIPE
(a)Disconnect the No. 1 cooler refrigerant suction pipe.
(b)Remove the O-ring from the No. 1 cooler refrigerant suction pipe.
NOTICE:
Seal the openings of the disconnected parts using vinyl tape to prevent entry of moisture and foreign matter.
15. REMOVE LOWER NO. 3 STEERING WHEEL COVER See: Air Bag > Removal and Replacement > Removal
16. REMOVE LOWER NO. 2 STEERING WHEEL COVER See: Air Bag > Removal and Replacement > Removal
17. REMOVE STEERING PAD See: Air Bag > Removal and Replacement > Removal
18. REMOVE STEERING WHEEL ASSEMBLY See: Steering Wheel > Removal and Replacement > Removal
19. REMOVE STEERING COLUMN COVER See: Steering Column > Removal and Replacement > Removal
20. REMOVE TURN SIGNAL SWITCH ASSEMBLY WITH SPIRAL CABLE SUB-ASSEMBLY See: Steering Column > Removal and Replacement > Removal
21. REMOVE INSTRUMENT CLUSTER FINISH PANEL ASSEMBLY See: Instrument Cluster / Carrier > Removal and Replacement > Removal
22. REMOVE COMBINATION METER ASSEMBLY See: Instrument Cluster / Carrier > Removal and Replacement > Removal
23. REMOVE CENTER INSTRUMENT PANEL REGISTER ASSEMBLY See: Dashboard / Instrument Panel > Removal and Replacement > Removal
24. REMOVE CENTER INSTRUMENT CLUSTER FINISH PANEL ASSEMBLY (w/o Smart Key System) See: Dashboard / Instrument Panel > Removal and Replacement > Removal
25. REMOVE CENTER INSTRUMENT CLUSTER FINISH PANEL ASSEMBLY (w/ Smart Key System) See: Dashboard / Instrument Panel > Removal and Replacement > Removal
26. REMOVE HEATER CONTROL AND ACCESSORY ASSEMBLY (for Manual Air Conditioning System) See: Control Assembly, HVAC > Removal and Replacement > Removal
27. REMOVE AIR CONDITIONING CONTROL ASSEMBLY (for Automatic Air Conditioning System) See: Control Assembly, HVAC > Removal and Replacement > Removal
28. REMOVE RADIO RECEIVER ASSEMBLY WITH BRACKET (w/o Navigation System) See: Radio/Stereo > Removal and Replacement > Removal
29. REMOVE NAVIGATION RECEIVER ASSEMBLY WITH BRACKET (w/ Navigation System) See: Navigation System > Removal and Replacement > Removal
30. REMOVE FRONT DOOR SCUFF PLATE LH See: Headliner > Removal and Replacement > Removal
31. REMOVE COWL SIDE TRIM SUB-ASSEMBLY LH See: Headliner > Removal and Replacement > Removal
32. REMOVE LOWER INSTRUMENT PANEL FINISH PANEL SUB-ASSEMBLY (for Manual Air Conditioning System) See: Dashboard / Instrument Panel > Removal and Replacement > Removal
33. REMOVE LOWER INSTRUMENT PANEL FINISH PANEL SUB-ASSEMBLY (for Automatic Air Conditioning System) See: Dashboard / Instrument Panel > Removal and Replacement > Removal
34. REMOVE FRONT DOOR SCUFF PLATE RH See: Headliner > Removal and Replacement > Removal
35. REMOVE COWL SIDE TRIM SUB-ASSEMBLY RH See: Headliner > Removal and Replacement > Removal
36. REMOVE NO. 2 INSTRUMENT PANEL UNDER COVER SUB-ASSEMBLY See: Dashboard / Instrument Panel > Removal and Replacement > Removal
37. REMOVE LOWER INSTRUMENT PANEL SUB-ASSEMBLY See: Dashboard / Instrument Panel > Removal and Replacement > Removal
38. REMOVE UPPER CONSOLE PANEL SUB-ASSEMBLY See: Dashboard / Instrument Panel > Removal and Replacement > Removal
39. REMOVE NO. 2 CONSOLE BOX DUCT (w/o Rear Air Conditioning System) See: Dashboard / Instrument Panel > Removal and Replacement > Removal
40. REMOVE LOWER REAR CONSOLE BOX See: Console > Removal and Replacement > Removal
41. REMOVE CONSOLE BOX ASSEMBLY (w/o Rear Air Conditioning System) See: Console > Removal and Replacement > Removal
42. REMOVE CONSOLE BOX ASSEMBLY (w/ Rear Air Conditioning System) See: Console > Removal and Replacement > Removal
43. REMOVE FRONT NO. 1 CONSOLE BOX INSERT See: Dashboard / Instrument Panel > Removal and Replacement > Removal
44. REMOVE FRONT NO. 2 CONSOLE BOX INSERT See: Dashboard / Instrument Panel > Removal and Replacement > Removal
45. REMOVE ENGINE SWITCH (w/ Smart Key System) See: Ignition Switch > Removal and Replacement > Removal
46. DISCONNECT FRONT DOOR OPENING TRIM WEATHERSTRIP LH See: Headliner > Removal and Replacement > Removal
47. REMOVE FRONT PILLAR GARNISH LH See: Headliner > Removal and Replacement > Removal
48. DISCONNECT FRONT DOOR OPENING TRIM WEATHERSTRIP RH See: Headliner > Removal and Replacement > Removal
49. REMOVE FRONT PILLAR GARNISH RH See: Headliner > Removal and Replacement > Removal
50. REMOVE NO. 1 INSTRUMENT PANEL SPEAKER PANEL SUB-ASSEMBLY See: Dashboard / Instrument Panel > Removal and Replacement > Removal
51. REMOVE FRONT NO. 2 SPEAKER ASSEMBLY (for LH Side) See: Speaker > Removal and Replacement > Removal
52. REMOVE NO. 2 INSTRUMENT PANEL SPEAKER PANEL SUB-ASSEMBLY See: Dashboard / Instrument Panel > Removal and Replacement > Removal
53. REMOVE FRONT NO. 2 SPEAKER ASSEMBLY (for RH Side) See: Speaker > Removal and Replacement > Removal
54. DISCONNECT INSTRUMENT PANEL WIRE ASSEMBLY See: Air Bag > Removal and Replacement > Removal
55. REMOVE INSTRUMENT PANEL SAFETY PAD ASSEMBLY (for Pole Antenna Type) See: Dashboard / Instrument Panel > Removal and Replacement > Removal
56. REMOVE INSTRUMENT PANEL SAFETY PAD ASSEMBLY (for Glass Antenna Type) See: Dashboard / Instrument Panel > Removal and Replacement > Removal
57. REMOVE BRAKE PEDAL RETURN SPRING See: Brake Pedal Assy > Removal and Replacement > Removal
58. REMOVE STOP LIGHT SWITCH ASSEMBLY See: Brake Light Switch > Removal and Replacement > Removal
59. SEPARATE BRAKE MASTER CYLINDER PUSH ROD CLEVIS See: Brake Pedal Assy > Removal and Replacement > Removal
60. REMOVE BRAKE PEDAL SUPPORT SUB-ASSEMBLY See: Brake Pedal Assy > Removal and Replacement > Removal
61. REMOVE DRIVER SIDE KNEE AIRBAG ASSEMBLY See: Air Bag > Removal and Replacement > Removal
62. REMOVE NO. 1 AIR DUCT SUB-ASSEMBLY See: Steering Column > Removal and Replacement > Removal
63. SEPARATE STEERING INTERMEDIATE SHAFT SUB-ASSEMBLY See: Steering Column > Removal and Replacement > Removal
64. REMOVE STEERING COLUMN ASSEMBLY See: Steering Column > Removal and Replacement > Removal
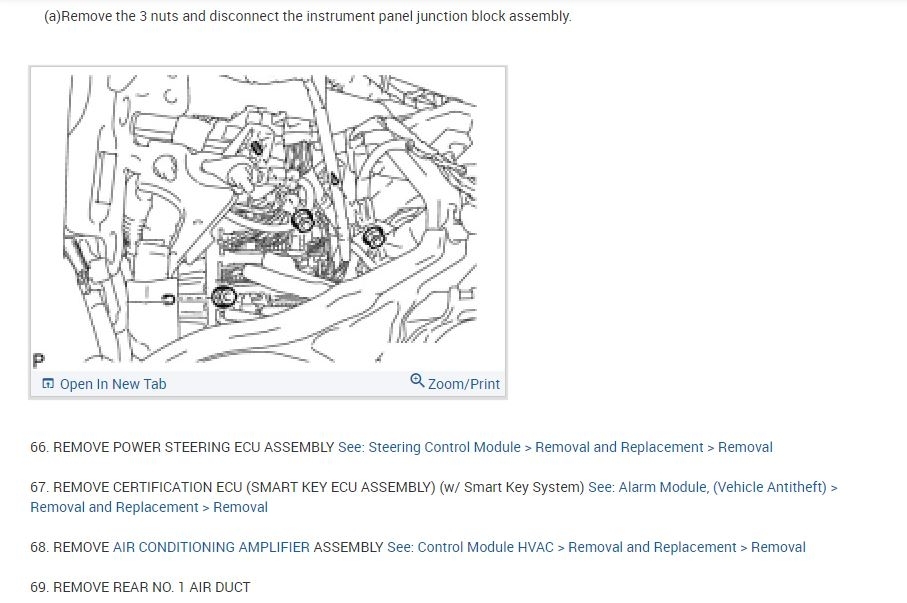
65. DISCONNECT INSTRUMENT PANEL JUNCTION BLOCK ASSEMBLY
(a)Remove the 3 nuts and disconnect the instrument panel junction block assembly.
imageOpen In New TabZoom/Print
66. REMOVE POWER STEERING ECU ASSEMBLY See: Steering Control Module > Removal and Replacement > Removal
67. REMOVE CERTIFICATION ECU (SMART KEY ECU ASSEMBLY) (w/ Smart Key System) See: Alarm Module, (Vehicle Antitheft) > Removal and Replacement > Removal
68. REMOVE AIR CONDITIONING AMPLIFIER ASSEMBLY See: Control Module HVAC > Removal and Replacement > Removal
69. REMOVE REAR NO. 1 AIR DUCT
(a)Disengage the claw.
imageOpen In New TabZoom/Print
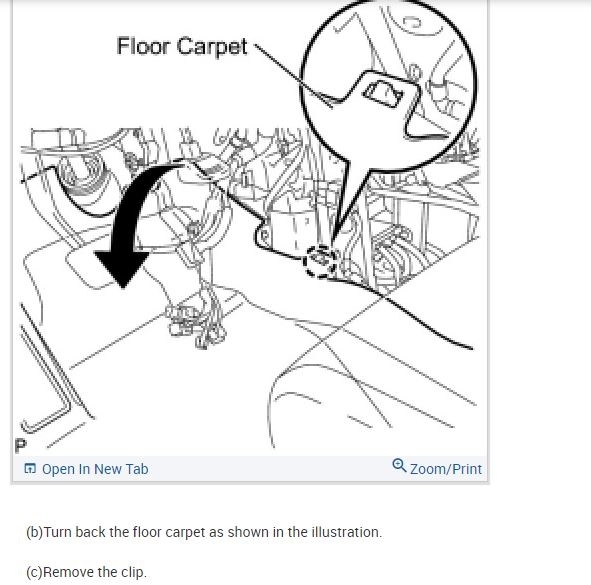
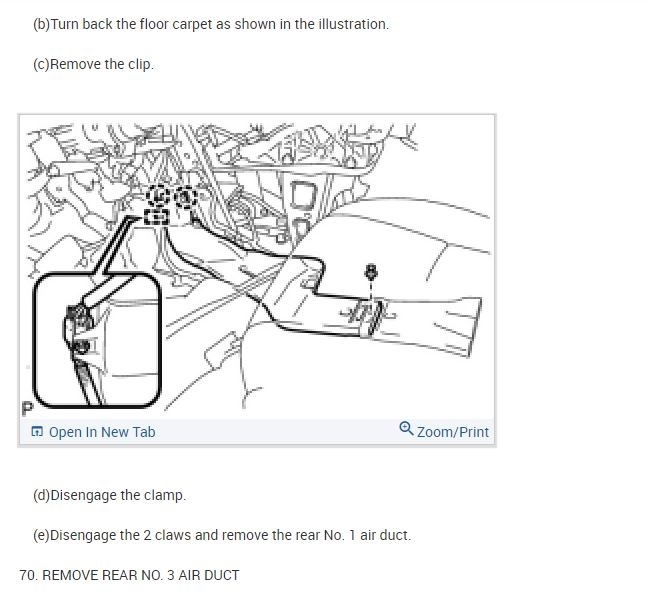
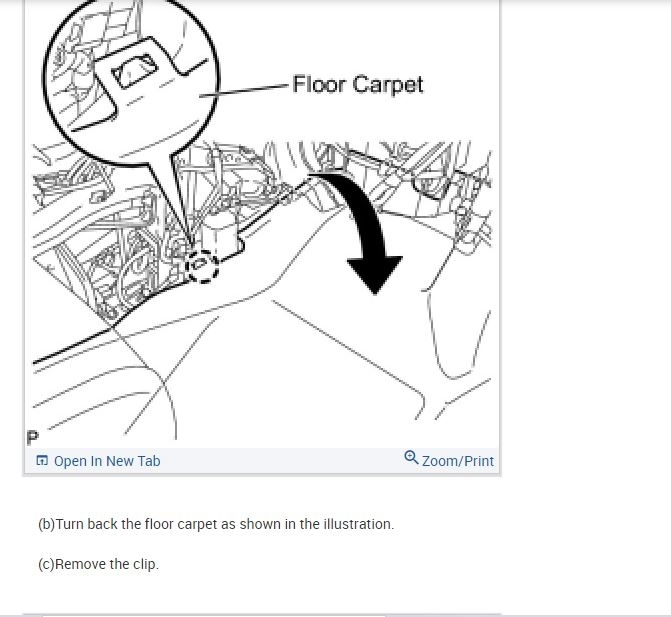
(b)Turn back the floor carpet as shown in the illustration.
(c)Remove the clip.
imageOpen In New TabZoom/Print
(d)Disengage the clamp.
(e)Disengage the 2 claws and remove the rear No. 1 air duct.
70. REMOVE REAR NO. 3 AIR DUCT
(a)Disengage the claw.
imageOpen In New TabZoom/Print
(b)Turn back the floor carpet as shown in the illustration.
(c)Remove the clip.
imageOpen In New TabZoom/Print
(d)Disengage the 2 claws and remove the rear No. 3 air duct.
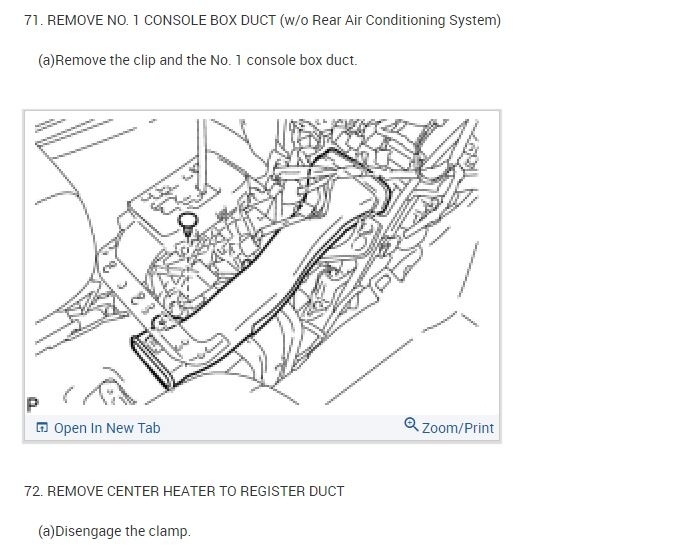
71. REMOVE NO. 1 CONSOLE BOX DUCT (w/o Rear Air Conditioning System)
(a)Remove the clip and the No. 1 console box duct.
imageOpen In New TabZoom/Print
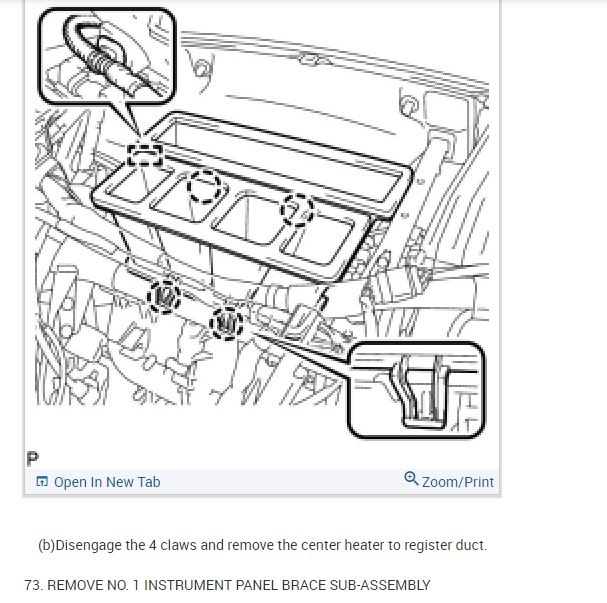
72. REMOVE CENTER HEATER TO REGISTER DUCT
(a)Disengage the clamp.
imageOpen In New TabZoom/Print
(b)Disengage the 4 claws and remove the center heater to register duct.
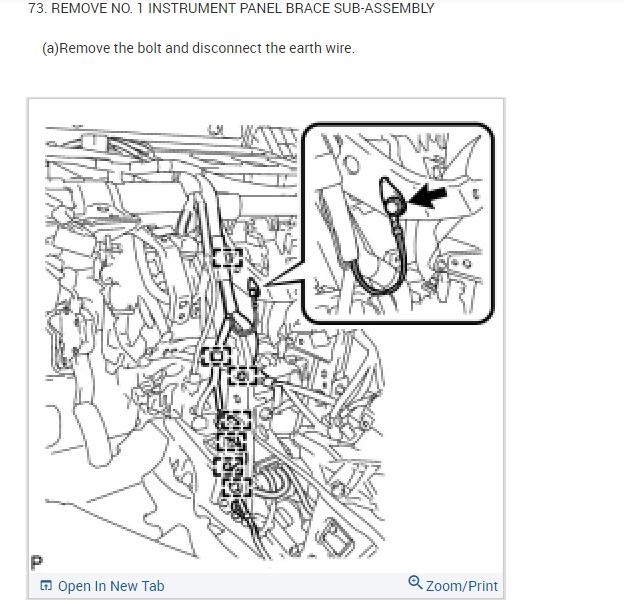
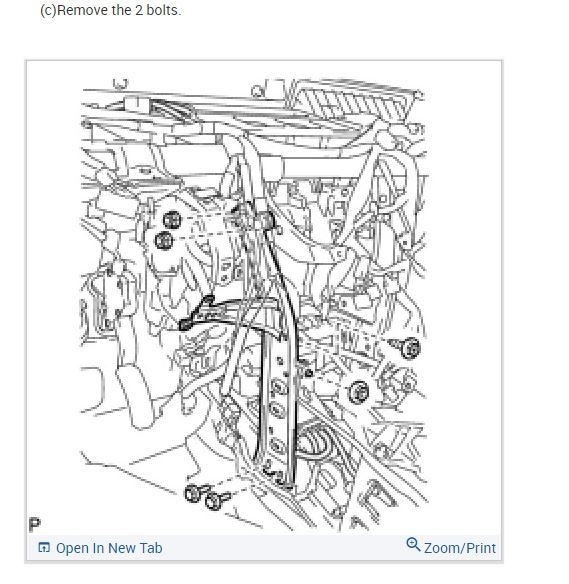
73. REMOVE NO. 1 INSTRUMENT PANEL BRACE SUB-ASSEMBLY
(a)Remove the bolt and disconnect the earth wire.
imageOpen In New TabZoom/Print
(b)Disengage each clamp.
(c)Remove the 2 bolts.
imageOpen In New TabZoom/Print
(d)Remove the screw.
(e)Remove the 3 nuts and the No. 1 instrument panel brace sub-assembly.
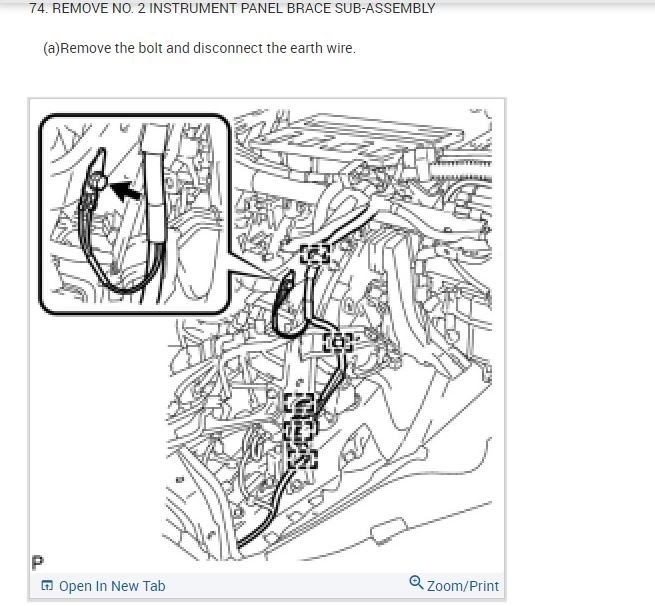
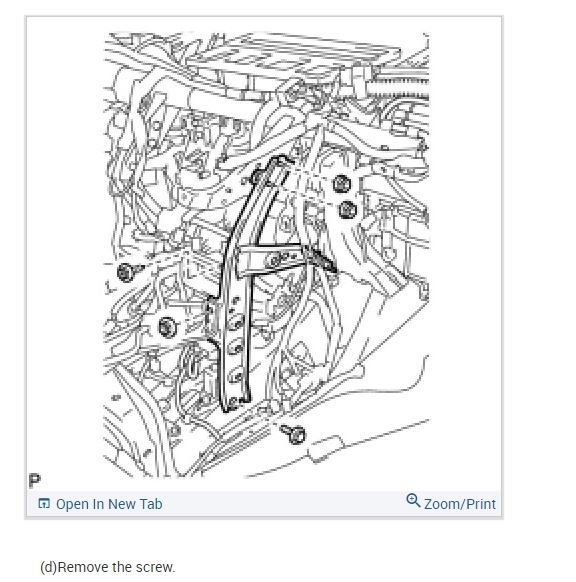
74. REMOVE NO. 2 INSTRUMENT PANEL BRACE SUB-ASSEMBLY
(a)Remove the bolt and disconnect the earth wire.
imageOpen In New TabZoom/Print
(b)Disengage each clamp.
(c)Remove the bolt.
imageOpen In New TabZoom/Print
(d)Remove the screw.
(e)Remove the 3 nuts and the No. 2 instrument panel brace sub-assembly.
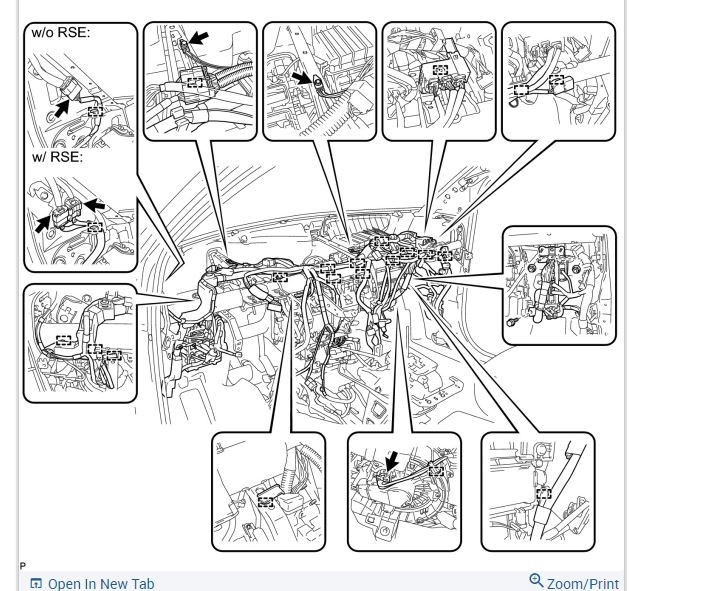
75. REMOVE INSTRUMENT PANEL REINFORCEMENT ASSEMBLY WITH AIR CONDITIONING UNIT (w/o PTC Heater)
(a)Disengage each clamp.
(b)Remove the 2 bolts and disconnect the 2 earth wires.
(c)Disconnect each connector.
(d)Remove the 2 nuts and bolt.
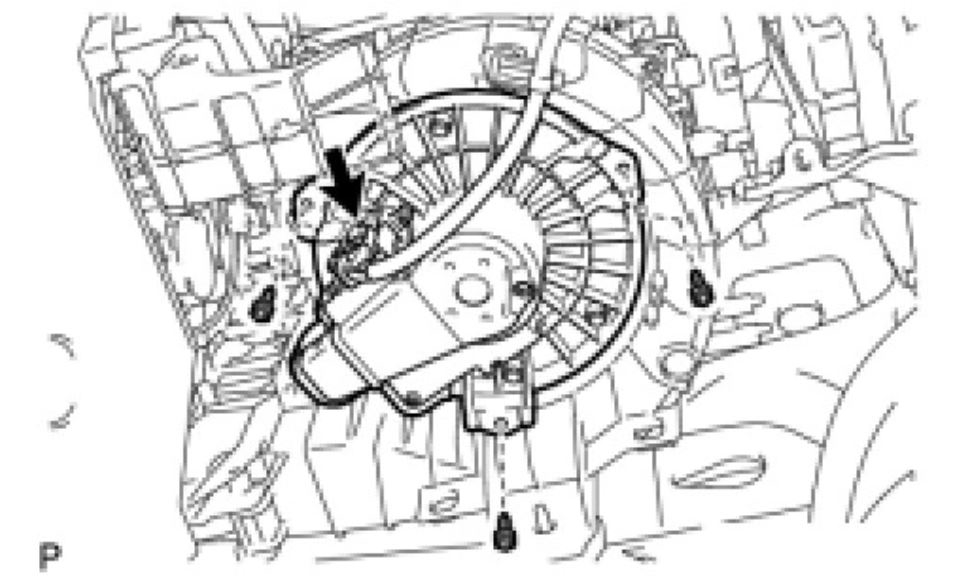
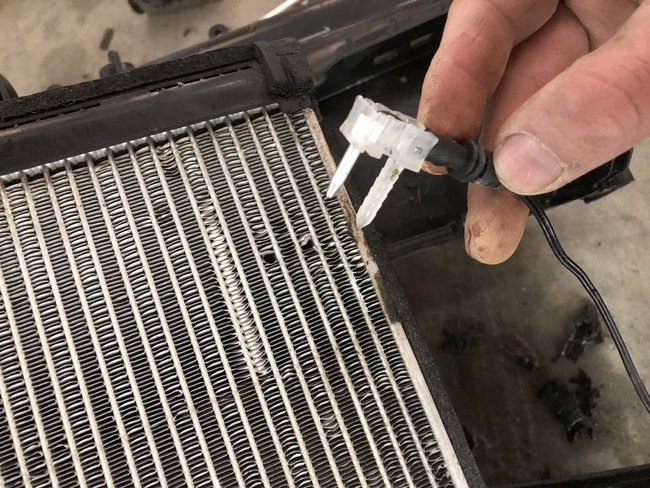
(e)Disconnect the blower motor connector.
imageOpen In New TabZoom/Print
(f)Remove the 2 caps and the 2 bolts from the engine compartment side.
(g)Disconnect the cooler drain hose.
(h)Remove the nut.
imageOpen In New TabZoom/Print
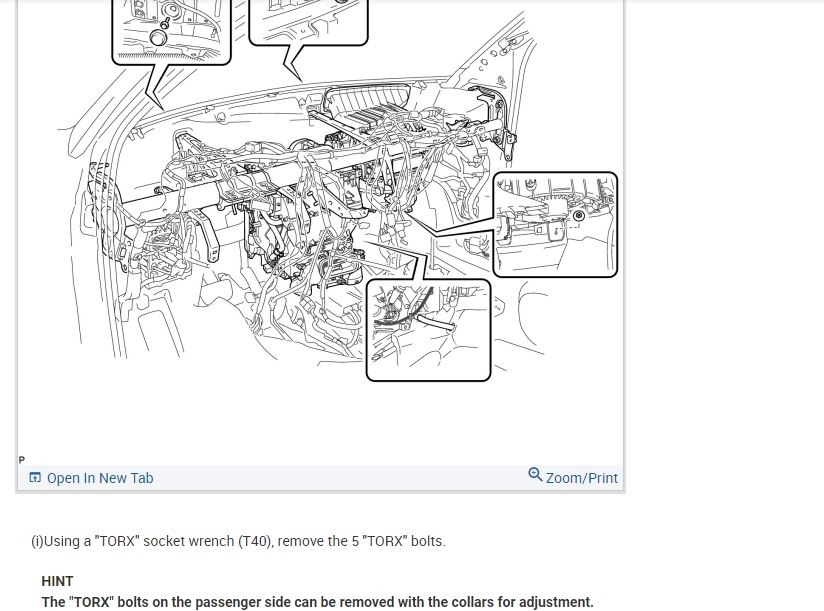
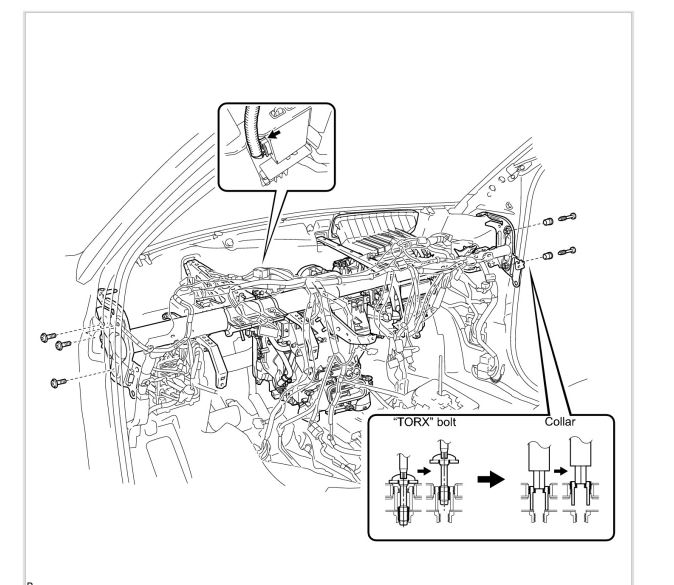
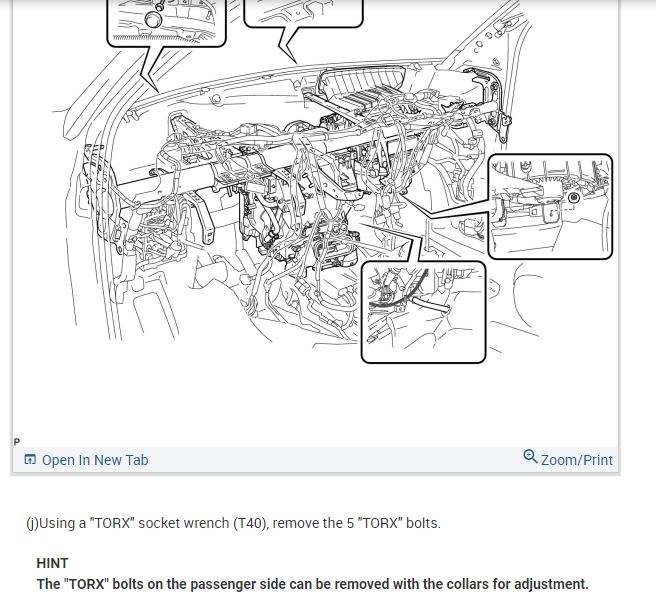
(i)Using a "TORX" socket wrench (T40), remove the 5 "TORX" bolts.
HINT
The "TORX" bolts on the passenger side can be removed with the collars for adjustment.
(j)Using a 12 mm hexagon wrench, remove the 2 collars and the instrument panel reinforcement assembly with air conditioning unit.
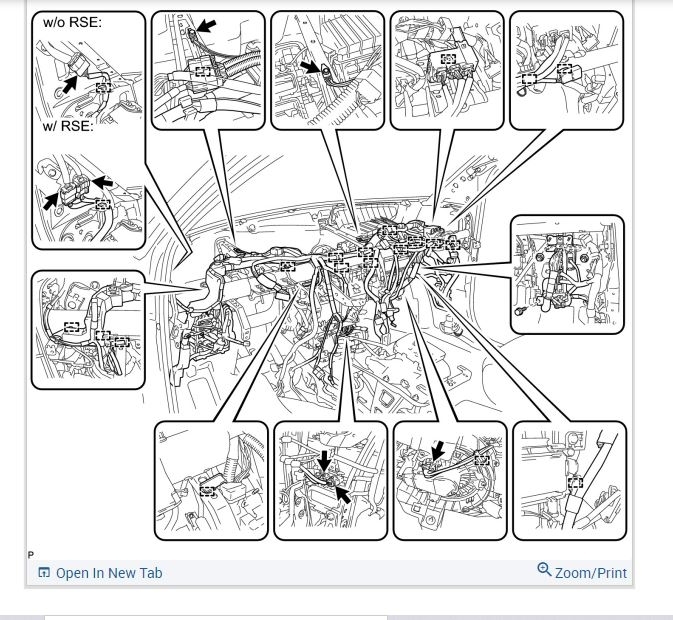
(k)Disconnect the connector.
imageOpen In New TabZoom/Print
76. REMOVE INSTRUMENT PANEL REINFORCEMENT ASSEMBLY WITH AIR CONDITIONING UNIT (w/ PTC Heater)
(a)Disengage each clamp.
(b)Remove the 2 bolts and disconnect the 2 earth wires.
(c)Disconnect each connector.
(d)Remove the 2 nuts and bolt.
(e)Disconnect the blower motor connector.
(f)Disconnect the 2 quick heater connectors.
imageOpen In New TabZoom/Print
(g)Remove the 2 caps and the 2 bolts from the engine compartment side.
(h)Disconnect the cooler drain hose.
(i)Remove the nut.
imageOpen In New TabZoom/Print
(j)Using a "TORX" socket wrench (T40), remove the 5 "TORX" bolts.
HINT
The "TORX" bolts on the passenger side can be removed with the collars for adjustment.
(k)Using a 12 mm hexagon wrench, remove the 2 collars and the instrument panel reinforcement assembly with air conditioning unit.
(l)Disconnect the connector.
imageOpen In New TabZoom/Print
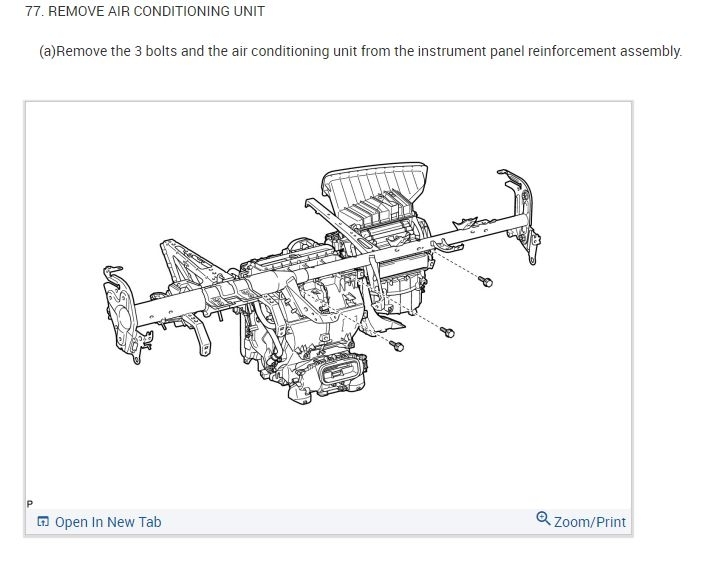
77. REMOVE AIR CONDITIONING UNIT
(a)Remove the 3 bolts and the air conditioning unit from the instrument panel reinforcement assembly.
imageOpen In New TabZoom/Print
Images (Click to make bigger)
SPONSORED LINKS
Thursday, March 25th, 2021 AT 12:14 PM