This is not a fun job. Basically you need to remove everything from the center console forward to the firewall. The dash has to be removed, the AC discharged and the HVAC housing has to be removed to split it to get to the cores. If you are going that far you should replace the actuator motors, the heat and AC cores all at once to avoid needing to repeat this process to replace one of those.
These are the factory instructions, I placed them in the order you actually do them, makes it a bit easier that way.
Warning: on vehicles equipped with airbags, disable the airbag system before attempting any steering wheel, steering column, or instrument panel component diagnosis or service. Disconnect and isolate the battery negative (ground) cable, then wait two minutes for the airbag system capacitor to discharge before performing further diagnosis or service. Failure to take the proper precautions could result in accidental airbag deployment and possible personal injury.
Dash Removal
Before starting this procedure, be certain to turn the steering wheel until the front wheels are in the straight-ahead position and block them in place. Very Important!
Much of this will be brittle plastic so be gentle in how you pry the clips loose.
1. Disconnect and isolate the battery negative cable.
2. Remove the trim from the right and left front door sills.
3. Remove the trim from the left and right cowl side inner panels.
4. Remove the steering column opening cover from the instrument panel.
5. Remove the two screws that secure the inside hood latch release handle to the instrument panel lower reinforcement and lower the release handle to the floor.
6. Disconnect the driver side airbag module wire harness connector from the instrument panel wire harness at the instrument panel lower reinforcement.
7. If the vehicle is so equipped, disconnect the overdrive lockout switch wire harness connector from the instrument panel wire harness near the instrument panel lower reinforcement.
8. Remove the steering column from the vehicle, but do not remove the driver side airbag module, the steering wheel, or the switches from the steering column. Be certain that the steering wheel is locked and secured from rotation to prevent the loss of clockspring centering.
9. From under the driver side of the instrument panel, perform the following:
a. Remove the screw from the center of the headlamp and dash to instrument panel bulkhead wire harness connector and disconnect the connector.
B. Disconnect the two body wire harness connectors from the two instrument panel wire harness connectors that are secured to the outboard side of the instrument panel bulkhead connector.
C. Disconnect the three wire harness connectors (one from the body wire harness, and two from the headlamp and dash wire harness) from the three junction block connector receptacles located closest to the dash panel.
D. Unsnap the plastic retainer clip that secures the park brake release linkage rod to the lever on the back side of the park brake release handle and disengage the linkage rod end from the lever on the handle.
E. Disconnect the instrument panel wire harness connector from the stop lamp switch connector receptacle.
F. Disconnect the vacuum harness connector located near the left end of the heater-A/C housing.
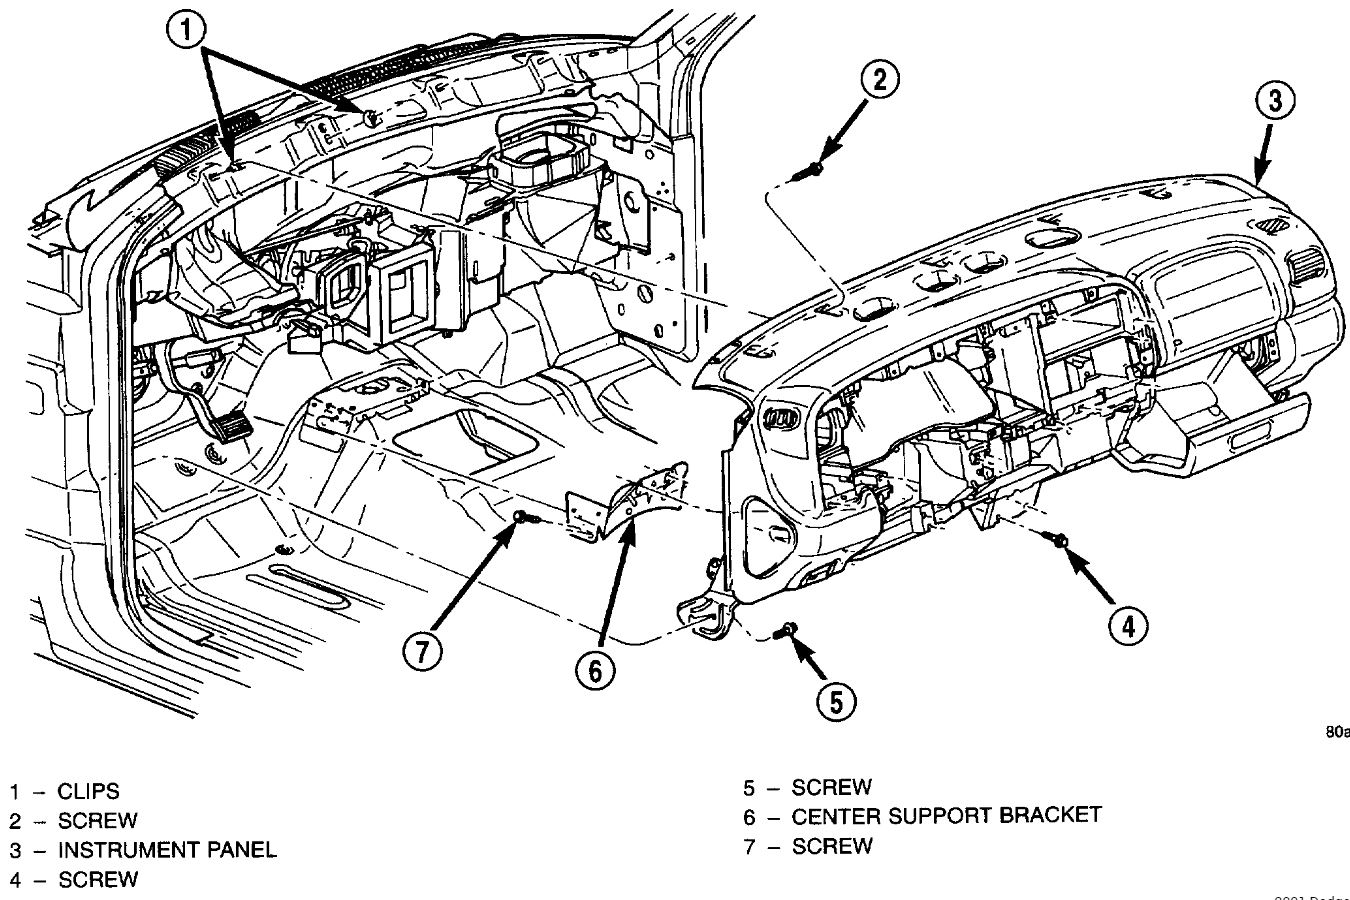
10. Remove the center support bracket from the instrument panel.
11. Remove the screw that secures the instrument panel wire harness ground eyelets to the left side of the Airbag Control Module (ACM) mount on the floor panel transmission tunnel.
12. Disconnect the instrument panel wire harness connector from the ACM connector receptacle.
13. Remove the glove box from the instrument panel.
14. Reaching through the instrument panel glove box opening, perform the following:
a. Disconnect the two halves of the radio antenna coaxial cable connector near the center of the lower instrument panel glove box opening.
B. Disengage the antenna half of the radio antenna coaxial cable from the retainer clip near the outboard side of the lower instrument panel glove box opening.
C. Disconnect the blower motor wire harness connector located near the heater-A/C housing support brace on the inboard side of the instrument panel glove box opening.
15. From under the passenger side of the instrument panel, perform the following:
a. If the vehicle is so equipped, disconnect the two instrument panel wire harness connectors from the Infinity speaker amplifier connector receptacles on the right cowl side inner panel.
B. Remove the nut that secures the instrument panel wire harness radio ground eyelet to the stud on the right cowl side inner panel.
16. Loosen the right and left instrument panel cowl side roll-down bracket screws about 6 mm (0.25 inch).
17. Remove the five screws that secure the top of the instrument panel to the top of the dash panel, removing the center screw last.
18. Pull the lower instrument panel rearward until the right and left cowl side roll-down bracket screws are in the roll-down slot position of both brackets.
19. Roll down the instrument panel and install a temporary hook in the center hole on top of the instrument panel. Secure the other end of the hook to the center hole in the top of the dash panel. The hook should support the instrument panel in its rolled down position about 46 cm (18 inches) from the dash panel.
20. With the instrument panel supported in the roll-down position:
a. Disconnect the two instrument panel wire harness connectors from the door jumper wire harness connectors located on a bracket near the right end of the instrument panel.
B. Disconnect the instrument panel wire harness connector from the blower motor resistor connector receptacle on the dash panel.
C. Disconnect the temperature control cable flag retainer from the top of the heater-A/C housing and pull the cable core adjuster clip off of the blend-air door lever.
D. Disconnect the demister duct flexible hose from the adapter on the top of the heater-A/C housing.
20. With the aid of an assistant, remove the temporary hook and lift the instrument panel assembly off of the roll-down bracket screws and remove it from the vehicle.
Front HVAC Housing
The heater-A/C housing assembly must be removed from the vehicle and disassembled for service access of the blower motor, blower motor wheel, heater core, evaporator coil, blend-air door, and each of the various mode control doors.
1. Disconnect and isolate the battery negative cable.
2. Remove the instrument panel from the vehicle. (Refer to Dash Removal)
3. Recover the refrigerant from the refrigerant system.
4. Remove the front expansion valve from the evaporator tube mounting flange. Install plugs in, or tape over all of the opened refrigerant line fittings.
5. Drain the engine cooling system.
6. Disconnect the heater hoses from the heater core tubes. Install plugs in, or tape over the opened heater core tubes.
7. Remove the four nuts from the heater-A/C housing mounting studs on the engine compartment side of the dash panel
8. Disengage the front floor panel transmission tunnel duct from the adapter on the heater-A/C housing.
9. Remove the two screws that retain the hanger strap and air inlet to the plenum.
10. Pull the heater-A/C housing rearward far enough for the mounting studs and the evaporator condensate drain tube to clear the dash panel holes.
11. Remove the heater-A/C housing from the vehicle.
HVAC Housing Plenum Adapter
1. Remove the heater-A/C housing from the vehicle.
2. Slide the heater-A/C housing plenum adapter all the way to one side of the plenum opening.
3. Pull downwards sharply and firmly on the opposite side of the plenum adapter to disengage the snap feature from the plenum opening.
4. Remove the plenum adapter from the plenum panel.
5. When reinstalling the heater-A/C housing plenum adapter to the plenum panel opening, be certain that the snap features on each side of the adapter are fully engaged with the sides of the plenum panel opening. This must be a water tight connection to prevent leaks.
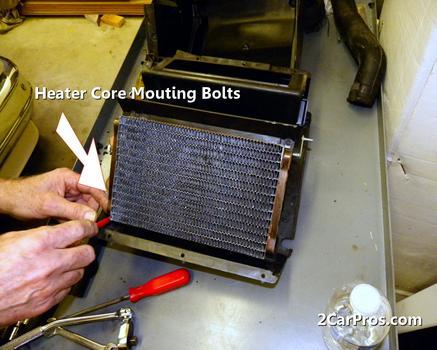
Heater core removal
1. Disassemble the HVAC housing to access the heater core.
2. Lift the heater core out of the heater-A/C housing.
Heater core installation
1. Insert the heater core into the bottom of the heater-A/C housing.
2. Reassemble the heater-A/C housing.
3. Install the heater-A/C housing into the vehicle.
Reverse all of the above to reinstall the HVAC case.
Verify that any foam seal, strips or other sound dampeners are in good condition. Having rattles, squeaks or noises from the dash because something is moving that shouldn't be gets really annoying. Also look for areas that have been rubbing that may not have any isolation and see if you can add some to prevent future issues.
Images (Click to make bigger)
SPONSORED LINKS
Thursday, November 1st, 2018 AT 2:32 PM