Hi and welcome back:
Honestly, I don't believe the bushing itself is available. I just checked on line and you can get the entire arm with new bushings for just over 60 dollars. It was a nationally recognized parts store.
Now, the concern is this. To remove the lower control arm, you have to remove the coil spring which can be dangerous. Here are the directions to remove the coil. Be careful when doing this not to allow the coil the chance to spring out.
__________________________
SPRING
Spring
Spring
Picture 1
Removal
CAUTION: Suspension fasteners are critical parts because they affect performance of vital components and systems and their failure may result in major service expense. New parts must be installed with the same part numbers or equivalent part, if replacement is necessary. Do not use a replacement part of lesser quality or substitute design. Torque values must be used as specified during reassembly to make sure correct retention of these parts.
1. Remove the wheel and tire.
2. Remove the stabilizer bar nut and bushings, stabilizer bar links and spacers on both sides of the stabilizer bar.
3. Using a suitable jack, raise the rear lower arm 32 mm (1.25 inch).
Picture 2
4. WARNING: The coil spring is under extreme load. Care must be taken at all times when removing or installing a loaded spring. Failure to follow this instruction may result in serious personal injury.
Remove the rearward lower arm outboard bolt.
5. Lower the rear lower arm and remove the jack.
Picture 3
6. Remove the spring.
1 Position the stabilizer bar aside.
2 Lower the rear lower control arm and remove the spring.
- Inspect the spring upper and lower seats and, if necessary, install new.
Picture 4
Installation
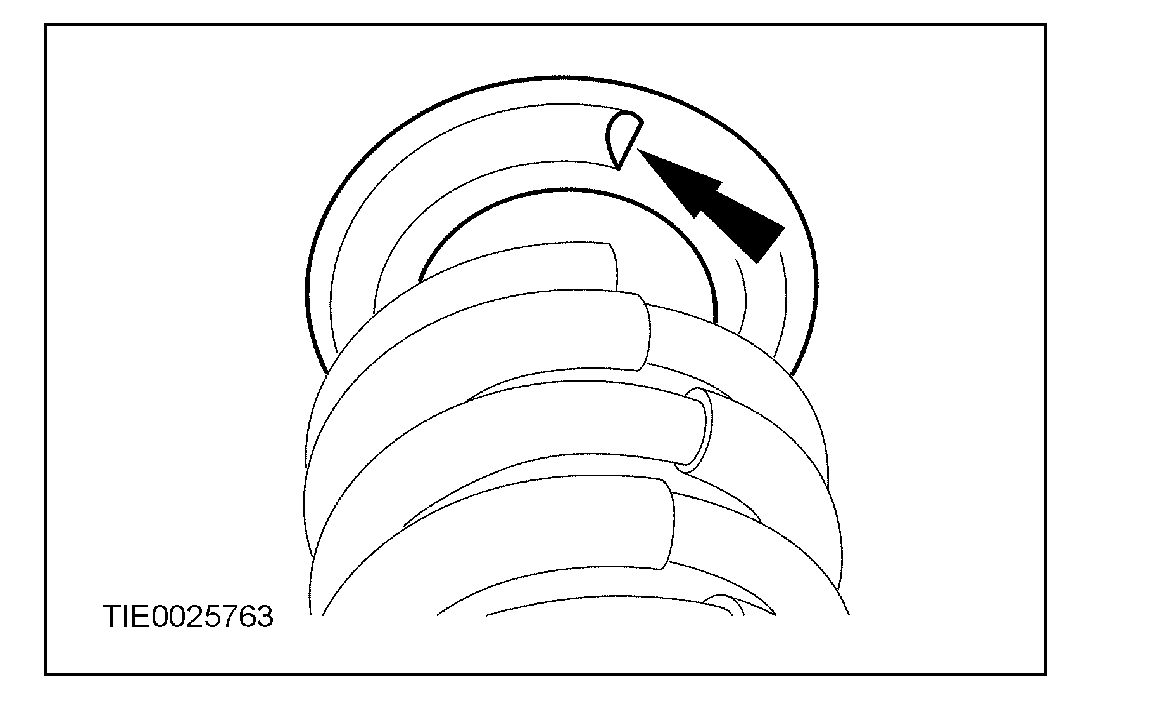
1. CAUTION: Make sure the upper spring seat is installed, and the spring ends butt correctly against the upper and lower spring seats.
Install the upper spring seat onto the spring.
Picture 5
2. Install the spring.
1 Position the stabilizer bar aside.
2 Position the spring into the upper spring mount and position the lower arm.
Picture 6
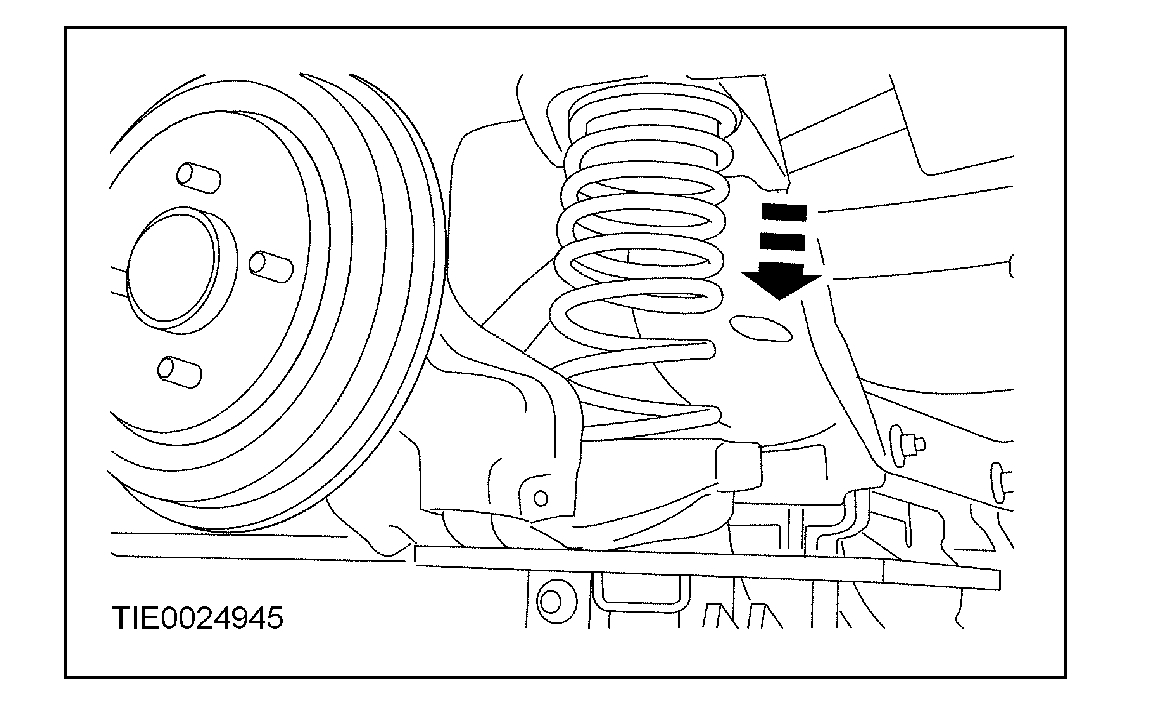
3. CAUTION: Make sure the spring butts against the rear lower arm spring stop and is visible through the drain hole.
If necessary, rotate the spring clockwise until the spring-end butts against the rear lower arm spring stop.
Picture 7
4. WARNING: The coil spring is under extreme load. Care must be taken at all times when removing or installing a loaded spring. Failure to follow this instruction may result in serious personal injury.
NOTE: Do not tighten the rearward lower arm outboard bolt at this time.
Using a suitable jack, raise the rear lower arm and install the rearward lower arm outboard bolt.
Tighten until snug.
5. Position the stabilizer bar links and spacers and install the nut and bushings.
Tighten to 15 Nm (11 ft. Lbs.).
6. Install the wheel and tire.
7. Lower the vehicle until the weight of the vehicle is resting on the wheels and tires.
8. Tighten the rearward lower arm outboard bolt to 115 Nm (85 ft. Lbs.).
_________________________________________
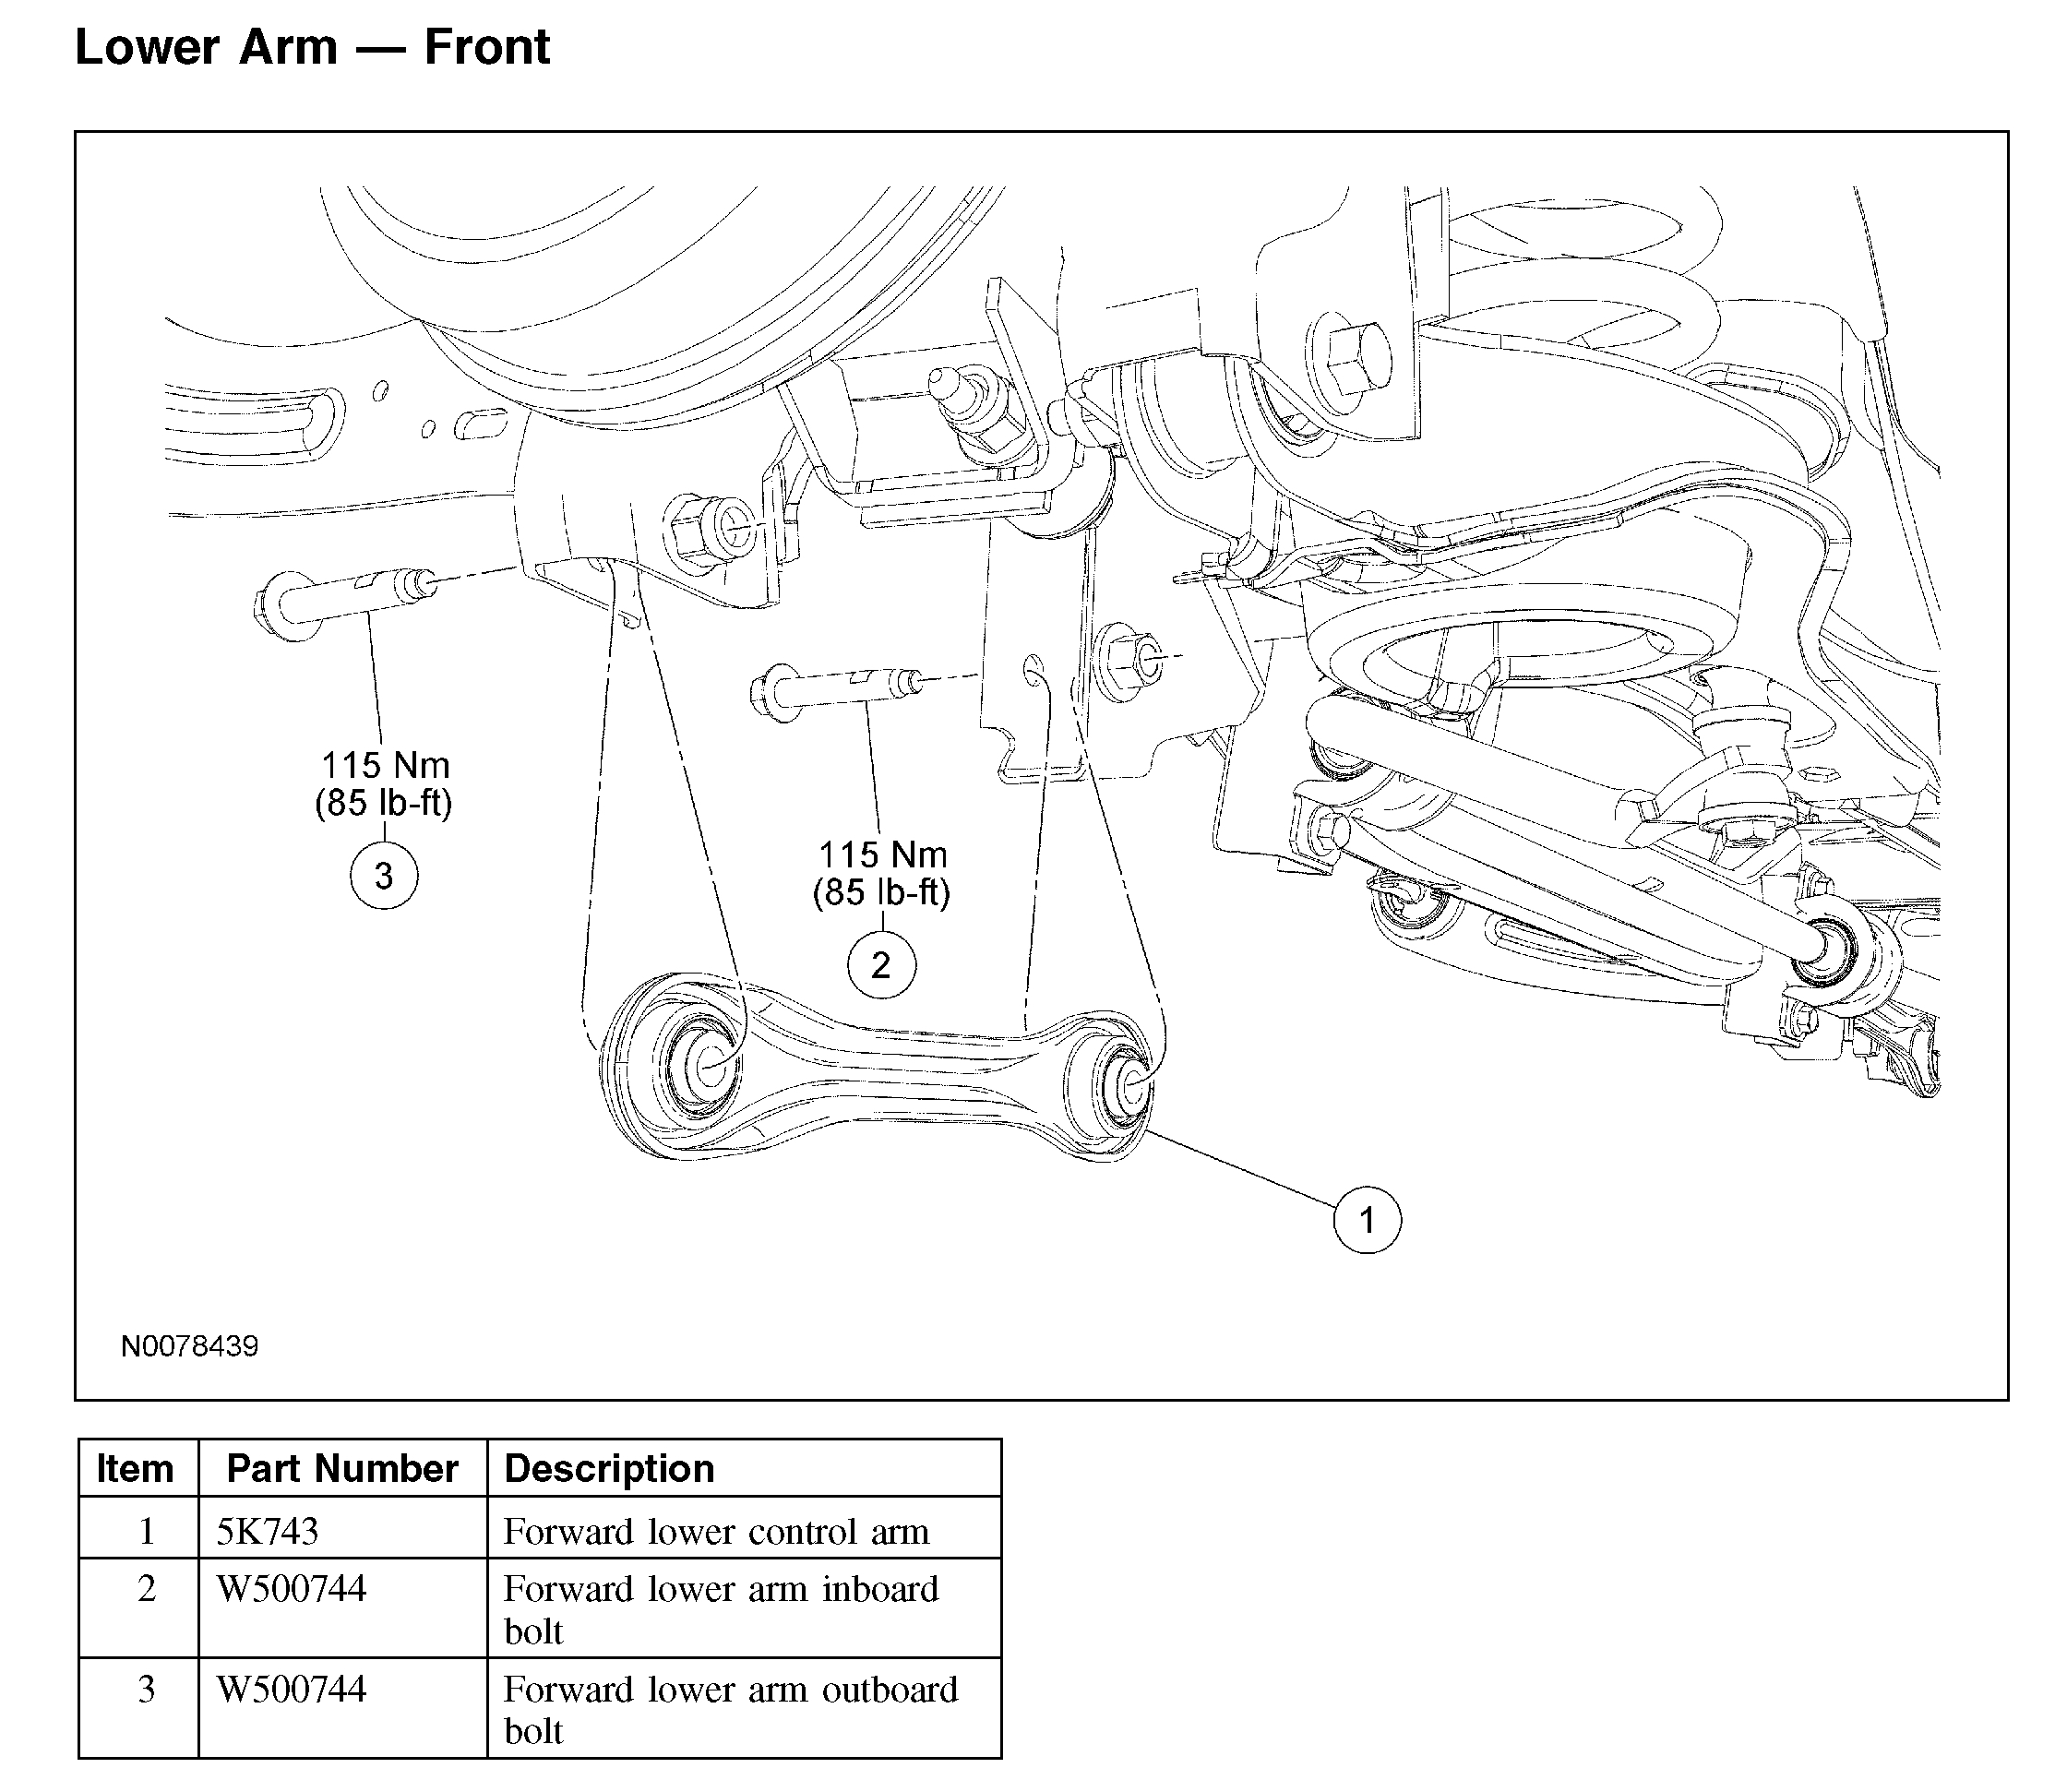
Now there are two lower control arms on the rear. One is called the front and the other is the rear. Yes, both are on the rear of the vehicle. Here are the directions for replacing the front lower control arm on the rear of the vehicle.
See pic 8
Removal
CAUTION: Suspension fasteners are critical parts because they affect performance of vital components and systems and their failure may result in major service expense. New parts must be installed with the same part numbers or equivalent part, if replacement is necessary. Do not use a replacement part of lesser quality or substitute design. Torque values must be used as specified during reassembly to make sure correct retention of these parts.
1. Remove the wheel and tire.
2. Remove and discard the forward lower arm inboard bolt.
3. Remove the forward lower arm outboard bolt and the forward lower arm.
Discard the bolt.
Installation
1. NOTE: The forward lower arm is marked FRONT. Make a note of the position of the front lower arm to aid installation.
NOTE: Do not tighten the bolt at this time.
Position the front lower arm and loosely install the lower arm outboard bolt.
2. NOTE: Do not tighten the bolt at this time.
Loosely install the forward lower arm inboard bolt.
3. Install the wheel and tire.
4. Lower the vehicle until the weight of the vehicle is resting on the wheels and tires.
5. Tighten the forward lower arm inboard bolt to 115 Nm (85 ft. Lbs.).
6. Tighten the forward lower arm outboard bolt to 115 Nm (85 ft. Lbs.).
___________________________
If it is the rear control arm, make sure to mark the camber bolt so you can replace it in the same position and keep the present alignment. Regardless, it may be a good idea to have it aligned when this part is replaced.
Here are the directions. Again, use caution when removing the spring. The last two pictures correlate with these directions.
Lower Arm - Rear
Lower Arm - Rear
Picture 9
Removal
CAUTION: Suspension fasteners are critical parts because they affect performance of vital components and systems and their failure may result in major service expense. New parts must be installed with the same part numbers or equivalent part, if replacement is necessary. Do not use a replacement part of lesser quality or substitute design. Torque values must be used as specified during reassembly to make sure correct retention of these parts.
1. Mark the position of the rearward lower arm adjustment cam to the crossmember.
Picture 10
2. Remove the spring.
3. Remove the rearward lower arm-to-crossmember nut, cam adjuster, cam bolt and the lower arm.
Discard the rearward lower arm-to-crossmember nut.
Installation
1. NOTE: Align the mark on the rearward lower arm adjustment cam to the mark on the crossmember.
NOTE: Do not fully tighten the rearward lower arm-to-crossmember nut at this time.
Position the rearward lower arm and install the cam bolt, cam adjuster and nut.
Tighten the nut until snug.
2. Install the spring.
3. NOTE: Final tightening of the rearward lower arm-to-crossmember nut should be carried out with the suspension at curb height.
Tighten the rearward lower arm-to-crossmember nut to 90 Nm (66 ft. Lbs.).
4. Check and, if necessary, adjust the rear toe.
_____________________________________
Let me know if this helps.
Take care,
Joe
Images (Click to make bigger)
SPONSORED LINKS
Tuesday, February 19th, 2019 AT 5:53 PM