Recently the heater stopped heating, pushing the slide bar to heat did not result in heat. Taking off the pannel showed an electrical connector with about twenty pins, no push-pull cable. Feeling the two hoses on the front side of the fire wall are both HOT seems to indicate that there is flow through the core and that it is not plugged. Question, how do I fix the electricaly controled dampers to provide heat??
updated 12/1/09
Hello 2CarPros; I am not making much progress with my Lack of Heat; I recieved a reply from Merlin 2021 on Nov 23 which gave a longish diagnostic proceedure which seemed too complicated for me to do and anyway if it showed the trouble I probably couldn't fix it so I took it to a Dealer who had some past connection to Chrysler. They said they went through some such proceedure and found that both the right and lefthand flappers didn't work which they thought odd as usually both don't go bad at once. They said that to go further they would have to take off the dashboard and that would cost about $700.00 so I told them to stop. They charged me $102.00.
So what I need now is information on where to cut away the plastic so that I can get access to the damppers to clean out the mouse nest, oil the hinges, disconnect the potentiometers to see if they work, and if necessary attach push-pull choke cables so that at least I can work them by hand.
Your help would be much appreciated because this is not just a matter of comfort, but as winter comes on I will need the defogger and deicer systems to work, and for this I need the heat to work. Many thanks,
updated 12/12/09
The car now has heat in a jury-rigged sort of way;
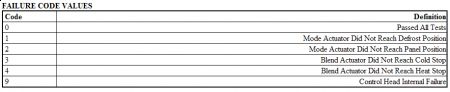
Results of diagnostic tests Wash flash once, Int flash 5;;;Wash flash twice, Int flash Blinking, rate increases/decreases as move from Pannel to defrost, {so OK];;; Wash flash thrice, {blend & Heat test],, Int flash Blinking, No change in rate as temp slide bar moved from hot to cold [So BAD] Wash flash 4 times;; Int flash 4,then going to 8 or 9,, or a sequence of 4 followed by 5 going to 4 or 3;; Wash flash five times,, Int flashes once. After the above word "BAD" I dont know what all the flashes mean as I don't have a code book.
While doing all this I noticed that when the testing sequence was first started up after about ten seconds all the lights on the pannel would flash for about another ten seconds and then stop as the testing sequence was ready. During the ten seconds of all flashing the tone of the assembly would get more intense-louder- and there would be heat. When the lights stoped flashing the tone and the heat went away and never came back during the rest of the testing. I could repeat this event by restarting the whole procedure and I would get heat again no matter wheather the slide bar was on HOT or COLD.
Some one sugested that I unplug the [Passenger Zone??] actuator in the middle of the time when it was making heat so I did this by turning off the ignition in the middle of the heat time frame, pulling the plug, and restarting the car, and it worked. Now I have heat constantly and it feels gooood, so I am OK untill Easter. One odd thing is that the wiper and intrmdiat lights now keep flashing and I can't make them go off, no big deal I supose. The unit cycles through all the positions from Pannel to Defrost OK.
I am wondering is there now enough information to say that some control module should be replaced to restor normalacy, what does it look like, where is it located, what number, what $$... OR could/can the whole thing have be corrected by "reflashing the computer" and have saved all this cotton picking work?? It seems I should ask these questions before I reinstall/rebuild the dashboard.
Thanks for sticking with me through all this, take another $20.00 contribution and thanks again.
updated 12/1/09
Hello 2CarPros; I am not making much progress with my Lack of Heat; I recieved a reply from Merlin 2021 on Nov 23 which gave a longish diagnostic proceedure which seemed too complicated for me to do and anyway if it showed the trouble I probably couldn't fix it so I took it to a Dealer who had some past connection to Chrysler. They said they went through some such proceedure and found that both the right and lefthand flappers didn't work which they thought odd as usually both don't go bad at once. They said that to go further they would have to take off the dashboard and that would cost about $700.00 so I told them to stop. They charged me $102.00.
So what I need now is information on where to cut away the plastic so that I can get access to the damppers to clean out the mouse nest, oil the hinges, disconnect the potentiometers to see if they work, and if necessary attach push-pull choke cables so that at least I can work them by hand.
Your help would be much appreciated because this is not just a matter of comfort, but as winter comes on I will need the defogger and deicer systems to work, and for this I need the heat to work. Many thanks,
updated 12/12/09
The car now has heat in a jury-rigged sort of way;
Results of diagnostic tests Wash flash once, Int flash 5;;;Wash flash twice, Int flash Blinking, rate increases/decreases as move from Pannel to defrost, {so OK];;; Wash flash thrice, {blend & Heat test],, Int flash Blinking, No change in rate as temp slide bar moved from hot to cold [So BAD] Wash flash 4 times;; Int flash 4,then going to 8 or 9,, or a sequence of 4 followed by 5 going to 4 or 3;; Wash flash five times,, Int flashes once. After the above word "BAD" I dont know what all the flashes mean as I don't have a code book.
While doing all this I noticed that when the testing sequence was first started up after about ten seconds all the lights on the pannel would flash for about another ten seconds and then stop as the testing sequence was ready. During the ten seconds of all flashing the tone of the assembly would get more intense-louder- and there would be heat. When the lights stoped flashing the tone and the heat went away and never came back during the rest of the testing. I could repeat this event by restarting the whole procedure and I would get heat again no matter wheather the slide bar was on HOT or COLD.
Some one sugested that I unplug the [Passenger Zone??] actuator in the middle of the time when it was making heat so I did this by turning off the ignition in the middle of the heat time frame, pulling the plug, and restarting the car, and it worked. Now I have heat constantly and it feels gooood, so I am OK untill Easter. One odd thing is that the wiper and intrmdiat lights now keep flashing and I can't make them go off, no big deal I supose. The unit cycles through all the positions from Pannel to Defrost OK.
I am wondering is there now enough information to say that some control module should be replaced to restor normalacy, what does it look like, where is it located, what number, what $$... OR could/can the whole thing have be corrected by "reflashing the computer" and have saved all this cotton picking work?? It seems I should ask these questions before I reinstall/rebuild the dashboard.
Thanks for sticking with me through all this, take another $20.00 contribution and thanks again.
Nov 22, 2009 at 11:16 AM