1999 Nissan Quest Raidator Fan did not turn on low speed

Tiny
VICAUTO2
  • MEMBER
  • 1999 NISSAN QUEST
  • 6 CYL
  • 2WD
  • AUTOMATIC
  • 10,000 MILES
I have Nissan Quest mini van 1999, 100:000 miles.
I have problem with Radiator fan did not turn on low speed when engine warm. The fan turn on only on high speed, or A/c or heat on.
1) I tested the Fan by Jumped the hot wire directed from battery to the fan, It worked.
2) I tested all three relay. Apply power to each invidual, all three clicked
03) I checked power of three terminal, all they have power, when inigtion key was on position.
The problem is there is 7.5 am RAD not power at all. Engine off, or run, the fuse checked ok. There is no power, even engine ran,
The raw of Fan relay A is low speed, B is high 1, C is high 2,
4) I switched relay by one at the time, both B and C high speed worked.
The problem is A relay position not work at all. Runing engine to hot. But relay did not click to close curcuit, so the low speed can turn.
I moved same relay to the other place B and C high speed fan, it worked high speed fan.
The theomastart worked Ok, Coolant sensor worked, It send signal to turn high speed fan on.
Please, Tell me How do you think? Thank yoiu
Monday, May 25th, 2009 AT 8:40 AM

29 Replies

Tiny
KHLOW2008
  • MECHANIC
  • 41,815 POSTS
Hi vicauto2,

Thank you for the donation.

Your problem seems to be Fuse J ( 7.5 or 10 A ) no power supply. It should be hot at all times. Power to it comes from the 140 A fusible link. It could be a fault in the fuse box internal connections.

Try attaching a remote wire to the the fuse and apply battery voltage to test if the slow speed works.

Check the # 44 Fuse. It also works the fans.
Was this
answer
helpful?
Yes
No
+1
Monday, May 25th, 2009 AT 11:55 AM
Tiny
VICAUTO2
  • MEMBER
  • 41 POSTS
Hi
I'm very sorry, I've tried to Jump the fuse, but it was burnd up, both ground jumping wire and underthernet of the fuse, just right engine started.
I jumped from 7. 5 A terminal fuse to baterry with the fuse holder and 7.5 fuse on it, between terminal and battery on hot wire.
I checked the fuse there was power on the fuse, with inigtion key to Acc position. I started to warm up engine to see how the fan is going. But just after started the smoke raise up. I have to stop immidiately. It melt negative wire and burn up the wire from terminal.
Please ! Tell me what did I do wrong? Or some thing grounded. Apply voltage to terminal it burn up.
I could not find the way to jump from 140A fuse. So I have to jump directly to battery, The Amp of battery is about 90 to 100 amp.
Was this
answer
helpful?
Yes
No
-1
Tuesday, May 26th, 2009 AT 7:38 PM
Tiny
KHLOW2008
  • MECHANIC
  • 41,815 POSTS
You bypased the 7.5A fuse and that is the cause of the wires burning up as there was a shorting somewhere.

I have some varied data and would like to confirm this.

Where is the location of the 7.5 A fuse that you are refering to?
Was this
answer
helpful?
Yes
No
+1
Wednesday, May 27th, 2009 AT 8:49 AM
Tiny
VICAUTO2
  • MEMBER
  • 41 POSTS
Hi !
7.5 A fuse is beside of relay A as low speed fan relay. It was same box of 3 Fan relay in engine comparment
As the first question email, I told you that, There was not voltage in this fuse, and in this socket, You told me Jump the fuse, Then it burned.
Please, Tell me How to Jump the fuse? And use some thing test out side the car first, otherwise this could happen again , Thank you
Was this
answer
helpful?
Yes
No
Wednesday, May 27th, 2009 AT 8:15 PM
Tiny
KHLOW2008
  • MECHANIC
  • 41,815 POSTS
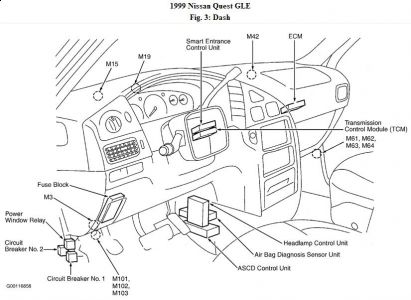
After some research I managed to get the testing procedures for the cooling fan circuits.

COOLING FAN CONTROL TEST (QUEST)
1. Check Low Speed Fan Operation
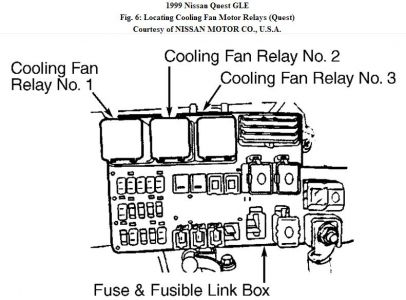
Ensure coolant level is okay. Turn ignition off. Disconnect cooling fan relays No. 2 and 3. See Fig. 6 . Start engine. Set A/C temperature control lever to full cold position. Turn A/C switch and blower fan switch on. Run engine at idle for several minutes. Cooling fan should operate at low speed. If cooling fan does not operate, go to next step.


https://www.2carpros.com/forum/automotive_pictures/192750_CoolingFanRelays99Quest06_1.jpg


2. Check Power Supply (Low Speed)
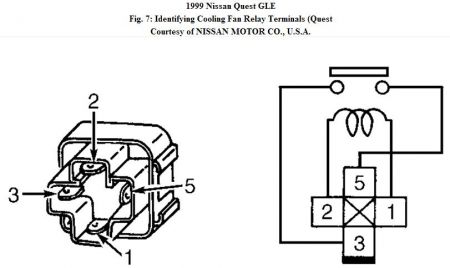
Turn ignition off. Disconnect cooling fan relay No. 1. Turn ignition on. Measure voltage between cooling fan relay No. 1 harness connector terminals No. 1 (Blue wire) and ground, and terminal No. 5 (White/Blue wire) and ground. See Fig. 7 . If battery voltage is present, go to next step. If battery voltage is not present, check fuse No. 29 (10-amp) and fusible link (75- amp). If fuse and fusible link are okay, check open in circuit between fuse block and relay.


https://www.2carpros.com/forum/automotive_pictures/192750_CoolingFanRelays99Quest07_1.jpg


3. Check Ground Circuit (Low Speed)
Turn ignition off. Disconnect cooling fan motor harness connector. Using ohmmeter, check for continuity between fan motor harness connector terminal No. 2 and fan relay No. 1 harness connector terminal No. 3 (Blue/White wire). If continuity does not exist, repair open in Blue/White wire. If continuity exists, check for continuity between fan motor harness connector terminal No. 3 (Black wire) and ground. If continuity exists, go to next step. If continuity does not exist, repair open or short in Black wire.

4. Check Output Signal Circuit (Low Speed)
Disconnect ECM harness connector. Check for continuity between ECM harness connector terminal No. 38 and fan relay No. 1 connector terminal No. 2 (Blue/Orange wire). If continuity does not exist, check repair open in Blue/Orange wire. If continuity exists, go to next step.

5. Checking Cooling Fan Relay (Low Speed) Remove cooling fan relay No. 1. Apply 12 volts and ground to relay terminals No. 1 and 2. See Fig. 7 . Check for continuity between relay terminals No. 3 and 5. If continuity does not exist, replace relay. If continuity exists, go to next step.

6. Test Cooling Fan Motor (Low & High Speed)
Disconnect cooling fan motor harness connectors. Connect positive battery voltage to fan motor terminal No. 2 and ground to fan motor terminal No. 3. Fan motor should operate at low speed. Connect battery positive to fan motor terminal No. 1 and negative lead to fan motor terminal No. 3. Fan motor should operate at high speed. If fan motor does not operate as described, replace fan motor. If fan motor is okay, check ECM pin terminals and/or wiring harness connectors for corrosion and damage. Repair or replace as necessary.

Do the above test and see what you come up with.

You mentioned the fuse was ok but did not have power to it. It should not have shorted. For testing of circuits, it is best to test with intermittent touching the contacts to confirm if it is horting first and the point of contact should be at the power source and not the component side.
Was this
answer
helpful?
Yes
No
+1
Thursday, May 28th, 2009 AT 10:14 AM
Tiny
VICAUTO2
  • MEMBER
  • 41 POSTS
HI, sofar I have checked continuity the socket relay 1 and fan connector have have continuity on tetminal 1 and 5.
I have proplem on step 4 ( Check signal out put from ECM )
Is the ECM location on the right site( passinger site)
between AC evamperator and the Air bag?
Do I hve to remove ECM test it? If I have to, Then
Please ! Tell me instruction how to remove?
The way I see I could remove AC evamperator, disconnect AC hoses to access to ECM is very pain.
Do I have to kill my AC?
Is any scan or intrument hook up ECM can tell some open in there? It 's very expensive, worse thing is replaced it, but not fix the problem, loosing money.
Please, tell me any thing you know about ECM testing, removing, e.T . Thank you
Was this
answer
helpful?
Yes
No
+1
Sunday, May 31st, 2009 AT 10:13 AM
Tiny
KHLOW2008
  • MECHANIC
  • 41,815 POSTS
There are diagnostic equipment that can be plugged in test the various circuits but these are rather expensive items.

The ECM is located behind right side of dash. Removal of the ECM would facilitate testing and AC components need not be removed.


https://www.2carpros.com/forum/automotive_pictures/192750_DashComp99Quest_1.jpg


Removing the glove box should allow you to access the ECM. I do not have much info on the ECM removal except the view of the instrument panel.


https://www.2carpros.com/forum/automotive_pictures/192750_GloveBox99Quest_2.jpg

Was this
answer
helpful?
Yes
No
+2
Sunday, May 31st, 2009 AT 11:43 AM
Tiny
VICAUTO2
  • MEMBER
  • 41 POSTS
Hi, I have one more trouble for ECM remonving,
I disconected battery removed Air bag, so I can have some room to ECM, But I could not get ECM out yet,
I Put Air bag back with conection, and I tried to start, But Engine did not start, and Air bag light is flasing,
please, some one know How to set it back to normal , and what did I do wrong? Please tell me.
Thank you very much
Was this
answer
helpful?
Yes
No
+2
Tuesday, June 9th, 2009 AT 7:49 PM
Tiny
KHLOW2008
  • MECHANIC
  • 41,815 POSTS
Recheck the wire connections, look out for loose connectors. Check if any ground wire had been loosened and not retightened.

Removal of battery could cause the securrity system to be armed when reconnecting. Try closing all doors and using the key to lock and unlock the doors.
Was this
answer
helpful?
Yes
No
+1
Wednesday, June 10th, 2009 AT 11:22 AM
Tiny
VICAUTO2
  • MEMBER
  • 41 POSTS
Hi ! Sofar I did not have any lucks, the problem got serious, I could not find any loosing connection, I put back the same way out, Just plug 2 white pin and power connection, That is it.
The Air bag is still flashing, engine could not start.
I hooked up scan OBD II, But It could read any thing in ECM. Alway said LINK ERROR.
When I removed ECM, I loose the srcew at the back that holding all the connection, But I could get ECM out, then I tighted It back,
Now, Air bag did not inflate, but flasing, Engine didi not start, Scan OBD II could not read ECM. Very frustrated,
Do you know any diagnostic tool can read this problem? Or how to fix these thing?
I need your helps, any helps will great apreaceation.
Was this
answer
helpful?
Yes
No
+1
Wednesday, June 10th, 2009 AT 7:41 PM
Tiny
KHLOW2008
  • MECHANIC
  • 41,815 POSTS
Lets try to see if you can get a manual reading of the MIL.


https://www.2carpros.com/forum/automotive_pictures/192750_MILCheck99Quest01a_1.jpg


https://www.2carpros.com/forum/automotive_pictures/192750_MILCheck99Quest01b_1.jpg


https://www.2carpros.com/forum/automotive_pictures/192750_MILCheck99Quest01c_1.jpg

Was this
answer
helpful?
Yes
No
+2
Thursday, June 11th, 2009 AT 10:28 AM
Tiny
VICAUTO2
  • MEMBER
  • 41 POSTS
Hi, The service engine light is not on, and Nissan quest 1999 did not have a retrieve MIL box under driver seat as early nissan maxima or so, could not retrieve MIL
I have talked to local auto body shop about air bag light flashed, He told me Air bag did not affect on engine start or not. Then I have ingnition test, there was any ingnition on Sparkplus, and I pluged the scan OBD II again, same thing LINK ERROR.
The ECM shut off engine, or there is power supply to ECM,
Is there any way to test If the power is on ECM?
I'm going to tear up A/C evaperator to remove ECM.
When it's nomal ECM just a few day ago, I still worked on fan relay to get low speed, and I warmed up engine evey morning before I go to work.
Now, ECM look like death, Scan could not read in side ECM,
How do you think? Thank you your helps
Was this
answer
helpful?
Yes
No
+1
Thursday, June 11th, 2009 AT 6:44 PM
Tiny
KHLOW2008
  • MECHANIC
  • 41,815 POSTS
MIL reading data is for Quest and you need to check the ECM for the slots required to activate it.

Test the OBD-II terminal # 16 for battery voltage at all times. Nissan should be compatible with generic OBD-II scanners.

There is a possibility a power supply or ground is missing causing the problem.

Did you recheck all the fuses, especially those in Power Distribution Centre under hood?
Was this
answer
helpful?
Yes
No
+1
Thursday, June 11th, 2009 AT 7:08 PM
Tiny
VICAUTO2
  • MEMBER
  • 41 POSTS
Hi, Thank you for quick responding, I have completed to remove ECM from the van, I have to remove A/C evapertor and blower in order to pull ECM out.
Please, Tell me some more How to test ECM on pin 38. Do you have diagram ECM? How do I know which pin is 38? Also tell me instruction how to test ECM? The way I see test it in the van is extremly tight room. The better way is test out side vihecle , otherwise burn up again, destroy all work and the van is going salvage yard
It's size is about PC hard drive
I also look all over web site and ebay to purchase the use ECM, but the code must be 100% match up,
sofar I have not luck yet.
Was this
answer
helpful?
Yes
No
+1
Saturday, June 13th, 2009 AT 4:46 AM
Tiny
KHLOW2008
  • MECHANIC
  • 41,815 POSTS
Here is the PCM identification.


https://www.2carpros.com/forum/automotive_pictures/192750_PCMConnector99Quest_1.jpg


There are no recommended PCM testing except by substituting. Sensors and circuits can be tested but not the PCM.
Was this
answer
helpful?
Yes
No
Saturday, June 13th, 2009 AT 10:07 AM
Tiny
VICAUTO2
  • MEMBER
  • 41 POSTS
Hi, I cleand up some and put ECM back it's place and hooked all connection, then plug scan OBD II scaned ECM, Scan read code P0340 as Camshaft position sensor A bank 1 Malfunction.
Engine still did not start, there was not ignition in spark plus,
I removed distributor cap and checked voltage in camshaft sensor, there are voltage present in three connector to the sensor, when key is on position,
I could not find ignition relay on quest, Do you know camshaft sensor held on tranaxle bellhousing.
I wonder why it've got this problem, Is it because removing EMC?
Any helps will be great. Thank you
Was this
answer
helpful?
Yes
No
+1
Saturday, June 13th, 2009 AT 8:29 PM
Tiny
KHLOW2008
  • MECHANIC
  • 41,815 POSTS
Removing the ECM should not cause any problem with the sensors. I would suspect a loose connection somewhere.


https://www.2carpros.com/forum/automotive_pictures/192750_P0340Quest99a01_1.jpg


https://www.2carpros.com/forum/automotive_pictures/192750_P0340Quest99a02_1.jpg


https://www.2carpros.com/forum/automotive_pictures/192750_P0340Quest99a03_1.jpg


https://www.2carpros.com/forum/automotive_pictures/192750_P0340Quest99aFig01_1.jpg


https://www.2carpros.com/forum/automotive_pictures/192750_P0340Quest99aFig03_1.jpg


https://www.2carpros.com/forum/automotive_pictures/192750_P0340Quest99aFig15_1.jpg


The sensor on the bell housing is known as crank sensor but for quest it is located at crank pulley side.
Was this
answer
helpful?
Yes
No
+1
Sunday, June 14th, 2009 AT 1:09 AM
Tiny
VICAUTO2
  • MEMBER
  • 41 POSTS
Hi, thank you quick responding, I removed ECM connection again and checked continuity the White No 3 on ditributor connector and ECM connector, There is only continuity on 48 pin on ECM, all the rest is none. I also checked continuity of orange wire, but got none. After that I put ECM Back it's place, Then test OBD II, It pass no and code, I also used MIL mode retrieve code, but it pass no code, no any sensor malfunction. But the engind is still not any ignition at all, I also checked distributor connector # 4, that connected to distributor, There is battery voltge on that, I hooked up light test to positve battery and light probe to ground in the plug and crank engine, the is not any spark. That could mean crank sensor. How do you think?
I used OBD II scaned ECM several time at difference hour, tried to deteted some thing in ECM, But no any code.
Bottom line is no spark was send to distributor, It could be crank sensor or ECM.
It is my home van, thus, I have to jack it up and craw underneat to find crank sensor, and test resistance. I don't know why ECM did not detect these thing, or it is bad.
Do you know what pin # on ECM connector to crank sensor I 'm goning to check the continuity from crank sensor and ECM connector.
Right now could not tell problem is distributor, because the no signal was send to the distributor connector. How do you think? Any help wiill be great.
Was this
answer
helpful?
Yes
No
+1
Monday, June 15th, 2009 AT 4:37 AM
Tiny
KHLOW2008
  • MECHANIC
  • 41,815 POSTS
When ECM is disconnected, faults would be erased and it would require some cranking ( 15 seconds) for the crank or cam sensors to register. Some codes needs the ignition to be turned off and on again to crank for them to register as they are require 2 trips to set the code.

Sorry I made a mistake when refering to the cranksensor location. It should be on the bell housing.


https://www.2carpros.com/forum/automotive_pictures/192750_P0335Crank99Quest01_1.jpg


https://www.2carpros.com/forum/automotive_pictures/192750_P0335Crank99QuestFig14_1.jpg

Was this
answer
helpful?
Yes
No
+1
Tuesday, June 16th, 2009 AT 8:25 AM
Tiny
VICAUTO2
  • MEMBER
  • 41 POSTS
Hi lhlow2008.
Thank you for your helps, the problem is still thumble around, I could find it yet, But I made little progress first time for whole week long, since I posted this problem on 2carpro, First time I found continuity for all connector as your instruction, White wire # 3 and oranged wire and black ground wire , included fan relay to ECM # 38. All have continuity.
I don't have much time work around my van, only a few hour a day after got off from work, exception on satuday and sunday consume more hour on the van, giving me some more time work around, I will find problem and let you know How thing is going on, the changlen is still ahead, I'm honestly, not very top guy on mechanic, whole week long could fix problem, humble learining, Thank you
Was this
answer
helpful?
Yes
No
+1
Tuesday, June 16th, 2009 AT 7:54 PM

Please login or register to post a reply.

Sponsored links