Hi guys. I've done this repair a number of times and I'm real familiar with it, so I had to stick my nose in here. Ken is right about the ignition switch. This switch design had a real common problem because in most applications it was required to do a lot of work. The heater fan motor and radio are on the same circuit, along with power windows if you have them.
The ignition switch actually has three or four individual switches built into the assembly. The switch for engine running, and the switch for engine cranking are separate from this problem. What happens is the switch section for the accessory systems all come through the part that develops overheated contacts. One of the first symptoms can be the cassette player appears to change directions when both power windows are rolled down and bottom out at the same time. It's not really changing directions. It just sounds like it is because the defective switch drops so much voltage, what's left to feed the radio is misinterpreted as you turned the ignition switch off. In response, the tape player makes a loud click as it retracts the head and pinch rollers. It resumes playing when the window switches are released.
This problem occurs at higher mileages, such as what you listed, but it will occur much sooner for people like my mother who leave the heater fan on the higher speeds when the ignition switch is turned on or off. The fan motor draws really high current. That high current causes arcing on the switch contacts, and that leads to the burned or pitted contacts. That pitting causes resistance, and that causes heat buildup. Excessive heat leads to more overheating and more resistance until it gets hot enough to melt the connector body.
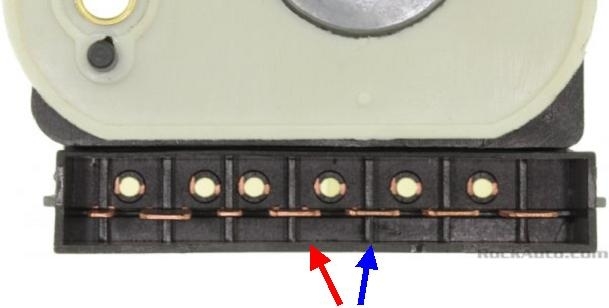
The only proper repair is to replace the ignition switch and the connector terminals. The old terminals are incapable of developing a solid connection. If they are not replaced, the terminals will now develop the excessive heat. That will migrate into the new switch and start the problem occurring again. You must replace the terminals along with the switch.
Since only two terminals will be black or discolored, my repair is to cut out those two terminals along with the melted part of the plastic connector body. Reconnect the plug that way, then use a pair of universal crimp-type terminals on the two affected wires. You'll find those wires are hardened for the first four inches, from the heat. Solder won't adhere to those sections. Cut that four inches off, then splice and solder in two new pieces of the same gauge. Seal the splices with heat-shrink tubing. Don't use electrical tape as that will unravel into a gooey mess on a hot day. Crimp the new terminals onto the wires, but solder them too to ensure a solid connection, then plug them in individually through the cut-away part of the connector body.
This is one of the few times I suggest not using a salvage yard part for two reasons. The first is all of these will develop this problem eventually. You don't want to go through all this work, then find out you have the same problem. The second is there were at least three versions of this switch. The difference has to do with the key cylinder. All three versions of this switch can be used in any of their applications, but only if you take the key cylinder and matching key with it. If you get the right switch for your model, it's a real easy task to transplant your cylinder, then you can keep your old keys.
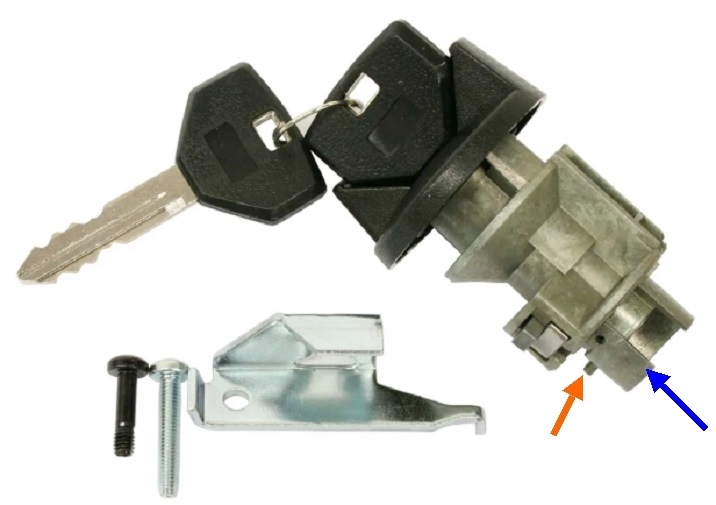
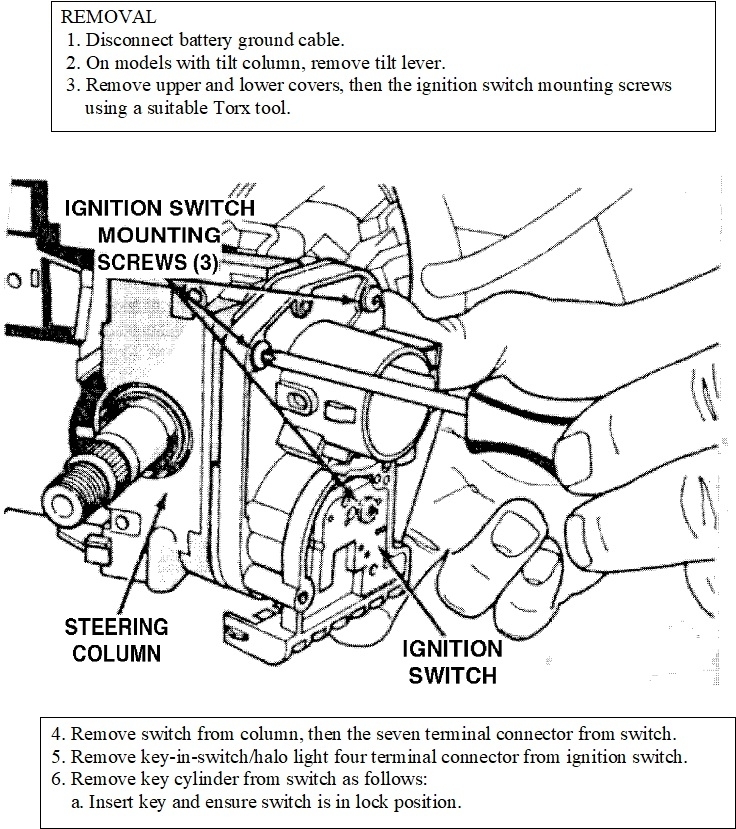
It seems most Jeep models share their own version of this switch and cylinder. One version has what looks like a "T" on the end of the cylinder that mates with a slot in the switch. I can't remember what the third version looks like. The more common version has a ring with a notch that mates with a notch in the switch. That switch is shown in the second photo, and the cylinder is shown in the third photo. This design has another common problem you might want to be aware of. The blue arrow is pointing to an area at the end of the ring that can crack off. The symptom will be everything else works normally, but you can't turn the key quite far enough to engage the starter. If you know what's happening, you can turn the switch to "run", then jumper the starter relay under the hood or remove its cover, then squeeze the movable contact to crank the engine. If you have the tools to remove the cylinder, you can use a large flat-blade screwdriver to turn the switch to "crank".
The dealer's parts department has a repair kit for this so you don't have to replace the cylinder or have a new cylinder recoded to use your old keys that match the door locks. The original ring is set over a keyed shaft, then the end of the shaft is peened over. You cut that ring off, then slide on the new one from the repair kit. That replacement ring is held on with a small roll pin. First you use the holes in the new ring as a guide to drill through the shaft. Slide the new ring on, then tap in the roll pin. That roll pin is shown by the orange arrow. It hasn't been tapped all the way in yet.
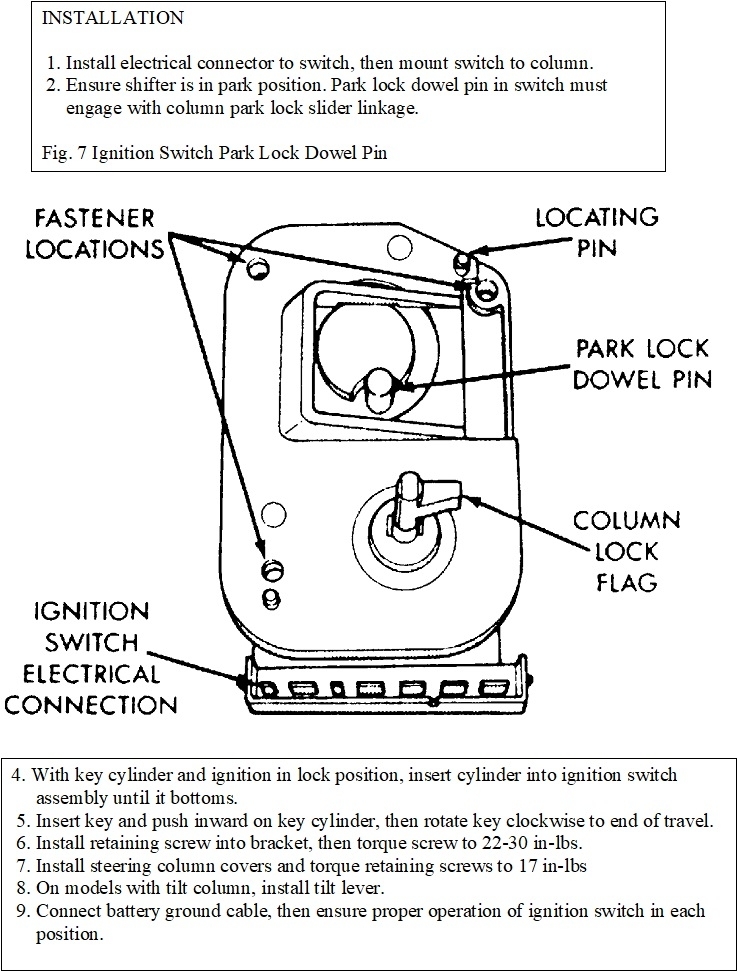
Drawings four through seven show the steps to remove the ignition switch. It includes removing the cylinder from the old switch, to which I must add a couple of comments. In the fifth drawing, they show the roll pin that must be pressed in to release the cylinder. It isn't always as easy as that. Sometimes you have to wiggle and twist it gently before it understands you want it to come out. This only adds a few seconds to the job, but it can put you into a panic the first time it doesn't work right away. The key has to be in the cylinder to do this. For my last comment of value, in the last drawing, step 5, they tell you to turn the ignition switch to the "crank" position, but they don't tell you why. Doing that pushes the roll pin out to its retaining position to lock the cylinder in place.
Images (Click to make bigger)
Saturday, October 1st, 2022 AT 12:45 PM