2002 Mercedes Benz C320

Tiny
SYKEONE
  • MEMBER
  • 2002 MERCEDES BENZ C320
2002 Mercedes Benz C320

Hello, I have a problem that I hope someone can help me with. I snapped the drive belt in my 2002 C320. If I bought the belt myself, how difficult would it be to install the new one by myself? I called the Mercedes dealer and they quoted me at 98$ for the labor to do the install but the nearest dealer is an hour away and theres no way im going to have my car towed all the way there.
Friday, January 23rd, 2009 AT 6:24 AM

7 Replies

Tiny
GFIMOTORCARS
  • MECHANIC
  • 673 POSTS
The folowing is the belt routing diagram. Note the automatic belt tensioner. This is how you will remove and place pressure on the new belt. To releive pressure on the belt so that it can be installed use a 17mm wrench on the tensioner nut. If the belt is correctly routed this will be the last thing you do for installation. Also a good trick is to start at the harmonic balancer, and work your way to the tensioner so that it is the last thing you put the belt on.


https://www.2carpros.com/forum/automotive_pictures/294900_112_belt_routing_1.jpg

Was this
answer
helpful?
Yes
No
+4
Saturday, January 24th, 2009 AT 11:17 AM
Tiny
SYKEONE
  • MEMBER
  • 4 POSTS
Thank you for the help. This doesn't seem very difficult to do at all. About how long would it take to do the install and would a wrench be the only tool I need for the install?
Was this
answer
helpful?
Yes
No
Saturday, January 24th, 2009 AT 8:08 PM
Tiny
GFIMOTORCARS
  • MECHANIC
  • 673 POSTS
You can use a wrench or socket and ratchet. I would recommend using a longer (maybe 12-15" long) ratchet with a socket. The extra length will give you more leverage making it easier to take the tension off the tensioner. This will only take a few minutes to put on. Just follow my instrustions and pay close attention to the belt routing on the diagram and you will be set. The automatic tensioner will take care of everything else once the belt is installed on the pullys.
Was this
answer
helpful?
Yes
No
Sunday, January 25th, 2009 AT 10:45 AM
Tiny
SYKEONE
  • MEMBER
  • 4 POSTS
I dont have to drop the engine do I? Or can I go straight to work under the hood?
Was this
answer
helpful?
Yes
No
Sunday, January 25th, 2009 AT 1:44 PM
Tiny
GFIMOTORCARS
  • MECHANIC
  • 673 POSTS
No you don't need to really do anything, maybe just remove the front half of the top enigne cover (black cover with MB star on it). Just pull up on it and it will come out of it's snaps. This will give you some room for the top pullys. Just be aware that you don't hit the radiator with your ratchet but other than that just route the belt correclty and pull on the tensioner to get the belt to slip on fully. Make sure the belt is lined up properly on the pullys (not hangin off any edges) and the release the tensioner. Also if you are having trouble getting to the harmonic balancer or any of the lower pulleys, remove the black belly pans on the under side of the front of the vehicle. This will require an 8mm socket. After you remove this you will have full access to the lower part of the motor. Please let me know if you need any further assistence. Thanks for using 2carpros. Com
Was this
answer
helpful?
Yes
No
+1
Sunday, January 25th, 2009 AT 3:43 PM
Tiny
SYKEONE
  • MEMBER
  • 4 POSTS
Thanks for the help, I routed the belt with no problems. But now I have a new problem, the belt tensioner needs to be replaced. It has a dent and it spins wobbly and eventually gets stuck, causing slippage on my belt. I'm already looking into buying the part today. Can you help me with replacing the tensioner?
Was this
answer
helpful?
Yes
No
Saturday, January 31st, 2009 AT 12:20 PM
Tiny
GFIMOTORCARS
  • MECHANIC
  • 673 POSTS
Here's how to replace the tensioner:

Tools you will need:
Standard Ratchet
17mm socket
10mm socket
Set of Torx sockets
Torque wrench (needs to be able to torque to 25ftlbs)
Anti Seize

1. Remove the electric fan assembly.
A. disconnect electrical connector for fan located on one bottom corners, drivers side I believe(1 connector only)
B. On the top of your radiator support (cross section that has your headlights, fan and radiator mounted to it) you should see at each corner of the fan assembly mountings that hold the fan onto the support, they should be 10mm bolts. Remove them.
C. Your fan should be loose from the vehicle. Carefully pull it out paying attention to your coolant hoses and transmission cooler lines going into the radiator. This will be a tight fit (but is possible with the right force)to get out but if you are having trouble you will need to disconnect one of the transmission cooler lines to make it a little easier. (the transmission line is a steel line , like a brake line, that goes into the side of your radiator. They are usually mounted on the passanger side of the radiator. There will be one at the bottom of the radiator and one about mid way up the radiator. If you cannot get the fan assembly out remove the middle trans line off the radiator, there is a fitting at the radiator on the line that you will loosen. You will loose a little trans fluid but if you plug it it's not enough to cause any trans problems if your fluid is at th proper level.

2. Now with the fan out you will remove your belt.

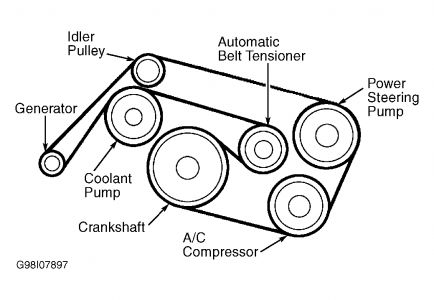
3. Now get a look at the tensioner and note a hole a little smaller than a pencil on the bottom (item #6 on the diagram Drift Pin) You will need to put a a nail (2 inch nail for woodworking will work)in this hole while turning the tensioner like you are relieving pressure off the belt. This hole will line up with another hole when tension is take completely off the tensioner. Once these holes line up put your nail through them. This will hold the tenisioner in place so that you can access the tensioner mounting screws behind them. (Note your new tensioner will already have the pin installed)


https://www.2carpros.com/forum/automotive_pictures/294900_112_Belt_Tensioner_1.jpg


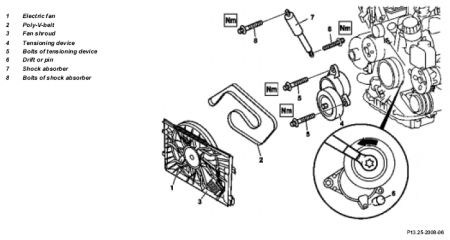
4. To remove the 2 bolts holding the tensioner on you will need a set of Torx sockets. You can purchase these at most autoparts stores for a 5-10 bucks and they are extremely useful and necessary if you plan on working on your MB in the future.

5. Be easy!!! A very important note! This tensioner is mounted to an aluminum front timing cover and can strip very easy if you over tighten bolts! If this gets stripped you will be looking at a good $1000 to replace. Not to scare you but to emphasize the importance of proper torque on this repair. So when removing do not use air tools (no air ratchet) use a standard ratchet. Also make sure you have a torque wrench that can torque 25ft lbs (available at auto parts stores for around $50-100.)

6. Now remove the two mounting bolts with your torx socket and standard ratchet.

8. Once removed the tensioner will come right off.

9. When reinstallting it is a good idea to put a dab of anti sieze (available at auto parts stores) on your bolt threads. This prevents the steel bolt from pulling the aluminum threads.

10. When starting the bolts run them down as far as you can by hand making sure not to cross thread. Then torque them to 25 ft lbs (no more). Once torqued you can remove the drift pin installed on the new tensioner. Now reinstall the rest of your components in reverse order.

If you need anything further just let me know.
Was this
answer
helpful?
Yes
No
Saturday, January 31st, 2009 AT 1:48 PM

Please login or register to post a reply.

Sponsored links