Rich Let me say right off the bat, I am not an Isuzu mechanic, but here's the proceedure by the book:
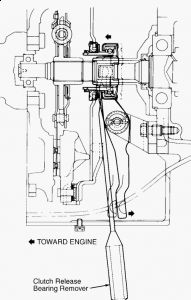
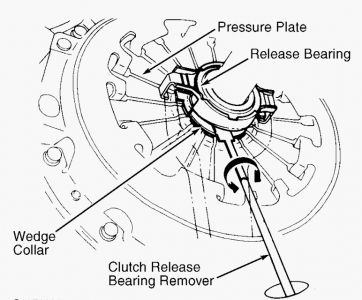
Inspection 1. Check clutch disc for loose rivets or springs. Discard disc if burned, worn or damaged. Ensure clutch disc hub slides smoothly on input shaft splines. Check clutch lining thickness. Original lining depth is .063" (1.6 mm). Minimum lining depth is .008" (.20 mm) above rivet heads. 2. Measure clutch disc runout at outer edge with dial indicator. Maximum runout is .039" (1.0 mm). Check friction surfaces of flywheel and pressure plate for scoring, roughness, heat cracks or distortion. Replace flywheel and pressure plate if surface is deeply scored. 3. Measure pressure plate thickness. Standard thickness is .39" (1.0 mm). Using straightedge and feeler gauge, check pressure plate friction surface flatness in at least 4 directions. Maximum limit is .012" (.3 mm). On models with clutch release fork, inspect release lever ball socket, release bearing contact face and ball retaining spring for damage. Spring must hold release lever tightly to ball stud. 4. Check contact areas of release bearing and release fork for excessive wear. Rotate release bearing and shift collar to check for noise or roughness. Inspect return spring and release bearing spring for wear. Installation 1. Lubricate ball stud and install release fork, if equipped. Lubricate shift collar. Assemble release bearing, shift collar, release fork, and retaining springs. Using clutch aligner, install clutch assembly into original position. 2. Tighten bolts evenly in diagonal pattern to specification. See TORQUE SPECIFICATIONS . Lubricate input shaft splines and release bearing contact surfaces with molybdenum grease. 3. Operate transmission jack to position transmission at same level as engine. Mate transmission to engine and install engine-to-transmission bolts. Pull firmly on clutch release fork to engage release bearing to pressure plate. A click should be heard indicating release bearing is engaged. Reverse removal procedure to complete installation. Adjust clutch pedal and replace fluids.
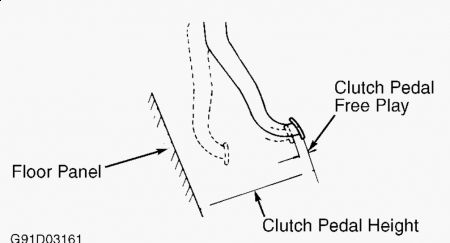
CLUTCH PEDAL FREE PLAY Hydraulically Operated Clutch pedal free play is self-adjusting. CLUTCH PEDAL HEIGHT Hydraulically Operated 1. Loosen clutch master cylinder push rod lock nut. Rotate push rod until clutch pedal height (from floor panel) is within specification. See CLUTCH PEDAL HEIGHT & FREE PLAY . Tighten lock nut after adjustment. See Fig. 1 . 2. On models with cruise control, rotate clutch switch until plunger is fully retracted against clutch pedal arm. Back switch out 1/2 turn and tighten lock nut. On models without cruise control, turn clutch pedal adjusting bolt until it contacts clutch pedal arm.

SPONSORED LINKS
Thursday, November 26th, 2009 AT 10:06 AM


