How to replace lower ball joints on passenger front side

Tiny
STEVE81888
  • MEMBER
  • 2002 ISUZU RODEO
  • 2.2L
  • 4 CYL
  • 2WD
  • AUTOMATIC
  • 163,000 MILES
I have been searching everywhere and can not seem to find the answer. What are the steps involved in replacing a lower ball joint on the passenger side of my car? Any help will be greatly appreciated! Thanks!
Friday, March 24th, 2017 AT 7:13 PM

4 Replies

Tiny
CARADIODOC
  • MECHANIC
  • 33,752 POSTS
You need a copy of a service manual for that. That will have pages of instructions with line drawings and torque specs. A better alternative is to work alongside a mentor who can point out the tricks we use to avoid causing problems.

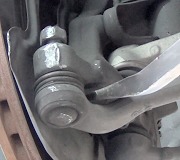
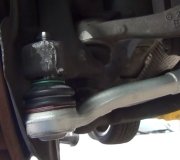
Specifically, your vehicle uses ball joints that are bolted to the control arms. Most of the time the originals are riveted in place, and cutting those rivets off can be a real frustrating and time-consuming affair.

Have you ever performed repairs on suspension systems before? Are you aware of jacking, supporting, and other safety concerns? Do you have tools to loosen the tapered studs on the ball joints? Are you doing the uppers or lowers? Once I have an idea of your skill level, I will offer advice and suggestions. If you check first to see if rivets have to be removed, you will either need a heavy-duty air chisel, or an angle grinder and an air hammer. If the old joints are bolted in, your life is going to be a lot easier.
Was this
answer
helpful?
Yes
No
Friday, March 24th, 2017 AT 7:34 PM
Tiny
STEVE81888
  • MEMBER
  • 2 POSTS
It is the lower ball joints, the old joints are bolted in and I have replaced brakes and wheel bearings but nothing in the suspension.

Also I have a jack and know how to use it and tools.
Was this
answer
helpful?
Yes
No
+1
Friday, March 24th, 2017 AT 7:53 PM
Tiny
STEVE W.
  • MECHANIC
  • 13,003 POSTS
Basic process is to jack it up, pull off the tire. Then place the jack stand so that the vehicle is supported, and put the jack under the A arm you are working on, you want to jack it up just enough that the upper arm is off the stop by 2" or so. It has to drop to let the knuckle drop off the ball joint stud. Remove the tire rod end from the knuckle. Now remove the nut on the ball joint stud, flip it and put it back on, hit it with a good sized hammed to break it loose from the knuckle. Remove the nut. Remove the 4 bolts holding the joint to the lower A arm. Remove the joint. Reverse to install. Tighten the new ball joint bolts to 85 ft. Lb. Tighten the stud through the knuckle to 108 ft. Lb. And tighten as needed to line up the cotter pin holes. Reinstall the tie rod end. Torque it to 87 ft. Lb.

I have done these without taking the tie rod off. Now you should take it for an alignment.
Was this
answer
helpful?
Yes
No
+4
Saturday, March 25th, 2017 AT 2:57 AM
Tiny
KEN L
  • MASTER CERTIFIED MECHANIC
  • 42,968 POSTS
Great Answer Steve!
Was this
answer
helpful?
Yes
No
Tuesday, March 28th, 2017 AT 12:06 PM

Please login or register to post a reply.

Sponsored links