Fuel line leak

Tiny
CHYANNE SHERIFF
  • MEMBER
  • 2013 FORD FOCUS
  • 2.0L
  • 4 CYL
  • 4WD
  • AUTOMATIC
  • 200,000 MILES
Will show video. I was told that the mechanic would have to drop gas tank to repair. The gas is coming from hard plastic tube on left under the metal part that you see. Another mechanic believes he could fix it by putting some epoxy for 12 hours and Ford dealer said it does not come apart and I would to have buy the whole part which means drop the gas tank. No one has visually seen the part except the one that said he could fix with epoxy. Thank you
Wednesday, October 7th, 2020 AT 2:13 PM

19 Replies

Tiny
KASEKENNY
  • MECHANIC
  • 18,907 POSTS
Due to this being a fuel leak I would not trust an epoxy fix. It could work but there are two systems on the vehicle that I don't try a repair like this and that is brakes and fuel systems.

Is there a way that you can get a better picture of where this is and we will have a better idea on possible replacement parts. Is this on top of the fuel tank?
Was this
answer
helpful?
Yes
No
+1
Wednesday, October 7th, 2020 AT 3:24 PM
Tiny
CHYANNE SHERIFF
  • MEMBER
  • 85 POSTS
No, this is in the engine bay near the battery and fuses under the hood on the drivers side. Is the fuel tank in the back of the car?
Was this
answer
helpful?
Yes
No
+1
Wednesday, October 7th, 2020 AT 4:26 PM
Tiny
KASEKENNY
  • MECHANIC
  • 18,907 POSTS
Yes. That is correct. So just to be sure, this is even more of a reason we need to replace the component or repair it in a better way then epoxy. A fuel leak by the battery and fuses in the engine bay is dangerous.

Just so I am clear, how are we not able to see where it is leaking? When you run the vehicle does it not leak every time or is this intermittent?
Was this
answer
helpful?
Yes
No
+1
Wednesday, October 7th, 2020 AT 7:30 PM
Tiny
CHYANNE SHERIFF
  • MEMBER
  • 85 POSTS
The leak is coming from the hard plastic tube attach to the yellow part. The tube is under the metal part of the image. It leaks every time the vehicle runs. I will try and send a video tomorrow.
Was this
answer
helpful?
Yes
No
Wednesday, October 7th, 2020 AT 8:33 PM
Tiny
KASEKENNY
  • MECHANIC
  • 18,907 POSTS
Okay. I think I understand. The video of it dripping will help. However, take a look at the picture. This line that I am pointing at? Is it number 1 or 2 or somewhere else?

Also, can you get a picture a little further away so we can orient where this is in the engine? Or if that is part of the video, that is fine. Thanks
Was this
answer
helpful?
Yes
No
+1
Thursday, October 8th, 2020 AT 6:11 PM
Tiny
CHYANNE SHERIFF
  • MEMBER
  • 85 POSTS
It is number one. It is plastic and has cracked. It is not a bad leak and it is hard to see when it drips. The part in the image looks just the part that is showing on the car. The Ford dealer says I need the whole tube assembly and have to drop the gas tank. The part number is BV6Z-9J280-A. He could not tell me where the part went on to. Thank you.
Was this
answer
helpful?
Yes
No
Friday, October 9th, 2020 AT 8:52 PM
Tiny
CHYANNE SHERIFF
  • MEMBER
  • 85 POSTS
Here is the video and picture of the part:
Was this
answer
helpful?
Yes
No
Friday, October 9th, 2020 AT 8:56 PM
Tiny
STEVE W.
  • MECHANIC
  • 13,001 POSTS
Shouldn't need to drop the tank unless the rear line is rusted really bad. There is a quick connect fitting down on the tube just past the protection plastic. You would release the fuel pressure then use a release tool to push the spring in and release the fitting. Put a dab of oil on the new one and snap it into place then push the upper fitting (where the crack is) into place. The image should show that short line at the end of the system circled.
Was this
answer
helpful?
Yes
No
+1
Saturday, October 10th, 2020 AT 6:47 AM
Tiny
CHYANNE SHERIFF
  • MEMBER
  • 85 POSTS
What type of release tool do I need to get? Thank you
Was this
answer
helpful?
Yes
No
Saturday, October 10th, 2020 AT 7:22 AM
Tiny
STEVE W.
  • MECHANIC
  • 13,001 POSTS
For the spring lock the tools look like those pictured, there are several makers of them, there are also ones like the second image that have the release tabs on an X frame and you pick which end and size you need, those work but in tight spots they get stuck and cause problems. If you wanted to have most types of the disconnects you can get sets like the last pic as well. But unless you plan on working on multiple cars it may not be worth the money.
Was this
answer
helpful?
Yes
No
+1
Saturday, October 10th, 2020 AT 3:16 PM
Tiny
CHYANNE SHERIFF
  • MEMBER
  • 85 POSTS
Thank you so much for your help. Have a great day!
Was this
answer
helpful?
Yes
No
Saturday, October 10th, 2020 AT 4:02 PM
Tiny
DANNY L
  • MECHANIC
  • 5,648 POSTS
Hello, I'm Danny.

Just here to add my 2 cents. I've attached two pictures below of images I captured from the video you made. These are the ends of the replacement hose disconnect locations and I circled in red. On the metal end there is a clip on lock that will be needed to be removed before separating the line. Sometimes you can just use your fingers to remove, If not a screwdriver will work. Hope this helps and keep us updated. Thanks again for using 2CarPros.
Was this
answer
helpful?
Yes
No
+1
Saturday, October 10th, 2020 AT 7:27 PM
Tiny
CHYANNE SHERIFF
  • MEMBER
  • 85 POSTS
Hi, did you see the image of the part that is being replaced? I will still have to remove it from the tube that it is attached to. See Steve's image. I knew about the first image circled in red but I thought the next step was to disconnect from the tube that is after the second image circled in red. That is the end part on the image above on the replacement part. Are you saying that I can just disconnect it from the second image in red and not have to bother with the end piece on the tube? Thank you
Was this
answer
helpful?
Yes
No
Sunday, October 11th, 2020 AT 8:05 AM
Tiny
STEVE W.
  • MECHANIC
  • 13,001 POSTS
It will have a connection on both ends. The lower one has the clip on it. They look like the attached images. The clip comes off then the tool slips onto the tube to release the fingers you see in the second image. I like to use some spray cleaner and some wd or similar in there to flush out any rust or dirt and help the tool work. Then as you put the tool in push the connecter onto the tube like you are installing it, that helps release the clips. Once you have it off some scotch brite to clean off the tube and allow the ring to seal better is a good idea. On the opposite end of the line where it connects to the fuel rail will have a different connection, it uses a clip like the third image, that white insert snaps in and holds the fitting to the rail. You can buy just that connector if it is the only failed part, but I can't see if it's the only thing leaking.
Was this
answer
helpful?
Yes
No
+1
Sunday, October 11th, 2020 AT 11:03 AM
Tiny
CHYANNE SHERIFF
  • MEMBER
  • 85 POSTS
Okay, I get the part where clip is off and tool releases fingers, do I spray the tool or inside the fingers? Then put the tool in what? And push the connecter. What connector? Once I have it off. What off? Do I need to get a new ring? Am I installing the replacement part or removing the old?
Was this
answer
helpful?
Yes
No
Sunday, October 11th, 2020 AT 1:02 PM
Tiny
STEVE W.
  • MECHANIC
  • 13,001 POSTS
First you remove the clip in the first picture, then spray up inside the end of the connector in the second pic to clean out the area where the tool goes. The tool goes around the tubing and slides up inside the end of the connector to release the fingers inside it.
This video shows removing the same type of connector using those tools. Not the same vehicle but using the same Ford connectors.
https://www.youtube.com/watch?v=wi6kzRjk5to
Once released the line will just pull free and you simply clean up the ends of the lines and push the replacement line into place. The new line will have the proper O-rings in it and just snaps into place. The safety clip snaps back on and you snap the top connector on.
You just need to buy the new part first.
Was this
answer
helpful?
Yes
No
+1
Sunday, October 11th, 2020 AT 3:28 PM
Tiny
CHYANNE SHERIFF
  • MEMBER
  • 85 POSTS
Hi, just got the part and it is the same part. I don't know how to release the pressure. Would you know how much the dealership would charge for this? Thank you.
Was this
answer
helpful?
Yes
No
Monday, October 19th, 2020 AT 1:20 PM
Tiny
STEVE W.
  • MECHANIC
  • 13,001 POSTS
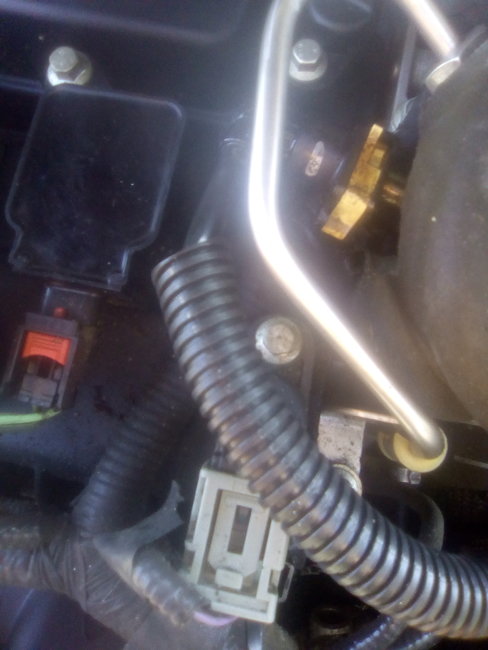
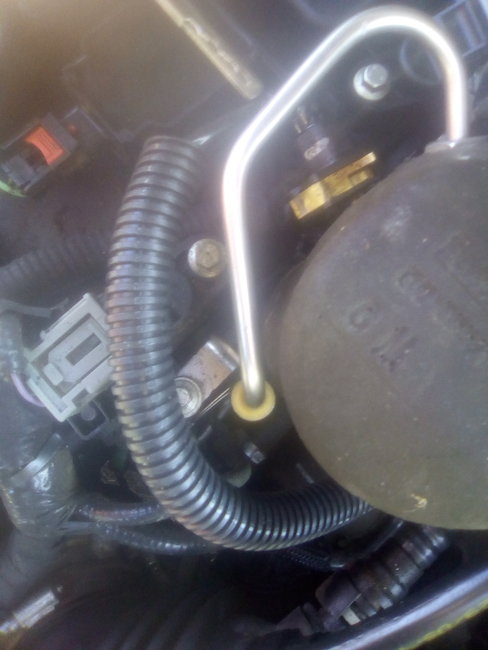
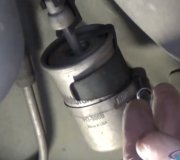
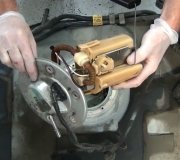
Releasing the pressure is easy, you go under the dash on the passenger side and release the trim panel under it. There will be a module under it which has the fuses on it. Remove fuse number F56. That is the fuel pump module power. With the fuse out start the engine, you will get a warning on the dash about servicing the car, ignore it at the moment. Run the engine until it stalls out. Now use the key to crank the engine another 20 seconds or so to be sure the pressure is gone. Then remove and replace the line. Reinstall the fuse and use the OK button on the dash to cancel the warning message. Turn the key on wait 5 seconds, repeat that about 3 times and try to start the engine. It may take a few cranking revolutions to purge air and get fuel back to the injectors. Check the new line for any leaks, if there are none, Reinstall the trim cover. For the upper quick release you can look at the new part and see the tabs shown in the third image, those pull up and out some to release that coupler. Then it pulls off the line.

As for what a shop would charge, it depends on the shop, it isn't a hard job to do but most would probably get at least their base charge and 1/2 hour of labor.
Was this
answer
helpful?
Yes
No
+1
Monday, October 19th, 2020 AT 2:27 PM
Tiny
DANNY L
  • MECHANIC
  • 5,648 POSTS
Hello again.

I've attached fuel pressure release picture instructions below. Hope this helps and thanks again for using 2CarPros.

Danny-
Was this
answer
helpful?
Yes
No
+1
Monday, October 19th, 2020 AT 2:57 PM

Please login or register to post a reply.

Sponsored links