KNUCKLE
CAUTION:DO NOT begin procedure unless new hub nut is available. Once removed, nut should not be reused as its torque holding ability is greatly reduced.
Removal
Raise vehicle. Remove wheel and tire assembly. Remove and discard hub nut and washer. Pull parking brake release lever while also pulling on cable. This will give cable enough slack to be removed from caliper or backing plate. Remove cable from caliper (disc brakes).
Remove both caliper bolts. Remove caliper, and wire it aside so brake cable is not stretched or damaged. Remove push-on nuts, and remove brake rotor or drum. Disconnect parking brake cable and brake line from wheel cylinder (drum brakes).
Remove upper control arm nut and bolt. Wire upper control arm to body. Using Hub Remover (T81P-1104-C), remove hub from half-shaft. With upper control arm bolt removed, lower control arm bushings are in relaxed or unloaded position. Mark control arm-to-knuckle relation for installation reference. See Fig. 2 .
If knuckle is being replaced, measure and record distance between upper bushing and any convenient point on vehicle body. Remove lower control arm-to-knuckle bolts and nuts. Remove knuckle assembly from axle shaft.
Fig. 2: Marking Control Arm for Installation Reference
Courtesy of FORD MOTOR CO.
Installation
Place hub and knuckle assembly on half-shaft and install lower control arm-to-knuckle bolts and nuts. Align index marks on control arm with marks on bushing. If new knuckle is being installed, set to measurement obtained during removal procedure.
Install upper control arm attaching bolt and nut. Tighten bolt and nut to specification. Install new hub nut and washer. Install splash shield (disc brakes). Tighten 3 retaining bolts to specification. On drum brakes, attach brake line to wheel cylinder, and install parking brake cable.
On all models, install rotor or drum and new push-on nuts. Install caliper. Tighten bolts to specification. Install parking brake cable. Adjust as necessary. Bleed drum brakes. Install wheel and tire assembly. Lower vehicle, and tighten hub retainer nut to specification. See TORQUE SPECIFICATIONS TABLE at end of article.
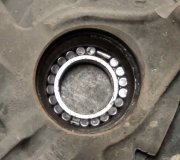
WHEEL BEARINGS
Removal
Remove knuckle and hub assembly. See KNUCKLE. Place knuckle and hub assembly in vise. On drum brakes, remove linings, springs and adjuster. Remove 4 bolts holding backing plate to knuckle.
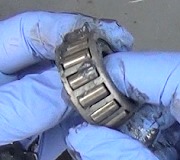
On all models, press hub out of knuckle assembly using a 3-jaw puller and Step Plate (D88L-1037-A). See Fig. 3 . Remove backing plate. Remove bearing retainer snap ring. Place bearing and knuckle assembly on press using Hub Support (T-89P-1104-A), and press bearing out.
Fig. 3: Removing Wheel Bearing (Typical)
Courtesy of FORD MOTOR CO.
Installation
Place knuckle assembly on press bed. Using Bearing Installer (T-86P-1104-A3), press in new bearing. See Fig. 4 . Install snap ring. Place backing plate on knuckle, and install 4 retaining bolts. Tighten backing plate bolts to 44-59 ft. lbs. (59-80 N.m).
Position hub on Spacer (T-83P-1104-AH3) with lugs facing down. Place hub and spacer on press bed. Place knuckle assembly on hub with outboard side facing down. Press down on Bearing Remover (T-83P-1104-AH2) until bearing is fully seated. Hub should rotate freely in knuckle.
Reinstall brake hardware on backing plate (drum brakes). Install new dust seal on outboard CV joint. Reinstall knuckle assembly on vehicle. Install wheel, and lower vehicle.
SPONSORED LINKS
Sunday, December 14th, 2008 AT 9:15 AM