Error code P1346

Tiny
S.BEARD
  • MEMBER
  • 2001 LEXUS RX 300
  • 3.0L
  • V6
  • 4WD
  • AUTOMATIC
  • 168,000 MILES
I have replaced the water pump, timing belt, tensioner and idler pulley. Check engine light comes on, code P1346 VVT sensor/camshaft position sensor circuit range/performance problem (bank 1). I've replaced the camshaft position sensor, bank 1, and the check engine light comes on again with the same error code. The car runs great, (except for the check engine light). Double checked timing marks and they are all aligned. I've cleared the codes a few times with the same results as mentioned.

What do you suggest?
Saturday, October 26th, 2019 AT 4:39 PM

25 Replies

Tiny
JACOBANDNICKOLAS
  • MECHANIC
  • 108,407 POSTS
Welcome to 2CarPros.

Take a look at picture 1. For this code, it indicates either a timing issue or ECM. If this wasn't an issue prior to the replacement of the belt, I suspect that for some reason, timing is off. I attached another picture. Is that where the timing marks are located with the engine cold?

Let me know.

Joe
Was this
answer
helpful?
Yes
No
+2
Saturday, October 26th, 2019 AT 11:12 PM
Tiny
S.BEARD
  • MEMBER
  • 13 POSTS
Yes, those are the locations of the timing marks that I used when I replaced the timing belt and related components. Would the engine run smooth if the timing was off? The engine runs very good, smooth.

I don't know if the 'check engine' light came on the day the water pump went out. The old water pump bearing was completely shot.

I suppose I should remove the timing covers and verify the timing marks positions.

How do I test the ECM?

Thank you.
Was this
answer
helpful?
Yes
No
+5
Sunday, October 27th, 2019 AT 10:39 AM
Tiny
JACOBANDNICKOLAS
  • MECHANIC
  • 108,407 POSTS
Welcome back:

If the engine is running that well, I suspect the timing is correct. However, VVT can be somewhat tricky. As far s the ECM, we will need to identify specifics as far as what we need to check. The ECM has a multitude of connector pins that need identified and then checked one at a time.
Was this
answer
helpful?
Yes
No
+6
Sunday, October 27th, 2019 AT 9:35 PM
Tiny
S.BEARD
  • MEMBER
  • 13 POSTS
What specifics are needed? I understand that it may be a bad connection, or contact or a bad contact crimp. Can you tell me where to start? What pins need to be identified?
Was this
answer
helpful?
Yes
No
+5
Monday, October 28th, 2019 AT 9:13 AM
Tiny
JACOBANDNICKOLAS
  • MECHANIC
  • 108,407 POSTS
Welcome back:

What I suggest first is to disconnect the ECM main harness and check it. Before you disconnect the ECM, first disconnect the battery and don't reconnect the battery until the ECM has been reconnected.

Inspect the ECM connections both at the plug and the ECM for damage, corrosion, or anything that can prevent a good contact.

Joe
Was this
answer
helpful?
Yes
No
+2
Monday, October 28th, 2019 AT 6:26 PM
Tiny
S.BEARD
  • MEMBER
  • 13 POSTS
Just to make sure, the ECM is what my manual calls the PCM. Engine Control Module vs Power Control Module. These are the same items, correct? Thank you.
Was this
answer
helpful?
Yes
No
+3
Friday, November 1st, 2019 AT 11:39 AM
Tiny
JACOBANDNICKOLAS
  • MECHANIC
  • 108,407 POSTS
Welcome back:

I have to assume yes. Your vehicle doesn't have a PCM, so I'm questioning what you are seeing. Older vehicles have an ECM which is responsible for some of the engine controls. Newer vehicles have a PCM which basically controls all of them.

If you look at the picture I attached, it is right from Alldata. Let me know if something is different than what you are seeing.

Joe
Was this
answer
helpful?
Yes
No
+1
Friday, November 1st, 2019 AT 9:44 PM
Tiny
S.BEARD
  • MEMBER
  • 13 POSTS
How do I access the ECM? If my Haynes manual is correct, it is located behind the glove box. Can you advise on how to remove the glove box, (if that is what is needed to access the ECM)? Thank you in advance.
Was this
answer
helpful?
Yes
No
+1
Sunday, November 3rd, 2019 AT 12:26 PM
Tiny
JACOBANDNICKOLAS
  • MECHANIC
  • 108,407 POSTS
Welcome back:

I attached a picture showing how it comes apart. Let me know if it helps.

Joe
Was this
answer
helpful?
Yes
No
+4
Sunday, November 3rd, 2019 AT 5:22 PM
Tiny
S.BEARD
  • MEMBER
  • 13 POSTS
Thanks, this was helpful. I was able to access the ECM connectors and mated / unmated them 4 or 5 times. My thought was that would have 'wiped' some oxidation from the contacts. I drove the car for 22 miles before the 'check engine' light came on. Where do I go from here? Thank you for any input.
Was this
answer
helpful?
Yes
No
+1
Tuesday, November 12th, 2019 AT 8:55 PM
Tiny
JACOBANDNICKOLAS
  • MECHANIC
  • 108,407 POSTS
Hi again:

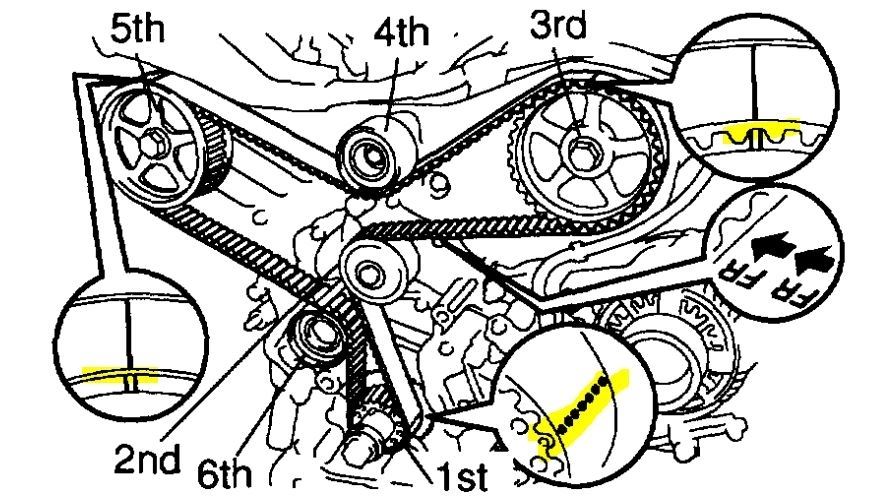
Is it the same code that returned? If it is, we know the code indicates a variation in VVT timing between the crankshaft and camshaft VVT sensor bank 1. I honestly suspect it is a mechanical issue such as a stretched timing belt. It is either a timing issue (stretched belt or off a tooth) or the ECM is bad.

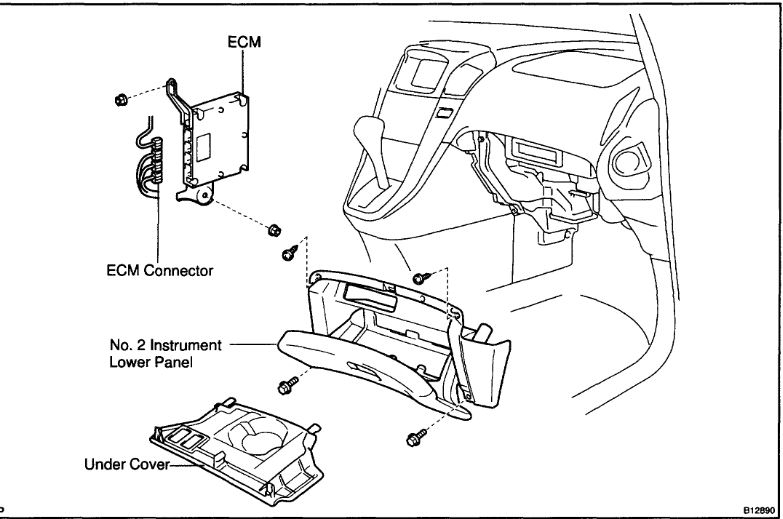
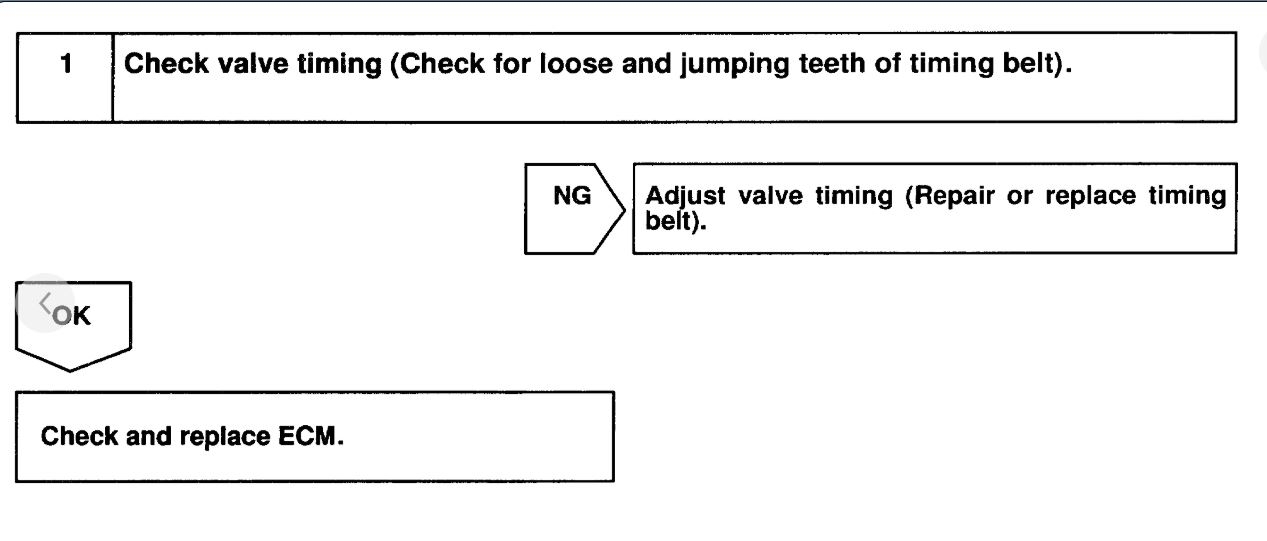
If you look at pic 1, it shows the flow chart for troubleshooting the problem.

In my mind, there is more than this. It could be an oil pressure issue not allowing the VVT actuator to function properly, a dirty or partially plugged timing oil control valve (one for each bank) or even dirty motor oil.

Before I suggest replacing the ECM or taking everything apart to check timing, I have one last suggestion. I would like you to check the timing oil control valves.

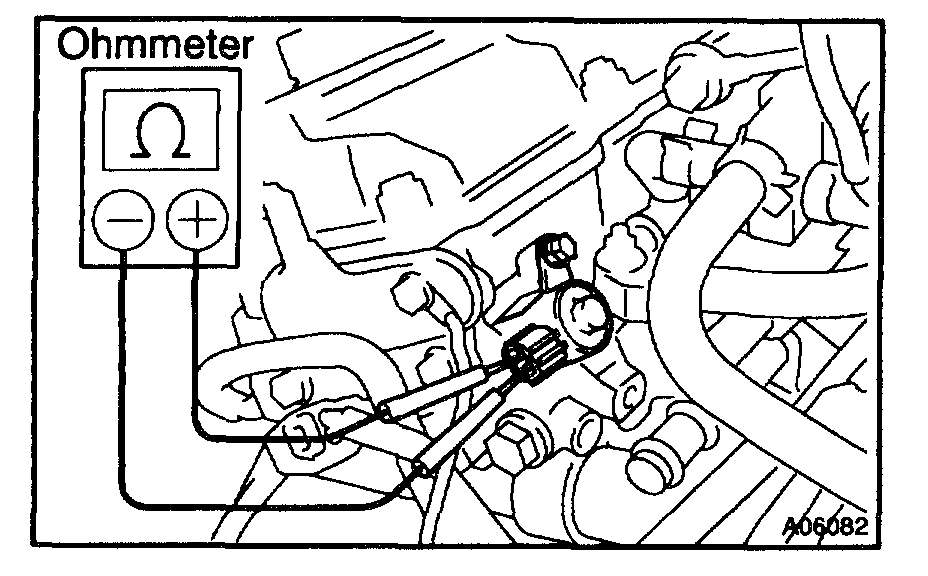
Here are the directions for testing them. Picture 2 correlates with these directions. All you are doing is checking resistance in the sensor itself.

__________________________________________

2001 Lexus Truck RX 300 AWD V6-3.0L (1MZ-FE)
On-Vehicle Inspection
Vehicle Powertrain Management Computers and Control Systems Variable Valve Timing Actuator Testing and Inspection Component Tests and General Diagnostics Camshaft Oil Control Valve On-Vehicle Inspection
ON-VEHICLE INSPECTION

pic 2

INSPECT OIL CONTROL VALVE RESISTANCE
a. Remove the V-bank cover.
B. Remove the intake air connector.
C. Disconnect the oil control valve connector.
D. Using an Ohmmeter, measure the resistance between the terminals.

Resistance: 6.9 - 7.9 ohms at 20 °C (68 °F)
If the resistance is not as specified, replace the valve.

E. Reconnect the oil control valve connector.
F. Reinstall the intake air connector.
G. Reinstall the V-bank cover.

________________________________________________

If you find the specs within the manufacturer's specs, we will then need to check the timing.

Let me know what you find. Also, sorry for all the different tests. However, I don't want to make a suggestion, be wrong, and do nothing but waste your money.

Take care,
Joe
Was this
answer
helpful?
Yes
No
Wednesday, November 13th, 2019 AT 5:38 PM
Tiny
S.BEARD
  • MEMBER
  • 13 POSTS
I will perform the test and report the results. Thank you for all the support.
Was this
answer
helpful?
Yes
No
Thursday, November 14th, 2019 AT 8:17 PM
Tiny
JACOBANDNICKOLAS
  • MECHANIC
  • 108,407 POSTS
Hi:

Sounds like a plan. I will watch for your reply. Let's hope it is one of the oil control valves. It will be much easier to deal with. LOL

Take care,
Joe
Was this
answer
helpful?
Yes
No
+1
Thursday, November 14th, 2019 AT 9:08 PM
Tiny
S.BEARD
  • MEMBER
  • 13 POSTS
The probes on my meter won't reach both contacts on the oil control valve. Is there any reason I can't test the control valve on the bench? (Remove the valve and test on the bench.) Please advise. Thank you in advance.
Was this
answer
helpful?
Yes
No
Monday, November 25th, 2019 AT 3:51 PM
Tiny
JACOBANDNICKOLAS
  • MECHANIC
  • 108,407 POSTS
Hi,

When checking resistance, you can remove it because all you are checking for is to see if there is a break down in the unit. The DMM (digital multi meter) supplies power.

Feel free to let me know if I can help. Also, if I don't hear from you, have a great Thanksgiving.

Take care,
Joe
Was this
answer
helpful?
Yes
No
+2
Monday, November 25th, 2019 AT 6:43 PM
Tiny
S.BEARD
  • MEMBER
  • 13 POSTS
Hi,
It is the same error code, P1346. I checked the resistance on the oil control valve and it is good. It measured 7.3 - 7.4 ohms. Do you suggest verifying the timing marks positions? I'm very confident I had them in the correct position when I replaced all those components. When I was doing that work, I wanted to be sure the timing marks were aligned because I didn't want to do all this work twice. Good plan, but maybe a poor execution. Is there a way to test the ECM? Please advise. Thank you in advance.
Was this
answer
helpful?
Yes
No
+1
Saturday, December 21st, 2019 AT 3:33 PM
Tiny
JACOBANDNICKOLAS
  • MECHANIC
  • 108,407 POSTS
If you are getting a signal from the ECM, it should be okay which leaves a few things. Based on the idea that it runs really well, I was leaning toward an ECM issue. If you made a mistake on the timing, it wouldn't be running as well as you described. Which only leaves a couple things, sensor, ECM, bad connection.

Have you checked the signal to the sensor?
Was this
answer
helpful?
Yes
No
+2
Sunday, December 22nd, 2019 AT 6:41 PM
Tiny
S.BEARD
  • MEMBER
  • 13 POSTS
Does the correct resistance from the oil control valve indicate a good signal from the ECM? I have replaced the bank 1 Cam Position sensor with a new one. I've exchanged the bank 2 Cam Position sensor with the original bank 1 Cam Position sensor. No change in error codes. I did not test the new Cam Position sensor before I installed it. Just to cover my bases, I will remove the new Cam Position sensor (bank 1) and bench test it.

I think it's a bad connection somewhere. The connectors I dealt with in replacing the water pump and timing belt and associated components were the grounding connectors, the cruise control connector and the air in-take connectors. Could any of these connections have an effect on this error code issue?

So this brings the question, is there a test I can perform to verify if the ECM is performing correctly? What am I looking for when checking the signal to the Cam Position sensor?

Please advise and thank you in advance.
Was this
answer
helpful?
Yes
No
+1
Sunday, December 22nd, 2019 AT 9:02 PM
Tiny
JACOBANDNICKOLAS
  • MECHANIC
  • 108,407 POSTS
Hi,

If you were checking ohms, that is different because the power was supplied via the multi meter simply checking resistance. I may have asked this already, but do you have a scanner that can provide freeze frame data? If so, read freeze frame data using an OBD II scan tool, because freeze frame records the engine conditions when the malfunction is detected, it will be useful for determining whether the vehicle was running or stopped, the engine was warmed up or not, the air-fuel ratio was lean or rich, etc. At the time of the malfunction. As far as checking the ECM, basically the directions indicate to check for an open or short in the wiring between the sensor and the ECM. If no problem is detected, replace the ECM.

Take a look at the flow charts I attached. See if anything helps.

Let me know.

Joe
Was this
answer
helpful?
Yes
No
+1
Monday, December 23rd, 2019 AT 9:41 PM
Tiny
S.BEARD
  • MEMBER
  • 13 POSTS
My code reader is a basic model and doesn't have a freeze frame option. I'll check the cost of a more advanced code reader and see if I can buy one. I'll let you know the results. I'm recovering from the holidays and just now getting time to work on this car again. Thank you in advance for the assistance.
Was this
answer
helpful?
Yes
No
+1
Monday, January 13th, 2020 AT 5:13 PM

Please login or register to post a reply.

Sponsored links