The only issue with removing the bed is rust. Often times the bolts break or won't come out. If you are able to remove them all, then it is simply of removing the fuel inlet tube from the side of the bed and wiring to the various components. Check out the diagrams (Below).
The bed will be quite heavy, so you will need help. Also, if you choose to do it this way, have somewhere to set the bed once it's off. You don't want to set it down on the bottom of the bed sides because it can bend, scrape or damage it in some way.
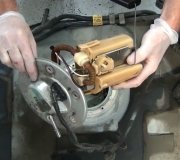
Once you have access, it is simply unbolting the fuel pump module from the top of the tank and removing the pump and float assembly. Once out, the pump needs to be removed from the module assembly. I attached a couple pics below of what you will see. In the first pic, I circled the actual pump.
If you decide to remove the tank, here are the directions. The attached pics correlate with the directions.
After tank removal, I included the directions for removing the bed. I'm not sure which way you want to go with it. If the truck doesn't have any rust issues, this may prove to be the easiest route.
REMOVAL
WARNING:
DO NOT SMOKE OR CARRY LIGHTED TOBACCO OR OPEN FLAME OF ANY TYPE WHEN WORKING ON OR NEAR ANY FUEL RELATED COMPONENT. HIGHLY FLAMMABLE MIXTURES ARE ALWAYS PRESENT AND MAY BE IGNITED, RESULTING IN POSSIBLE INJURY.
FUEL IN THE FUEL SYSTEM REMAINS UNDER HIGH PRESSURE EVEN WHEN THE ENGINE IS NOT RUNNING.
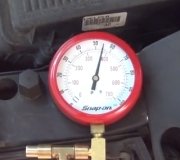
1. Relieve the fuel pressure.
2. Disconnect the battery ground cable. For additional information, refer to Battery.
3. Raise and support the vehicle; refer to Maintenance/Service and Repair.
4. If equipped, remove the fuel tank skid plate.
1 Remove the bolts.
2 Lower the fuel tank skid plate.
5. Drain the fuel from the fuel tank.
6. Remove one hose clamp on the fuel tank filler pipe support.
7. Disconnect the fuel tank to filler pipe hose from the fuel tank.
8. Disconnect the fuel tank filler pipe vent hose from the fuel tank.
9. Position a Hi-Lift Jack under the fuel tank.
10. Remove the fuel tank support straps.
1 Remove the bolts.
2 Remove the fuel tank support straps.
Partially lower the fuel tank.
11. Using the special tool, disconnect the fuel lines from the fuel sender.
12. Disconnect the fuel tank front connections.
Disconnect the Evaporative Emission (EVAP) hose (A).
Disconnect the fuel tank pressure transducer electrical connector (B).
13. Release the rear EVAP hose clamp and disconnect the hose.
14. Disconnect the fuel pump electrical connector.
15. Lower and remove the fuel tank.
INSTALLATION
1. To install, reverse the removal procedure.
Bed Removal
All vehicles
1. If equipped, roll up the tonneau cover.
Bi-fuel vehicles
2. Remove the bi-fuel tank.
All vehicles
3. Remove the fuel filler neck screws.
4. Disconnect the tail lamp harness electrical connector.
5. Disconnect the license plate lamps.
6. If equipped, unhook the trailer wiring harness electrical connector from the bumper.
7. Remove the fuel tank filler pipe to pickup bed bracket clamp.
8. Disconnect the rear axle vent tube from the pickup bed.
9. CAUTION: Use care not to scratch the pickup bed.
NOTE: The short pickup beds have six bolts and the long pickup beds have eight bolts.
Remove the bolts.
10. CAUTION:
- Use body decking protectors over the front corners of the pickup bed to prevent scratches.
- Lifting the pickup bed requires at least two people on each side.
Remove the pickup bed.
11. Inspect the J-nuts for damage; install new J-nuts if damaged.
12. Make sure the anti-squeak isolators are present and not damaged. Install new anti-squeak isolators if damaged.
13. To install, reverse the removal procedure.
As far as removing the fuel from the tank, you will need to use some safe form of transfer pump on this one. There is no drain.
Check out the diagrams (Below). Please let us know what happens.
Images (Click to make bigger)
SPONSORED LINKS
Saturday, May 29th, 2021 AT 10:56 AM