Not a fun project and not really a DIY job especially if it has A/C.
Disable air bag system.
Remove two glove box hinge pins and glove box.
Remove hood release handle screws.
Remove passenger's air bag module.
Remove plastic retaining clips and screws and remove parking brake lever bezel from center console.
Disconnect electrical connectors from center console. Remove center console retaining clips and screws and remove center console.
Remove ashtray.
Remove heater control panel knobs.
Pull heater control panel front plate and illumination bulb straight out from instrument panel.
Remove four attaching screws and center trim bezel.
Remove four screws and radio.
Remove knee bolster trim panel and knee bolster from instrument panel.
Remove two screws and knee bolster trim panel.
Disconnect ignition switch connector. On models with A/T, remove parking brake lock cable from ignition switch by removing bracket retaining screw and "C" clip.
On all models, remove steering column attaching bracket bolts.
Remove bolt attaching steering shaft to lower steering shaft joint.
Remove two steering column Torx bolts and remove column from vehicle.
Remove instrument cluster bezel and cluster from instrument panel.
Disconnect all connectors and speedometer cable from instrument cluster.
Disconnect mode and temperature control cables from heater case.
Disconnect fresh/recirculated air control cable from blower case. Ensure all wiring harness connectors necessary to remove instrument panel are disconnected.
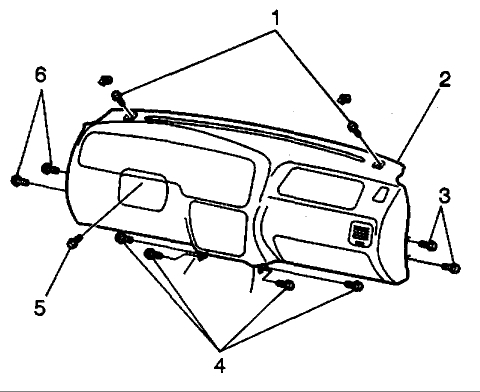
Remove screw attaching left side of instrument panel support beam to instrument panel. Remove screw on bottom left side of instrument panel.
Remove instrument panel support beam covers and bolts.
Remove two instrument panel screws from bottom of glove box opening.
Remove front speaker grilles and instrument panel upper center cover with a screwdriver. Remove three upper instrument panel screws.
Pull instrument panel from support member and remove from vehicle.
To install, reverse removal procedure.
Heater Core Removal Procedure
Drain the engine cooling system.
Remove the Instrument Panel (IP) carrier.
Remove the heater hoses and clamps from the heater core.
Disconnect the electrical connector from the A/C compressor control module, if equipped.
Remove the A/C compressor control module (2), if equipped.
Remove the two nuts and six screws (three) from the air box.
Remove the air box from the vehicle. If equipped with A/C, remove the evaporator after recovering the refrigerant.
Remove the nut from the center of the bulkhead on the engine side (1).
Remove the two nuts from the heater case (two).
Separate the floor ducts from the heater case.
Remove the heater case from the vehicle.
Disassembly Procedure
Remove the eight heater case retaining clips.
Remove the screw and the blend door linkages.
Separate the heater case halves.
Remove and replace the following components as necessary:
The defrost switch
The blend doors
The heater core
The linkages
Installation Procedure
Install the heater case to the vehicle.
Connect the floor ducts to the heater case.
Install the nut to the center of the bulkhead on the engine side.
Install the two nuts to the heater case. Tighten the heater case nuts to 10 N.M (89 lb in).
Install the air box or the A/C evaporator, if equipped.
Secure with the two nuts and six screws. Tighten the nuts and screws to 10 N.M (89 lb in).
Install the A/C compressor control module, if equipped.
Connect the electrical connector to the A/C compressor control module, if equipped.
Install the heater hoses and clamps to the heater core.
Install the instrument panel.
Fill the engine cooling system. Recharge the A/C system if equipped.
Images (Click to make bigger)
SPONSORED LINKS
Saturday, February 25th, 2017 AT 5:38 AM