Here are the directions. They are extensive. IF you run into trouble, let me know.
REMOVAL AND INSTALLATION
1. Disconnect the negative battery cable.
2. Drain and recycle the engine coolant into a suitable container.
CAUTION
Never open, service or drain the radiator or cooling system when hot; serious burns can occur from the steam and hot coolant. Also, when draining engine coolant, keep in mind that cats and dogs are attracted to ethylene glycol antifreeze and could drink any that is left in an uncovered container or in puddles on the ground. This will prove fatal in sufficient quantities. Always drain coolant into a sealable container. Coolant should be reused unless it is contaminated or is several years old.
3. Remove the engine forward strut bracket at the radiator, then swing the strut rearward. Make sure to loosen the bolt before swinging the strut, to prevent ripping the rubber bushing.
4. Disconnect the forward lamp harness from the fan frame and unplug the fan connector. Remove the fan and frame assembly by removing the fan attaching bolts. On some applications, a Low Coolant Module needs to be unplugged and removed also.
5. Scribe the hood latch installed location for reinstallation, then remove the hood latch from the radiator support.
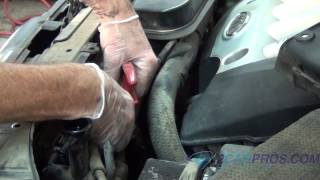
6. Disconnect the coolant hoses from the radiator and coolant recovery tank hose from the radiator neck.
7. Disconnect and plug the transaxle cooler lines.
8. Remove the radiator-to-radiator support attaching bolts and clamps.
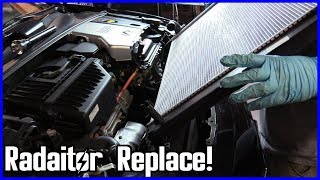
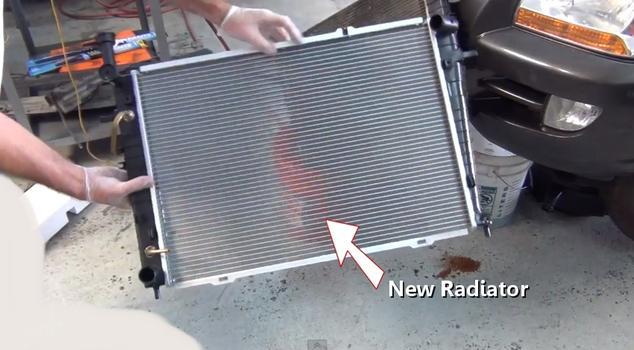
9. Lift the radiator out of the vehicle. If the lower mounting pads stick to the radiator during removal, the pads must be placed back in the lower radiator frame for installation of a new radiator.
If the old radiator is being replaced with a new one, transfer the fittings from the old to the new radiator.
10) Lift the radiator up and out of the vehicle. The bottom hose (A) is disconnected from the engine; trans cooler line (B) is disconnected at the rubber hose; and trans cooler line (C) is left connected at radiator.
11) Radiator removed from vehicle; note the trans cooler lines and lower hose are still attached to radiator. Where clearance allows, this is an easier removal
To install:
1. Place the radiator in the vehicle, locating the bottom of the radiator into the lower mounting pads.
Try to maintain the location of the air baffles and seals; they help direct the airflow through the radiator.
2. Install the radiator-to-radiator support attaching clamp and bolts. Tighten to 89 inch lbs. (10 Nm).
12. Unplug and connect the cooler lines for the transaxle, be sure to check the fluid level upon completion.
3. Install the coolant hoses to the radiator and the recovery hose to the neck.
4. Replace the hood latch, aligning it to the scribed mark on the radiator frame. Tighten the bolts to 18 ft. Lbs. (25 Nm).
5. Install the fan and frame assembly, tighten the radiator attaching bolts, route the forward lamp harness to the fan frame and plug in the fan connector.
6. If equipped, install and reconnect the Low Coolant Module sensor.
7. Swing the engine front strut and brace forward, until brace the contacts the radiator support. Install the brace-to-radiator support attaching bolts and tighten to 37 ft. Lbs. (50 Nm).
8. Refill the engine cooling system.
9. Connect the negative battery cable and check for leaks.
SPONSORED LINKS
Sunday, December 13th, 2009 AT 9:57 PM