Hello -
First, Thank you for the update.
By your reply it appears you didn't get the answer you were looking for. I apologize for that.
One of our main tasks is to make sure we assist the customer so that they don't waste money being told something or purchasing something they didn't need.
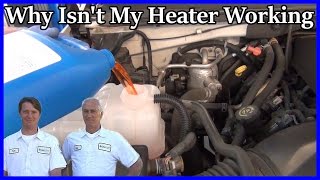
Depending on the coolant being used, like in your vehicle, some of the coolants are clogging up heater cores and radiators. . ...even with extremely low mileage. This is to the point the manufactures are putting TSBs out on them.
That is why I suggested to first feel the hoses to see if there was a difference. Many times customers open a panel, look at something and it isn't anything like what they or we thought or the manual says. This is why before we suggested going out and purchasing something or doing this or that which may waste your time, I suggest to open up the area and get a good visual on it to actually see what is going on. If I suggest that you purchase something or that a controller is bad before you have even looked at it. . ...I would be doing you a disservice and I am here to save you money, not cost you money.
I have located a TSB and attached for your review discussing the premature failure of the heater cores, radiators, and water pumps. As you see the TSB is dated Feb 2005. Depending on when your vehicle was made it may have just sat for some time even before the 15K was put on it. All that time. . ..the problem may have been started and already in work.
Also, I have attached a TSB discussing poor heat and the need to install an Auxiliary Heater Pump. Now you could do this but if the heater core is plugged then the auxiliary pump still will not make a difference and you have wasted your money.
However, if you find both hoses are the same temp, no problems around the area, then I would do the auxiliary pump.
My suggestion: First open the area and get a good visual on it. Check the hoses for both being hot or at least the same temp. Ensure there is no other problems in that area. If all is well, them my advice is the auxiliary pump.
I hope this helps you out better and you have a better understanding of the direction I was going. Again, I apologize for appearing to not provide the info you requested.
If you have any more questions, please feel free to get back with me. . .. . .
Have a safe New Year.
The TSBs
Cooling System - Aluminum Radiator/Heater Core Info.
Notes
Information on Aluminum Heater Core and/or Radiator Replacement # 05-06-02-001 - (Feb 24, 2005)
Models:
2005 and Prior Passenger Cars and Light Duty Trucks
2005 and Prior Saturn Vehicles
This bulletin is being revised to add model years and enhance the content. Please discard Corporate Bulletin Number 73-62-13A (Section 06 - Engine Cooling).
Important: 2004-05 Chevrolet Aveo (Pontiac Wave, Canada Only) does not use DEX-COOL(R) Refer to the flushing procedure explained later in this bulletin.
The following information should be utilized when servicing aluminum heater core and/or radiators on repeat visits. A replacement may be necessary because erosion, corrosion, or insufficient inhibitor levels may cause damage to the heater core, radiator or water pump. A coolant check should be preformed whenever a heater core, radiator, or water pump is replaced. The following procedures/inspections should be done to verify proper coolant effectiveness.
Caution: To avoid being burned, do not remove the radiator cap or surge tank cap while the engine is hot. The cooling system will release scalding fluid and steam under pressure if the radiator cap or surge tank cap is removed while the engine and radiator are still hot.
Important: If the vehicle's coolant is low, drained out, or the customer has repeatedly added coolant or water to the system, then the system should be completely flushed using the procedure explained later in this bulletin.
Technician Diagnosis
Verify coolant concentration. A 50% coolant/water solution ensures proper freeze and corrosion protection. Inhibitor levels cannot be easily measured in the field, but can be indirectly done by the measurement of coolant concentration. This must be done by using a Refractometer J 23688 (Fahrenheit scale) or J 26568 (centigrade scale), or equivalent, coolant tester. The Refractometer uses a minimal amount of coolant that can be taken from the coolant recovery reservoir, radiator or the engine block. Inexpensive gravity float testers (floating balls) will not completely analyze the coolant concentration fully and should not be used. The concentration levels should be between 50% and 65% coolant concentrate. This mixture will have a freeze point protection of -34 degrees Fahrenheit (-37 degrees Celsius). If the concentration is below 50%, the cooling system must be flushed.
Inspect the coolant flow restrictor if the vehicle is equipped with one. Refer to Service Information (SI) and/or the appropriate Service Manual for component location and condition for operation.
Verify that no electrolysis is present in the cooling system. This electrolysis test can be performed before or after the system has been repaired. Use a digital voltmeter set to 12 volts. Attach one test lead to the negative battery post and insert the other test lead into the radiator coolant, making sure the lead does not touch the filler neck or core. Any voltage reading over 0.3 volts indicates that stray current is finding its way into the coolant. Electrolysis is often an intermittent condition that occurs when a device or accessory that is mounted to the radiator is energized. This type of current could be caused from a poorly grounded cooling fan or some other accessory and can be verified by watching the volt meter and turning on and off various accessories or engage the starter motor. Before using one of the following flush procedures, the coolant recovery reservoir must be removed, drained, cleaned and reinstalled before refilling the system.
Notice: Using coolant other than DEX-COOL(R) may cause premature engine, heater core or radiator corrosion. In addition, the engine coolant may require changing sooner, at 30,000 miles (50,000 km) or 24 months, whichever occurs first. Any repairs would not be covered by your warranty. Always use DEX-COOL(R) (silicate free) coolant in your vehicle.
If you use an improper coolant mixture, your engine could overheat and be badly damaged. The repair cost would not be covered by your warranty. Too much water in the mixture can freeze and crack the engine, radiator, heater core and other parts.
Flushing Procedures using DEX-COOL(R)
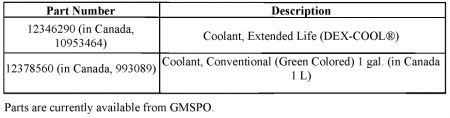
Important: The following procedure recommends refilling the system with DEX-COOL(R) P/N 12346290 (in Canada, use P/N 10953464), GM specification 6277M. This coolant is orange in color and has a service interval of 5 years or 240,000 km (150,000 mi). However, when used on vehicles built prior to the introduction of DEX-COOL(R), maintenance intervals will remain the same as specified in the Owner's Manual.
If available, use the approved cooling system flush and fill machine (available through the GM Dealer Equipment Program) following the manufacturer's operating instructions.
If approved cooling system flush and fill machine is not available, drain the coolant and dispose of properly following the draining procedures in the appropriate Service Manual. Refill the system using clear, drinkable water and run the vehicle until the thermostat opens. Repeat and run the vehicle three (3) times to totally remove the old coolant or until the drained coolant is almost clear. Once the system is completely flushed, refill the cooling system to a 50%-60% concentration with DEX-COOL(R), P/N 12346290 (in Canada, use P/N 10953464), GM specification 6277M, following the refill procedures in the appropriate Service Manual. If a Service Manual is not available, fill half the capacity of the system with 100% DEX-COOL(R), P/N 12346290 (in Canada, use P/N 10953464), GM specification 6277M. Then slowly add clear, drinkable water (preferably distilled) to the system until the level of the coolant mixture has reached the base of the radiator neck. Wait two (2) minutes and reverify the coolant level. If necessary, add clean water to restore the coolant to the appropriate level.
Once the system is refilled, reverify the coolant concentration using a Refractometer J 23688 (Fahrenheit scale) or J 26568 (centigrade scale) coolant tester, or equivalent. The concentration levels should be between 50% and 65%.
Flushing Procedure using Conventional Silicated (Green Colored) Coolent
Important: 2004-2005 Chevrolet Aveo (Pontiac Wave, Canada Only) does not use DEX-COOL(R). The Aveo and Wave are filled with conventional, silicated engine coolant that is blue in color. Silicated coolants are typically green in color and are required to be drained, flushed and refilled every 30,000 miles (48,000 km). The Aveo and Wave are to be serviced with conventional, silicated coolant. Use P/N 12378560 (1 gal) (in Canada, use P/N 993089 (4L). Refer to the Owner's Manual or Service Information (SI) for further information on OEM coolant.
Important: Do not mix the OEM orange colored DEX-COOL(R) coolant with green colored coolant when adding coolant to the system or when servicing the vehicle's cooling system. Mixing the orange and green colored coolants will produce a brown coolant which may be a customer dissatisfier and will not extend the service interval to that of DEX-COOL(R). Conventional silicated coolants offered by GM Service and Parts Operations are green in color.
If available, use the approved cooling system flush and fill machine (available through the GM Dealer Equipment Program) following the manufacturer's operating instructions.
If approved cooling systems flush and fill machine is not available, drain coolant and dispose of properly following the draining procedures in appropriate Service Manual. Refill the system using clear, drinkable water and run vehicle until thermostat opens. Repeat and run vehicle three (3) times to totally remove old coolant or until drained coolant is almost clear. Once the system is completely flushed, refill the cooling system to a 50%-60% concentration with a good quality ethylene glycol base engine coolant, GM P/N 12378560, 1 gal (in Canada, use P/N 993089 4L), conforming to GM specification 1825M, or recycled coolant conforming to GM specification 1825M, following the refill procedures in the appropriate Service Manual. If a Service Manual is not available, fill half the capacity of the system with 100% good quality ethylene glycol base (green colored) engine coolant, GM P/N 12378560 1 gal., (in Canada, use P/N 993089 1L) conforming to GM specification 1825M. Then slowly add clear, drinkable water (preferably distilled) to system until the level of the coolant mixture has reached the base of the radiator neck. Wait two (2) minutes and recheck coolant level. If necessary, add clean water to restore coolant to the appropriate level.
Once the system is refilled, recheck the coolant concentration using a Refractometer J 23688 (Fahrenheit scale) or J 26568 (centigrade scale) coolant tester, or equivalent. Concentration levels should be between 50% and 65%.
NEXT TSB
A/C - Poor Rear Heater Performance
Notes
Bulletin No.: 05-01-37-002A
Date: November 01, 2005
TECHNICAL
Subject:
Poor Rear Heat Performance (Install Auxiliary Heater Pump)
Models:
2003-2005 Chevrolet TrailBlazer EXT
2003-2005 GMC Envoy XL
Supercede:
This bulletin is being revised to update the correction information. Please discard Corporate Bulletin Number 05-01-37-002 (Section 01 - HVAC).
Important: Implementation of this Service Bulletin by "GM of Canada" dealers requires prior District Service Manager approval.
Condition
Some customers may comment on poor 2nd and/or 3rd row seating heater performance when the vehicle is at idle.
Cause
This condition may be due to lack of coolant circulation to the rear heater core.
Correction
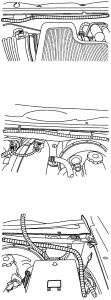
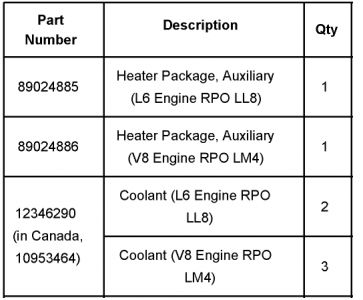
Install auxiliary heater pump package, P/N 89024885 (L6 Engine RPO LL8) or P/N 89024886 (V8 Engine RPO LM4 or LH6). This pump will improve coolant flow to the rear heater core. Use the procedure listed below.
1. Recover the A/C refrigerant.
2. Drain the cooling system.
3. Disconnect the negative battery cable.
4. Remove the fender rear upper brace.
5. Remove the air cleaner cover.
6. Remove the air cleaner filter element and air outlet duct.
7. Remove the air inlet duct from the lower air cleaner housing/washer solvent tank assembly.
8. Disconnect the washer solvent tank electrical and remove wiring harness from the retaining clips.
9. Disconnect the washer pump hoses and plug the pump outlet ports to prevent loss of washer solvent.
10. Remove the two air cleaner housing/washer tank assembly retaining nuts from the mounting studs.
11. Lift the lower air cleaner housing/washer tank assembly off of the studs and remove the assembly.
12. On the A/C accumulator, disconnect the electrical connector from the low pressure switch.
13. Remove the compressor suction hose assembly from the accumulator.
14. Remove the nut retaining the accumulator to the evaporator.
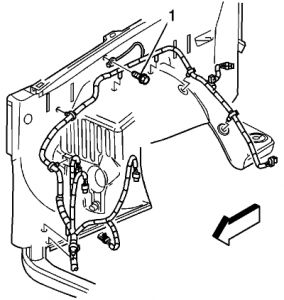
15. Remove the coolant hoses from the coolant recovery reservoir.
16. Remove the nut and bolt securing the coolant recovery reservoir.
17. Remove the coolant recovery reservoir with the accumulator attached.
18. Remove the evaporator tube nut at the evaporator.
19. Remove the evaporator tube from the evaporator
20. Using the J 43181, disconnect the heater hoses from the core.
20.1. Install the J 43181 to the heater core hose.
20.2. Close the tool around the heater core hose.
20.3. Firmly pull the tool into the quick connect end of the heater hose.
20.4. Firmly grasp the heater hose. Pull the heater hose forward in order to disengage the hose from the heater core.
21. Disconnect the coolant bypass valve hose from the auxiliary rear heater line.
22. Disconnect the coolant bypass valve hose from the engine.
23. Disconnect the electrical connector from the coolant bypass valve. This connector will no longer be used. Tape off with electrical tape.
24. Disconnect the vacuum hose from the coolant bypass valve.
25. Remove the nut retaining the coolant bypass valve to the cowl and remove the coolant bypass valve with hoses attached.
26. Remove the heater hose quick connect retainers from the heater core pipes.
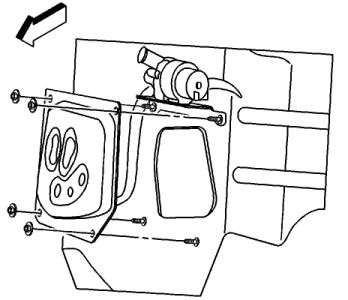
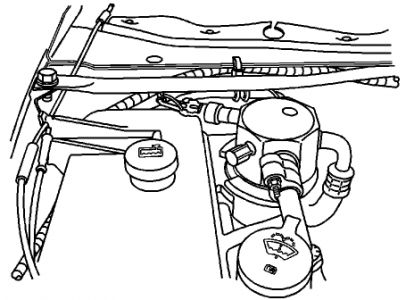
27. Remove the four nuts and the HVAC plate from the dash panel.
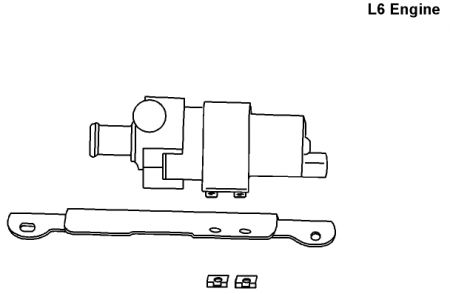
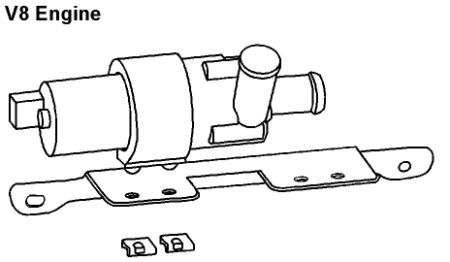
28. Attach the new auxiliary heater pump to the new bracket using the supplied retainers as shown. Note the position of the pump on the bracket.
29. Install the auxiliary heater pump and bracket onto the dash panel studs.
30. Reinstall the HVAC plate and nuts.
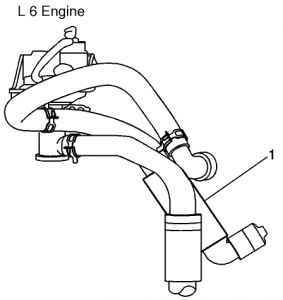
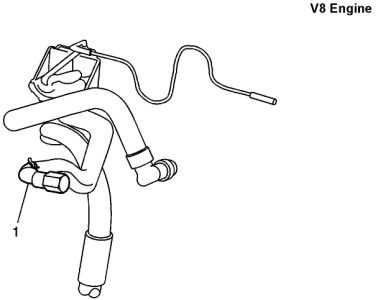
31. On the coolant bypass valve, remove the hose (1) that went from the valve to the engine and discard.
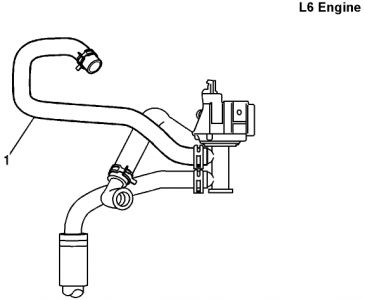
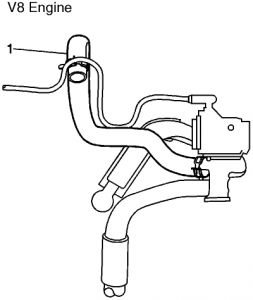
32. Install the new hose (1), # 1005 (L6 engine) or# 1006 (V8 engine) onto the coolant bypass valve at the location the above hose was removed. The other end of this hose will be installed on the auxiliary heater pump outlet port.
33. Install the new hose, # 1003 (L6 engine) or # 1004 (V8 engine) onto the auxiliary heater pump inlet port. Connect the other quick connect end to the engine.
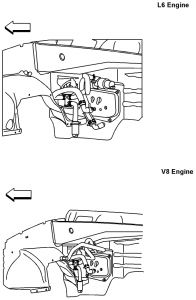
34. Install the coolant bypass valve to its original location and secure with a nut.
35. Connect the other end of the new hose from step 29 to the outlet port of the auxiliary heater pump.
36. Connect the vacuum hose to the coolant bypass valve.
37. Connect the coolant bypass valve hose to the auxiliary rear heater line.
38. Install the heater hose quick connect retainers to the heater core pipes.
39. Connect the remaining two hoses to the heater core.
40. Install the new auxiliary heater pump wiring harness to the vehicle.
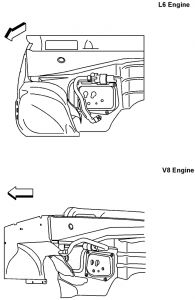
40.1. Install the ring terminal (black wire) to ground G103 (1), located on the right side inner tender.
40.2. Route the pump wiring harness along the existing right side forward lamp harness.
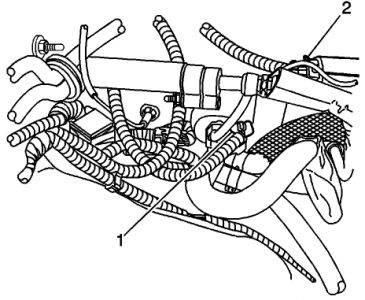
40.3. Connect the electrical connectors to the coolant bypass valve (1) and auxiliary heater pump (2).
40.4. Position the relays onto the inner wheelhouse panel near the rear of the engine compartment.
40.5. Route the other end of the harness along the rear of the engine compartment to the left side and secure to the cross bar and dash panel with tie straps.
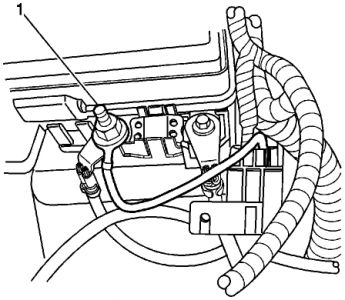
40.6. Install the ring terminal (orange wire) to the underhood fuse block stud (1).
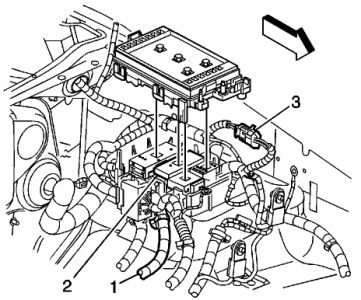
40.7. Locate circuit no. 241 or 441 (ignition 3 brown wire) (PIN B11 or C11) in the existing underhood fuse block harness (1) of C2 (2) and splice bare wire to it using a splice clip. Wrap with electrical tape.
40.8. Locate connector C105 (3), located on the left side inner fender. Separate the connector halves. On the female side of the connector, remove the terminal from cavity F (gray/black wire) and tape back.
40.9. Install the terminal end on the pump wiring harness into cavity F of connector C105.
41. Install the evaporator tube and nut to the evaporator.
Tighten
Tighten the nut to 28 N.m (21 lb ft).
42. Install the coolant recovery reservoir with the accumulator attached.
43. Install the nut and bolt securing the coolant recovery reservoir.
44. Install the coolant hoses to the coolant recovery reservoir.
45. Install the nut retaining the accumulator to the evaporator.
Tighten
Tighten the nut to 28 N.m (21 lb ft).
46. Install the compressor suction hose assembly to the accumulator.
Tighten
Tighten the nut to 48 N.m (35 lb ft).
47. Connect the electrical connector to the A/C low pressure switch.
48. Install the lower air cleaner housing/washer solvent tank assembly onto the mounting studs.
49. Install the two air cleaner housing/washer tank assembly retaining nuts to the mounting studs.
50. Connect the washer pump hoses.
51. Connect the washer solvent tank electrical and install wiring harness to the retaining clips.
52. Install the air inlet duct to the lower air cleaner housing/washer solvent tank assembly.
53. Install the air cleaner filter element and air outlet duct.
54. Install the air cleaner cover.
55. Install the tender rear upper brace.
56. Connect the negative battery cable.
57. Recharge the refrigerant system.
58. Fill the cooling system.
59. Inspect the cooling system for leaks.
60. Leak test the refrigerant fittings using J 39400-A.
Parts Information
Warranty Information

Tuesday, December 30th, 2008 AT 6:27 PM