Did you give a donation and did you give me good feedback? :)
Okay then, here's how to do it. Do you have a backlash or feeler gauge?
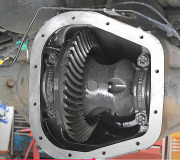
Axle can be disassembled either in or out of vehicle. If axle is disassembled in vehicle, it may be necessary to remove spare tire and/or disconnect shock absorbers to provide clearance for differential case removal. If axle assembly is allowed to hang, care must be taken not to damage or stretch flexible brake hose between axle and frame mounted lines .
Loosen rear cover bolts, break cover loose at bottom and drain lubricant, then remove cover and gasket.
Mount suitable dial indicator on bearing cap, and measure and record ring gear and pinion backlash.
Remove axles. Refer to Drive Axles, Bearings and Joints / Axle Shaft, Conventional Fixed/Floating / Service and Repair . See: Drive Axles, Bearings and Joints Axle Shaft Assembly
Remove outer wheel bearings and seals, then pinion shaft lock screw and pinion shaft.
Roll pinion gears out of case with pinion thrust washers, then remove side gears and side gear thrust washers. Mark gears and differential case as left and right.
Remove differential bearing cap bolts, then bearing caps. Mark caps and housing as left and right.
Fig. 1 Differential Case Assembly Removal.
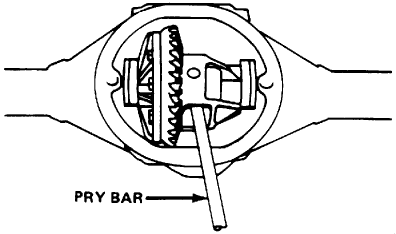
Pry differential case assembly from axle housing, taking care not to damage cover gasket surface. Remove differential carrier by prying case from axle housing at differential window, Fig. 1 .
Remove bearing outer races, shims and spacers. Mark races and bearings as left and right, then place them with cages.
Remove differential side bearings using tool No. J-8107-2 and tool No. J-22888 or their equivalents.
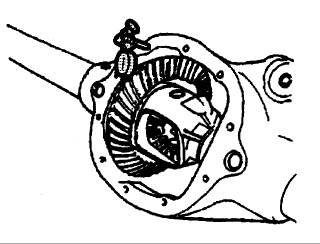
Remove ring gear bolts, then ring gear. Ring gear bolts are left handed threads. Do not pry ring gear from case as damage to gear and case will result. Drive ring gear off with a brass drift, if necessary .
Check drive pinion preload using suitable torque wrench and record reading. Inspect pinion assembly for looseness by moving it back and forth, looseness will indicate excessive bearing wear.
Hold driveshaft yoke with suitable tool and remove pinion nut and washer.
Remove driveshaft yoke with suitable puller.
Thread pinion nut halfway onto pinion, temporarily install rear cover, then tap pinion from bearings using large hammer and soft drift.
Remove pinion seal and front pinion bearing from housing.
Remove rear cover, then the drive pinion and rear bearing assembly from housing.
Discard collapsible preload spacer, press rear bearing from pinion, then remove depth adjusting shim and retain for assembly adjustment.
Remove bearing cups from axle housing using a hammer and punch in slots provided. Work cups out of housing evenly by moving punch back and forth between sides of cup.
ASSEMBLY
Ensure that pinion depth and bearing preload are properly adjusted.
Install differential case assembly and selected side bearing shims. Refer to Side Bearing Preload & Backlash . See: Adjustments
Install bearing caps in proper position and torque cap bolts to 55 ft. lbs.
Rotate assembly to ensure that bearings are properly seated.
Mount dial indicator on housing with plunger bearing against tooth on ring gear, Fig. 18 . Use small contact button on indicator plunger so that contact can be made at heel end of tooth and position dial indicator with plunger in line with gear rotation and perpendicular to gear tooth.
Hold pinion stationary and rock ring gear back and forth while reading backlash on indicator.
Check backlash at 3 evenly spaced positions around ring gear and record readings. If backlash varies by more than .002 inch at any position, check ring gear installation and runout, and correct as needed .
If backlash is not within specifications, remove differential case assembly and bearing shims keeping shims in order. If ring gear and pinion are being reused, backlash should be adjusted as close as possible to value measured prior to disassembly .
Backlash is adjusted by increasing thickness of one shim while decreasing thickness of opposite side shim by the same amount in order to maintain proper side bearing preload. Select shims to adjust backlash as follows:
If backlash is excessive, decrease thickness of shim on gear tooth side and increase thickness of shim on opposite side by the same amount.
If backlash is less than specified, increase thickness of shim on gear tooth side while decreasing thickness of opposite shim by the same amount. On models with 7-1/2 & 7-5/8 inch ring gear, each .002 inch change in shim thickness alters backlash by .001 inch. On models with 8 1/2 and 8 5/8 inch ring gear, each .003 inch change in shim thickness alters backlash by .002 inch .
Reinstall differential assembly, shims and bearing caps, torque bearing cap bolts to 55 ft. lbs., then recheck backlash and adjust as needed.
If side bearing preload was set to zero during side bearing preload adjustment, proceed as follows:
Remove both bearing caps and shim packs, keeping shim packs in respective left or right positions.
Select shim .004 inch thicker than one removed from left side, insert shim between left bearing race and spacer, then install left bearing cap with bolts hand tight.
Select shim .004 inch thicker than one removed from right side and install shim between right bearing race and spacer using suitable driver.
Install right bearing cap and torque all cap bolts to 55 ft. lbs.
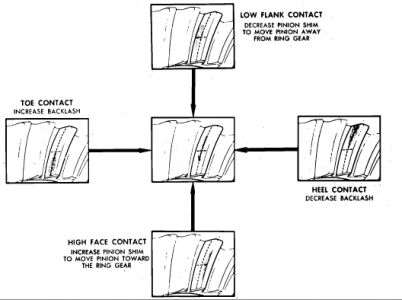
Ensure that ring gear teeth are clean and free from oil, then coat both drive and coast side of each tooth with suitable marking compound.
Apply braking force to ``load'' ring gear, then rotate driveshaft yoke with wrench so that ring gear rotates one full revolution in each direction. Test made without ``loading'' gears will not yield satisfactory pattern, and excessive rotating of gears is not recommended .
Compare gear tooth pattern with Fig. 19, and correct assembly adjustments as needed.
When proper gear tooth contact pattern has been obtained, clean marking compound from gears, install cover and new gasket and fill housing with specified lubricant.
Side Bearing & Preload Backlash
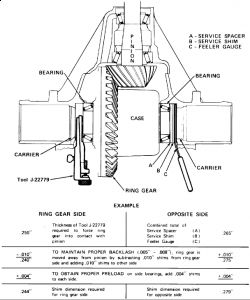
With ring gear tight against pinion (zero to 0.001 inch backlash), insert gauging tool No. J-22779, or equivalent, between left bearing race and housing, Fig. 14 .
While oscillating tool, turn adjusting nut clockwise to force ring gear toward pinion until noticeable drag on tool can be felt, then tighten lock bolt on side of tool.
Insert a 0.170 inch service spacer between right bearing cap and housing, then select and install service shim that will easily slip between spacer and housing. Do not reuse cast iron production shims as they may crack during installation. If service spacers and shims were previously installed, they can be reused .
Insert progressively thicker feeler gauges between housing and service shim until slight drag can be felt when inserting gauge. Thickness of feeler gauge used to produce slight drag will be dimension C used in Fig. 14 , to determine shim thickness.
Remove service spacer and shim, and gauge tool, without disturbing adjustment of tool.
Measure thickness of gauging tool at a minimum of three positions, average measurements and record average.
Add thicknesses of service spacer (A), shim (B) and feeler gauge (C), Fig. 14 , and record sum.
Apply dimensions obtained in steps 9 and 10 calculation shown in Fig. 14 , to determine proper left and right shim thicknesses.
Install shim selected for left side first, then wedge right shim between bearing race and service spacer. Position shims so that chamfer is toward outside. If chamfer in right shim is not sufficient to allow installation without damaging spacer, grind or file chamfer prior to installation. If difficulty is encountered installing right shim, partially remove case, insert shim, slide shim and case into position, then seat shim using soft-faced hammer while rotating differential case .
Install bearing caps and tighten bolts to specifications, then check and adjust backlash as needed.
Monday, October 19th, 2020 AT 11:11 AM
(Merged)