REMOVAL:
Disconnect the negative battery cable. Raise and safely support the vehicle.
Properly drain the engine oil and the cooling system into suitable containers.
Remove the flywheel housing or transaxle converter cover, as applicable.
Remove the right front wheel and tire assembly, then remove the right splash shield.
Remove the serpentine drive belt.
Unfasten the A/C compressor lower retaining bolts.
Remove the transaxle-to-engine brace.
Disconnect the engine mount strut bracket.
Unfasten the radiator outlet pipe bolts, then remove the pipes from the oil pan.
Remove the exhaust manifold brace.
Unfasten the oil pan-to-flywheel cover bolt and nut.
Remove the flywheel cover stud for clearance.
Disconnect the radiator outlet pipe from the lower radiator hose and oil pan.
Detach the oil level sensor connector.
Unfasten the oil pan retaining bolts, then remove the pan and gasket. Inspect the gasket for damage. If it's OK, you can reuse it. No sealer is necessary.
INSTALLATION:
Position the gasket, then install the oil pan. Loosely install the retaining bolts.
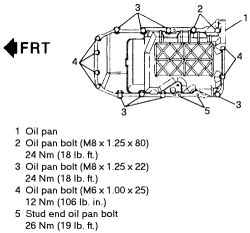
Place the spacer in its approximate installed location by allowing clearance to tighten the pan bolt directly above the spacer. Tighten the oil pan bolts to the specifications given in the accompanying figure.
Position the spacer into its proper position, then install the stud.
Fasten the oil pan-to-transaxle nut.
Attach the oil level sensor connector.
Connect the radiator outlet pipe to the oil pan and fasten with the retaining bolts.
Install the engine mount strut bracket.
Fasten the transaxle-to-engine brace.
Secure the A/C compressor bolts.
Install the serpentine drive belt.
Fasten the right splash shield, then install the wheel and tire assembly.
Install the flywheel housing or transaxle converter cover.
Fill the cooling system and engine crankcase with the correct type and amount of fluids.
Connect the negative battery cable.
Jun 11, 2009 at 2:39 PM
