Catalytic converters location

Tiny
JONSOLOW13
  • MEMBER
  • 2002 SATURN STATION WAGON
  • 3.0L
  • 6 CYL
  • 2WD
  • AUTOMATIC
  • 116,000 MILES
How many catalytic converters on the 3.0l engine, and where are they located? I found one, but need to locate the other. Can you send me a diagram? Need to know how to remove the upper Catalytic converter (or Catalytic converters?).
Sunday, January 27th, 2019 AT 7:26 PM

22 Replies

Tiny
HARRY P
  • MECHANIC
  • 2,292 POSTS
Hello and thanks for using 2CarPros. I've looked up your car and it only has the one catalytic converter. I'm attaching a diagram of your car's exhaust system, provided by GM. Since GM didn't actually label the diagram for some reason, I've labeled the catalytic converter for you. Looks like removal will require cutting the exhaust pipe on the upstream side of the converter (the side nearest the engine) and installation will require welding. Kind of a dumb design if you ask me, but this is actually fairly common for some reason. Hope this information helps and let us know how it goes for you.

PS. If you buy your parts at the GM dealership, you can probably avoid the cutting and welding because they'll sell you the while converter with the Y pipe, new flange/donut gaskets, and a new resonator (the little thingy to the left of the converter in the attached image). But it'll probably be ridiculously expensive to buy the parts there.
Was this
answer
helpful?
Yes
No
Sunday, January 27th, 2019 AT 8:20 PM
Tiny
JONSOLOW13
  • MEMBER
  • 126 POSTS
Heyman:

Thank you so much for your timely response!

May I take more of your time to discuss our issue?

Jon
Was this
answer
helpful?
Yes
No
Sunday, January 27th, 2019 AT 8:25 PM
Tiny
JACOBANDNICKOLAS
  • MECHANIC
  • 108,289 POSTS
Hi and thanks for using 2CarPros.

There are two pre catalytic converters on your vehicle and one three way. On the down pipe from the exhaust manifolds are the catalytic converters. The two pipes join together and then exhaust runs through the three way converter.

As far as the upper catalytic converters (pre catalytic converters) they bolt directly to the exhaust manifold. I will provide directions. I am going to start with the front. All attached pictures correlate with these directions.

FRONT EXHAUST MANIFOLD PIPE

REMOVAL

NOTICE: Do not apply grease or silicon products to the heated oxygen sensor. Do not alter the wiring in any way. The wires carry air reference to the sensor.

Picture 1

1. Remove the heated oxygen sensor electrical connector

CAUTION: MAKE SURE VEHICLE IS PROPERLY SUPPORTED AND SQUARELY POSITIONED ON HOIST.

2. Raise vehicle on hoist
3. Remove heated oxygen sensor.

Picture 2

4. Remove exhaust manifold pipe to exhaust manifold nuts.

Picture 3

5. Remove front exhaust manifold pipe to rear exhaust manifold pipe attachment bolts.

INSTALLATION

Picture 4

1. Position gasket on exhaust manifold pipe.
2. Position front exhaust manifold pipe into vehicle.

NOTICE: Do not tighten fasteners.

3. Install exhaust manifold pipe to exhaust manifold nuts.

Picture 5

4. Position gasket between front and rear exhaust manifold pipes
5. Install front exhaust manifold pipe to rear exhaust manifold pipe bolts and tighten
Torque:
Exhaust Manifold Pipe Bolts: 20 Nm (15 ft. Lbs.)
6. Tighten exhaust manifold pipe to exhaust manifold nuts
Torque:
Exhaust Manifold Pipe-to-Exhaust Manifold Nuts: 30 Nm (25 ft. Lbs.)

Picture 6

NOTICE: Always use a pickle-based anti-seized compound (Saturn P/N 21485279 or equivalent) on the threads of the oxygen sensor If the oxygen sensor is replaced, do not apply anti-seize to the new sensor. New sensors have anti-seize pre-applied. Never use silicon product; silicon products will cause damage to oxygen sensor.

7. Install the heated oxygen sensor
Torque:
Oxygen Sensors (Lower Exhaust Pipe): 45 Nm (33 ft. Lbs.)
8. Connect heated oxygen sensor harness connector
9. Lower vehicle from hoist
10. Start engine and check for exhaust leaks

_____________________________________

Here are the directions for the rear pre cat

REAR EXHAUST MANIFOLD PIPE

Picture 7

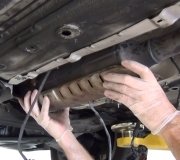
1. Remove exhaust manifold pipe heat shield.

Picture 8
NOTICE: Do not apply grease or silicon products to the heated oxygen sensor. Do not alter the wiring in any way. The wires carry air reference to the sensor.

2. Remove heated oxygen sensor electrical connector.
3. Remove heated oxygen sensor.

CAUTION: MAKE SURE VEHICLE IS PROPERLY SUPPORTED AND SQUARELY POSITIONED ON HOIST.

4. Raise vehicle on hoist.

Picture 9

5. Remove rear exhaust manifold pipe to exhaust manifold nuts

Picture 10

6. Remove rear exhaust manifold pipe to front exhaust manifold pipe attachment bolts.

Picture 11

7. Remove rear exhaust manifold pipe to resonator bolts.
8. Remove rear exhaust manifold pipe from vehicle.

INSTALLATION

NOTICE: Do not tighten fasteners at this time.

Picture 12

1. Install exhaust manifold pipe to exhaust manifold gasket, position pipe into vehicle.
2. Install rear exhaust manifold pipe to exhaust manifold nuts.

Picture 13

3. Position gasket and install front exhaust manifold pipe to rear exhaust manifold pipe bolts.

Picture 14

4. Position gasket and install exhaust manifold pipe to resonator bolts and tighten
Torque:
Exhaust Manifold Pipe Bolts: 20 Nm (15 ft. Lbs.)
5. Tighten exhaust manifold pipe to exhaust manifold nuts
Torque:
Exhaust Manifold Pipe-to-Exhaust Manifold Nuts: 30 Nm (25 ft. Lbs.)
6. Tighten rear exhaust manifold pipe to front exhaust manifold pipe bolts
Torque:
Exhaust Manifold Pipe Bolts: 20 Nm (15 ft. Lbs.)

Picture 15

7. Lower vehicle from hoist

NOTICE: Always use a pickle-based anti-seized compound Saturn PIN 21485279 (or equivalent) on the threads of the oxygen sensor. If the oxygen sensor is replaced, do not apply anti-seize to the new sensor. New sensors have anti-seize pre-applied. Never use silicon product; silicon products will cause damage to oxygen sensor.

8. Install heated oxygen sensor
Torque:
Oxygen Sensors (Lower Exhaust Pipe): 45 Nm (33 ft. Lbs.)
9. Connect heated oxygen sensor harness connector

Picture 16

10. Install exhaust manifold pipe heat shield
Torque:
Exhaust Manifold Pipe Heat Shield Bolts: 8 Nm (71 inch lbs.)
11. Start engine and check for exhaust leaks

_____________________

I hope this helps. The last picture shows the entire system. Let me know if you have other questions or need additional help.

Take care,
Joe
Was this
answer
helpful?
Yes
No
+2
Sunday, January 27th, 2019 AT 8:25 PM
Tiny
HARRY P
  • MECHANIC
  • 2,292 POSTS
Sure. What else do you need to know?
Was this
answer
helpful?
Yes
No
Sunday, January 27th, 2019 AT 8:26 PM
Tiny
JONSOLOW13
  • MEMBER
  • 126 POSTS
Heyman:

Thank you so much for your timely response!

May I take more of your time to discuss our issue?

Jon
Was this
answer
helpful?
Yes
No
Sunday, January 27th, 2019 AT 8:27 PM
Tiny
HARRY P
  • MECHANIC
  • 2,292 POSTS
I defer to Joe. He's clearly taken more time and spent more energy on his response, and it's considerably more detailed. Go for it Joe. He's totally right about the Pre catalytic converters. I wasn't even thinking about them. I guess I got tunnel vision.
Was this
answer
helpful?
Yes
No
Sunday, January 27th, 2019 AT 8:33 PM
Tiny
JONSOLOW13
  • MEMBER
  • 126 POSTS
JacobandNickolas:

This was exactly what I was looking for!

Here was our problem:
We bought the car inexpensively, and it would start but immediately stall out. We figured problem was the crankshaft position sensor.
But when we got into the car, oil was everywhere. First problem was a tiny hose below the intake manifold. My partner said it was an exhaust host of some sort. It was kinked and the back pressure sent oil everywhere.

We corrected the problem, and the back pressure solved! Ran a diagnostic and replaced the crankshaft position sensor, camshaft position sensor, MAF and sensor, TPS and exchanged the throttle body, Same issue.

We changed out the fuel pump and fuel filter. Same issue.

Finally we took it to another wrench with a much better computer and he found out the catalytic converters were clogged up! He removed the O2 sensor in front of the CAT and immediately the engine ran great (didn't drive it of course). This made sense of course, after the fact.

So we removed the catalytic converter, cleaned it (hardened carbon from all the oil going through it). However, when we put it back, the same issue. So we figured there had to be another catalytic converter above it, but couldn't find it. The pre-catalytic converters are probably completely clogged up. With your directions we will remove, inspect, and hopefully clean them. Will let you guys know the result.

Thanks so much, all of you!

Jon
Was this
answer
helpful?
Yes
No
Sunday, January 27th, 2019 AT 8:37 PM
Tiny
JONSOLOW13
  • MEMBER
  • 126 POSTS
One last question, since the engine is in the car, and the car is up on jack stands, can one get to the exhaust manifold directly to remove the upper pre catalytic converter?

By the way, this is an amazing website. How can I show my appreciation?

Jon
Was this
answer
helpful?
Yes
No
Sunday, January 27th, 2019 AT 8:46 PM
Tiny
JACOBANDNICKOLAS
  • MECHANIC
  • 108,289 POSTS
Hi Jon:

Thanks for the kind words. Your appreciation can be shown by telling others about the site and coming back yourself.

As far as your question, yes. You can access them if the car is lifted. Most likely you will need to remove a heat shield. Before you do it, however, I would spray them down with a good penetrating oil and allow them to sit for awhile.

You will see that the two down pipes that have the pre catalytic converter, s connect right behind the engine. Basically, they make a Y pipe. At that point, I believe there is a flex pipe that attaches the rest of the system and the three way.

Let us know what you find or if you have other questions.

Take care,
Joe
Was this
answer
helpful?
Yes
No
Sunday, January 27th, 2019 AT 9:17 PM
Tiny
JONSOLOW13
  • MEMBER
  • 126 POSTS
Joe:

For sure I will tell everyone that works on cars about this site, and of course, I will be back!

Concerning my issue, I have egg on my face- we removed one of the pre catalytic converters, the easy one not part of the of the "Y" We still have to remove the pre catalytic converters that is part of the exhaust going to the catalytic converter. From the diagram you sent me it looks like that pre catalytic converter and the catalytic converter, have to be taken off at the same time. Please let me know if I am incorrect.

FYI, by shaking the pre catalytic converter, and bumping it on a hard surface we were able to remove the hardened carbon build up, then tested with a shop vac and had decent airflow in both directions.

After your excellent directions I am hoping that the other pre catalytic converter, is all that is clogged. Will update you after we are finished with testing.

Can't thank you enough.

Jon
Was this
answer
helpful?
Yes
No
Sunday, January 27th, 2019 AT 9:28 PM
Tiny
JACOBANDNICKOLAS
  • MECHANIC
  • 108,289 POSTS
Welcome back:

You are correct. The two should have a flex pipe between the, but if it is original, it is welded together. Nothing is ever easy. Lol You will need to disconnect the main cat at the flange. Get a new gasket and honestly, the bolts will most likely break at the flange.

Let me know the results or if you have other questions.

Take care,
Joe
Was this
answer
helpful?
Yes
No
+1
Monday, January 28th, 2019 AT 6:10 PM
Tiny
JONSOLOW13
  • MEMBER
  • 126 POSTS
Joe:

So here is where we are:
-We loosened the bolts at the aft end of the catalytic converter. That's good.
-We removed the three nuts and bolts holding the heat shield covering the pre-catalytic converter at the exhaust manifold. That's good.
-Then we ran into trouble. The car is on jack stands (we don't have a lift yet) and very difficult to work underneath. Can't get the heat shield off to get to the bolts on the flange.
-The good news- we are in Florida, this is a Florida car and we are hoping the bolts aren't rusted.

Hopefully tomorrow a wrench who owes us a favor will get underneath (he has a pretty hefty jack for big trucks that should lift the car higher and we can reinforce to protect all) and get the bolts off and we can drop the upper pre-catalytic converter and converter exhaust, cut the pre-catalytic converter off and test the converter.

Will keep you posted. Big thanks for your follow-up.

Jon
Was this
answer
helpful?
Yes
No
Monday, January 28th, 2019 AT 6:54 PM
Tiny
JACOBANDNICKOLAS
  • MECHANIC
  • 108,289 POSTS
No problem. Let me know when once you get things apart if that was the problem. By the way, it must be nice to be in Florida. Tomorrow, the high here will be 6 degrees. Ugh! -5 at night with -30 degree wind chills. How about I come there and work on the vehicle and you can move here. LOL

Take care,
Joe
Was this
answer
helpful?
Yes
No
Monday, January 28th, 2019 AT 8:29 PM
Tiny
JONSOLOW13
  • MEMBER
  • 126 POSTS
Joe:

Latest update on the catalytic converter replacement- the part arrived, tomorrow morning we are welding it on. Will install tomorrow afternoon, evening. We tested the original, and it was completely blocked. No way to clean it so we ordered a universal replacement catalytic converter.

Will update you tomorrow night.

On another issue, I own a 2004 GMC Yukon XLT 1500. Does it use coil packs ore just an ignition coil?

Thanks again for your help. I'm letting everyone know about you guys.

Jon
Was this
answer
helpful?
Yes
No
Monday, February 4th, 2019 AT 10:58 AM
Tiny
RENEE L
  • ADMIN
  • 1,257 POSTS
Hello and thank you using 2CarPros.

For question regarding your 2004 GMC Yukon XLT 1500, please start a new question as this question is about a different vehicle and issue. For your convenience I am including the link.

https://www.2carpros.com/questions/new

Have a great rest of your day!

Sincerely,

Renee
Was this
answer
helpful?
Yes
No
-1
Monday, February 4th, 2019 AT 2:35 PM
Tiny
HARRY P
  • MECHANIC
  • 2,292 POSTS
Hey jon. I'm glad that you got to the bottom of your problem. As for the GMC, as Renee suggested, please start a new thread. This helps with site organization from the point of view of future users with the same or similar issues who happen to be searching. Plus it'll cue in other experts and possibly gain more insight into your truck.
Was this
answer
helpful?
Yes
No
+1
Monday, February 4th, 2019 AT 8:48 PM
Tiny
JONSOLOW13
  • MEMBER
  • 126 POSTS
Okay. Will do tonight.
Was this
answer
helpful?
Yes
No
Tuesday, February 5th, 2019 AT 11:40 AM
Tiny
JACOBANDNICKOLAS
  • MECHANIC
  • 108,289 POSTS
Did the catalytic converters take care of the original issue?

Joe
Was this
answer
helpful?
Yes
No
+1
Tuesday, February 5th, 2019 AT 7:03 PM
Tiny
JONSOLOW13
  • MEMBER
  • 126 POSTS
Just got back. Success, you guys are the best!
Was this
answer
helpful?
Yes
No
Tuesday, February 5th, 2019 AT 7:26 PM
Tiny
JACOBANDNICKOLAS
  • MECHANIC
  • 108,289 POSTS
That's good news. I just saw the other replies you got. I will check for you new post.

Take care,

Joe
Was this
answer
helpful?
Yes
No
+1
Tuesday, February 5th, 2019 AT 7:34 PM

Please login or register to post a reply.

Sponsored links