Hi and thanks for using 2CarPros.
What you describe sounds like a crankshaft position sensor that is going bad. What often happens is the internal winding in the sensor expand with heat and then fail. Take a look through this link.
https://www.2carpros.com/articles/symptoms-of-a-bad-crankshaft-sensor
Now, if the sensor fails, you will not have spark when it fails to start. With that in mind, here is a link that shows how to check for spark.
https://www.2carpros.com/articles/how-to-test-an-ignition-system
If you determine the sensor is bad, here is a link that shows in general how one is replaced.
https://www.2carpros.com/articles/crankshaft-angle-sensor-replacement
Here are the specific directions (which are extremely vague) for replacing the sensor. The attached picture correlates with these directions. To do this, the timing belt needs removed which is not an easy job. So, make sure there is no spark to the plugs when it doesn't start.
Pre-Removal and Post Installation
- Timing belt Removal and Installation
Removal
To remove follow the steps listed in the image.
Installation
To install reverse the steps listed in the image.
__________________________________________________________________
Here are the directions for timing belt removal and replacement. Starting with picture 2, the remaining pics correlate with these directions.
TIMING BELT
Removal
Pre-removal Operation:
- Under Cover Removal.
Follow removal steps outlined in illustration.
Removal Service Point
[A] Timing Belt Removal.
(1) Turn the crankshaft in the forward direction (to the right) to align the camshaft sprocket timing marks.
CAUTION: The crankshaft should always be turned in the forward direction only.
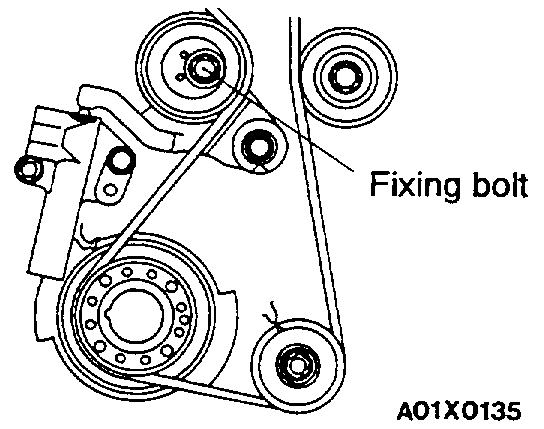
(2) Loosen the tension pulley fixing bolt.
(3) Move the tension pulley to the water pump side, and then remove the timing belt.
CAUTION: If the timing belt is to be re-used, use chalk to mark (on its flat side) an arrow indicating the clock-wise direction.
Installation
Installation in reverse order as removal.
Installation Service Points
]A[ Auto Tensioner Installation.
(1) Apply 98 - 196 N (22 - 44 lbs.) force to the push rod of the auto tensioner by pressing it against a metal (cylinder block,..etc.), and measure the movement of the push rod.
Standard value:
Within 1 mm (0.04 inch)
A: Length when it is free (not pressed)
B: Length when it is pressed
A - B: Movement
(2) If it is outside the standard value, change the auto tensioner.
(3) Use a press or vise to gently compress the auto tensioner push rod until pin hole A of the push rod and pin hole B of the tensioner cylinder are aligned.
CAUTION: If the compression speed is too fast, the rod may become damaged, so be sure to carry out this operation slowly.
(4) Once the holes are aligned, insert the set pin.
NOTE: When replacing the auto tensioner with a new part, the pin will be in the auto tensioner.
(5) Install the auto tensioner to the engine.
]B[ Timing Belt Installation.
(1) Align the timing marks on the crankshaft sprocket, crankshaft sprocket and oil pump sprocket.
(2) After aligning the timing mark on the oil pump sprocket, remove the cylinder block plug and insert a Phillips screwdriver with a diameter of 8 mm (0.32 inch). Check to be sure that the screwdriver goes in 60 mm (2.36 inch) or more. If the screwdriver will only go in 20 - 25 mm (0.79 - 0.98 inch) before striking the silent shaft, turn the sprocket once, realign the timing mark and check that the screwdriver goes in 60 mm (2.36 inch) or more.
The screwdriver should not be taken out until the timing belt is installed.
(3) Install the belt to the crankshaft sprocket, oil pump sprocket and camshaft sprocket in that order, so that there is no slackness in the belt tension.
CAUTION: If the timing belt is re-used, install so that the arrow marked on it at time of removal is pointing in the clockwise direction.
(4) Set the tension pulley so that the pin holes are at the bottom, press the tension pulley lightly against the timing belt, and then provisionally tighten the fixing bolt.
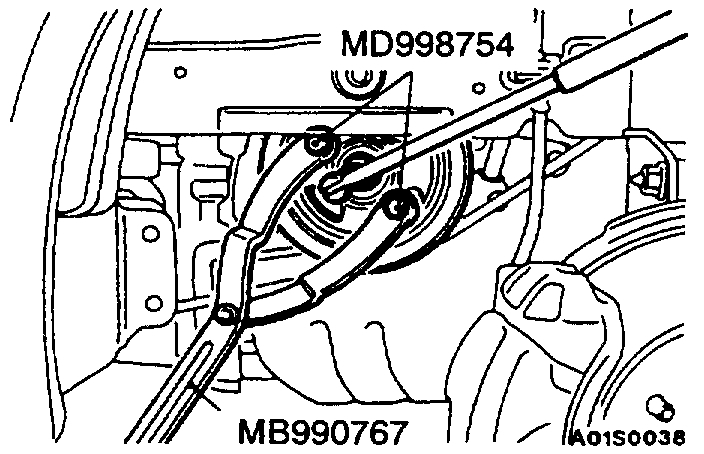
(5) Screw the tool into the engine left support bracket until its end makes contact with the tensioner arm. At that point, screw the tool in some more and then remove the set wire attached to the auto tensioner.
(6) Remove the tool.
(7) Tighten the fixing bolt to the specified torque
Tightening torque: 48 Nm (35 ft. lbs.)
(8) Adjust the timing belt tension.
]C[ Timing Belt Tension Adjustment.
(1) After turning the crankshaft 1/4 of a revolution in the anticlockwise direction, turn it in the clockwise direction until the timing marks are aligned.
(2) Loosen the tension pulley fixing bolt, and then use the special tool and a torque wrench to tighten the fixing bolt to the specified torque while applying tension to the timing belt.
Standard value:
3.5 Nm (2.6 ft. lbs.) [Timing belt tension torque]
CAUTION: When tightening the fixing bolt, make sure that the tension pulley does not turn with the bolt.
(3) Turn the crankshaft two revolutions in the clockwise direction so that the timing marks are aligned. After leaving it for 15 minutes, measure the amount of protrusion of the auto tensioner.
Standard value (A): 3.8 - 4.5 mm (0.150 - 0.177 inch)
(4) If the amount of protrusion is outside the standard value, repeat the operation in steps (1) to (3).
(5) Check again to be sure that the timing marks of each sprocket are aligned.
]D[ Timing Belt Front Lower Cover Timing Belt Front Upper Cover Installation.
Install the bolts, being careful not to mistake the bolt sizes.
Post-installation Operation:
(1) Under Cover Installation.
(2) Engine Adjustment.
TIMING BELT B
Removal
Follow removal steps outlined in illustration.
Removal Service Points
[A] Crankshaft Sprocket Removal.
(1) Use the special tool to remove the bolt.
(2) Use the special tool to remove the crankshaft sprocket.
[B] Timing Belt B Removal.
CAUTION: If timing belt "B" is to be re-used, use chalk to mark it with an arrow on its flat side indicating the turning direction (to the right).
Installation
Installation in reverse order as removal.
Installation Service Points
]A[ Timing Belt B Installation, Adjustment.
(1) Install timing belt "B" by the following procedure.
1) Ensure that crankshaft sprocket "B" timing mark and the silent shaft sprocket timing mark are aligned.
2) Fit timing belt "B" over crankshaft sprocket "B" and the silent shaft sprocket. Ensure that there is no slack in the belt.
(2) Adjust the tension of timing belt "B" by the following procedure.
1) Temporarily fix the timing belt "B" tensioner so the center of the tensioner pulley is to the left and above the center of the installation bolt. Temporarily attach the tensioner pulley so the flange is toward the front of the engine.
2) Holding the timing belt "B" tensioner up with your finger in the direction of the arrow, place pressure on the timing belt so the tension side of the belt is taut. Now tighten the bolt to fix the tensioner.
CAUTION: When tightening the bolt, ensure that the tensioner pulley shaft does not rotate with the bolt. Allowing it to rotate with the bolt can cause excessive tension on the belt.
3) To ensure that the tension is correct, depress the belt (point A) with a finger. If not, adjust.
Standard value: 5 - 7 mm (0.20 - 0.28 inch)
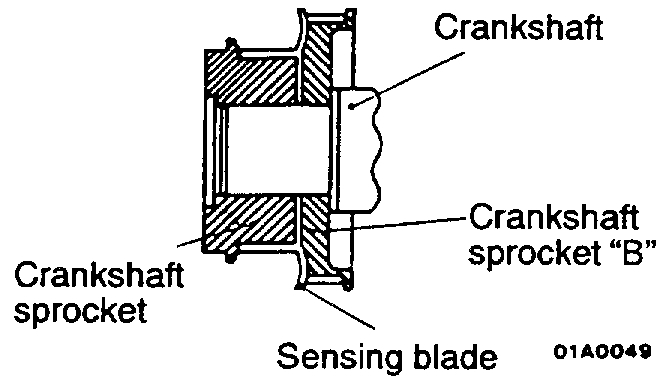
]B[ Sensing Blade Installation.
When installing, make sure the direction is correct.
]C[ Crankshaft Sprocket Installation.
Use the special tool to tighten the bolts to the specified torque.
Tightening torque: 108 - 127 Nm (80 - 94 ft. lbs.)
NOTE: Apply the minimum amount of engine oil to the bearing surface and thread of the crankshaft bolt.
_____________________________________________
The engine you listed is a 1.8. I checked all models of this vehicle and the only engine available is the 2.4. These directions correlate with the 2.4. Please recheck engine size.
Let me know if you have other questions.
Take care,
Joe
Images (Click to make bigger)
SPONSORED LINKS
Wednesday, January 2nd, 2019 AT 5:37 PM