Hi dburgette,
Hope the following explains the installation process.
CRANKSHAFT SENSOR
Removal
1. Disconnect crankshaft sensor harness connector.
2. Position harmonic balancer so that window in interrupter ring is lined up with sensor. Loosen sensor retaining bolt until sensor is free to slide in pedestal. Remove pedestal mounting bolts. Carefully remove sensor and pedestal as an assembly.
Installation
1. Loosen bolt on pedestal until sensor is free to slide in pedestal. Verify that window in interrupter ring is properly positioned. Install sensor and pedestal as an assembly. Install and tighten pedestal mounting bolts.
2. Rotate harmonic balancer until interrupter ring fills sensor slot and edge of window is aligned with edge of deflector on pedestal. Insert Crankshaft Position Sensor Adjuster (J-36179) into gap between sensor and each side of interrupter ring.
3. If gauge will not slide past sensor on either side of ring, sensor is out of adjustment or interrupter ring is bent. Check clearance at 3 positions around outer interrupter ring (about 120 degrees apart).
ADJUSTMENTS
CRANKSHAFT SENSOR
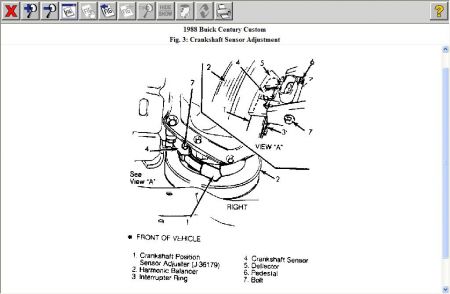
1. Loosen bolt on sensor pedestal and insert Position Sensor Adjuster (J-36179) into gap between sensor and interrupter on each side of ring. See Fig. 3 .
2. Make sure interrupter is sandwiched between blades of adjuster and both blades are properly inserted into sensor slot. Tighten sensor while maintaining light pressure on sensor.
3. A clearance of .025" (.64 mm) is required on either side of interrupter ring. Check clearance at 3 positions around outer interrupter ring (about 120 degrees apart). If interrupter ring contacts sensor at any point during harmonic balancer rotation, the interrupter ring is bent and must be replaced.
IGNITION SYSTEM - C3I (FWD) -1988 Buick Century Custom 10/13/2006
Oct 13, 2008 at 9:20 AM
