Hello -
BRAKE PADS
Brake pads can be replaced without disconnecting the brake fluid hose from the caliper or having to bleed the brakes. Replace pads in sets.
NOTE: This procedure is applicable to both front and rear brake pads.
Removal
1. Raise and support vehicle. Remove wheels.
2. Remove plastic caps from guide bolts and remove guide bolts from caliper. Disconnect brake pad wear sensor wire from holder. See Fig. 11 .
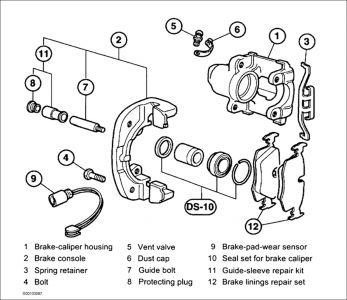
3. Using a screwdriver, unhook anti-rattle clip from caliper. Pull caliper straight off disc. If there is a ridge on the disc edge, the caliper piston will have to be pushed into the caliper slightly before the caliper can be removed. Do not let the brake caliper hang from the brake hose. Support it from the chassis with strong wire. With the pads removed, residual hydraulic pressure may cause the caliper piston to slide out. Use a wooden block to hold the piston in place.
4. Remove brake pads from caliper. Carefully pry wear sensor from pad using a thin screw driver. If reusing the sensor, use care when removing as it is easily damaged during removal.
5. Mark any worn brake pads. In the event of one sided wear, do not change brake pads around. New brake pads should only be installed if the brake disc thickness is greater than or equal to minimum thickness.
6. Note residual lining thickness of brake pads and clean. Do not grease brake lining back plate.
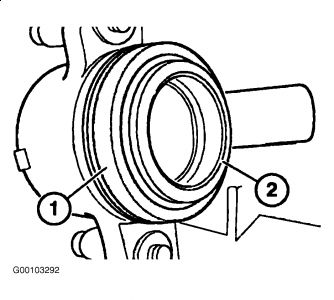
CAUTION: Dust sleeve must not come into contact with anti-squeak compound as it may cause dust sleeve to expand.
7. Check dust sleeve (1) for damage and replace if necessary. See Fig. 12 . Clean contact surfaces (2) of brake piston and coat with a thin layer of anti-squeak compound.
Installation
1.Inspect calipers for signs of leakage. Check that piston slides smoothly into caliper. Replace caliper if any faults are found. See BRAKE CALIPER .
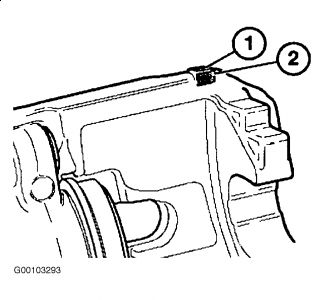
NOTE: Grease contact surfaces on brake caliper at top and bottom.
2. Clean contact surfaces (1,2) of brake pad tee heads on brake caliper and thinly coat with anti-squeak compound. See Fig. 13 .
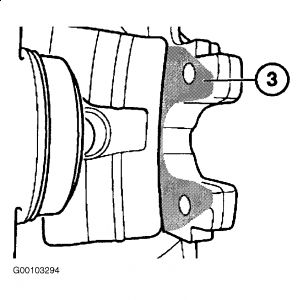
3. Clean contact surface (3) of brake pads on brake caliper and thinly coat with anti-squeak compound. See Fig. 14 .
4. Clean hammer head guides on brake caliper holders and coat with a thin layer of anti-squeak compound.
CAUTION: When pressing down piston, note brake fluid level in expansion tank. If it will overflow, draw off some with a syringe dedicated to brake fluid.
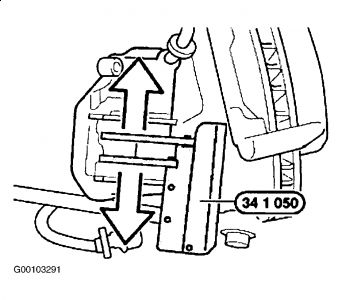
5. Turn piston fully back with special tool 34 1 050. See Fig. 15 .
6. Only clean guide bolts and inspect for damage. Do not grease. Check threads. Replace components as necessary.
NOTE: If the brake lining indicator light came on prior to brake pad replacement, the wear sensor should be replaced.
7. Insert brake pad wear sensor into cutout in new pad.
8. Replace plastic plugs.
9. Check brake fluid level.
10. Replace wheels and tighten wheel lug bolts to specification. See TORQUE SPECIFICATIONS .
11. When installation is complete, pump brake pedal several times to seat pads.
Sep 16, 2009 at 11:22 PM