Backfire, no start

Tiny
CATCHINGPRIME
  • MEMBER
  • 2006 CHEVROLET COLORADO
  • 2.8L
  • 4 CYL
  • 2WD
  • MANUAL
  • 135,000 MILES
This truck has sat for four years. Trying to make it run, have fire to all four cylinders and 57 to 60 psi on the fuel rail. About to replace injectors, these are working but seem to be somewhat plugged. The pintle caps are worn and not sure they are sealing good. Do not have compression test yet, loaned gauge waiting to get it back. Thought someone may have ran into this before? Oh, the intake to engine manifold gaskets are leaking, about to replace. Thanks for any and all ideas!
Saturday, August 18th, 2018 AT 7:26 AM

10 Replies

Tiny
JACOBANDNICKOLAS
  • MECHANIC
  • 108,366 POSTS
Hi and thanks for using 2CarPros.com.

The fuel pressure should be 50 to 57 psi. You are a little high, but it should run. If the engine is backfiring and has sat for four years, I have a feeling you have some valves that are stuck open causing the backfire and no start.

You mentioned checking compression. That is where I would start.

This link shows in general how to check it. You may already know, but thought I would add it in case.

https://www.2carpros.com/articles/how-to-test-engine-compression

Here are the directions specific to your vehicle for checking compression. The attached picture correlates with these directions.
__________________________________________

Engine Compression Test

Tools Required
J 38722 Compression Tester

A compression pressure test of the engine cylinders determines the condition of the rings, the valves, and the head gasket.

1. Important: The battery must be at or near full charge. Do not block the throttle open.

Remove the air duct from the throttle control module.
2. Remove the ignition control modules.
3. Disable the fuel system.
4. Remove the spark plugs.
5. Measure the engine compression, using the following procedure:
1 Firmly install J 38722 to the spark plug hole.
2 Have an assistant crank the engine through at least four compression strokes in the testing cylinder.
3 Check and record the readings on J 38722 at each stroke.
4 Disconnect J 38722.
5 Repeat the compression test for each cylinder.
6. Record the compression readings from all of the cylinders. A normal reading should be approximately 1482 kPa (215 psi). The lowest reading should not be less than 70 percent of the highest reading.
7. The following are examples of the possible measurements:
When the compression measurement is normal, the compression builds up quickly and evenly to the specified compression on each cylinder.
When the compression is low on the first stroke and tends to build up on the following strokes, but does not reach the normal compression, or if the compression improves considerably with the addition of three squirts of oil, the piston rings may be the cause.
When the compression is low on the first stroke and does not build up in the following strokes, or the addition of oil does not affect the compression, the valves may be the cause.
When the compression is low on two adjacent cylinders, or coolant is present in the crankcase, the head gasket may be the cause.
8. Install the air duct to the throttle body.
9. Install the spark plugs.
10. Enable the fuel system.
11. Install the ignition control modules.

_________________________________________

If compression is off and you determine the timing chain has jumped or is an issue, here are the directions for replacing it. The remaining pictures correlate with these directions.

_________________________________________

Timing Chain and Sprockets Replacement

Tools Required
J 44221 Camshaft Holding Tool
J 45059 Angle Meter

Removal Procedure
1. Remove #1 cylinder spark plug.
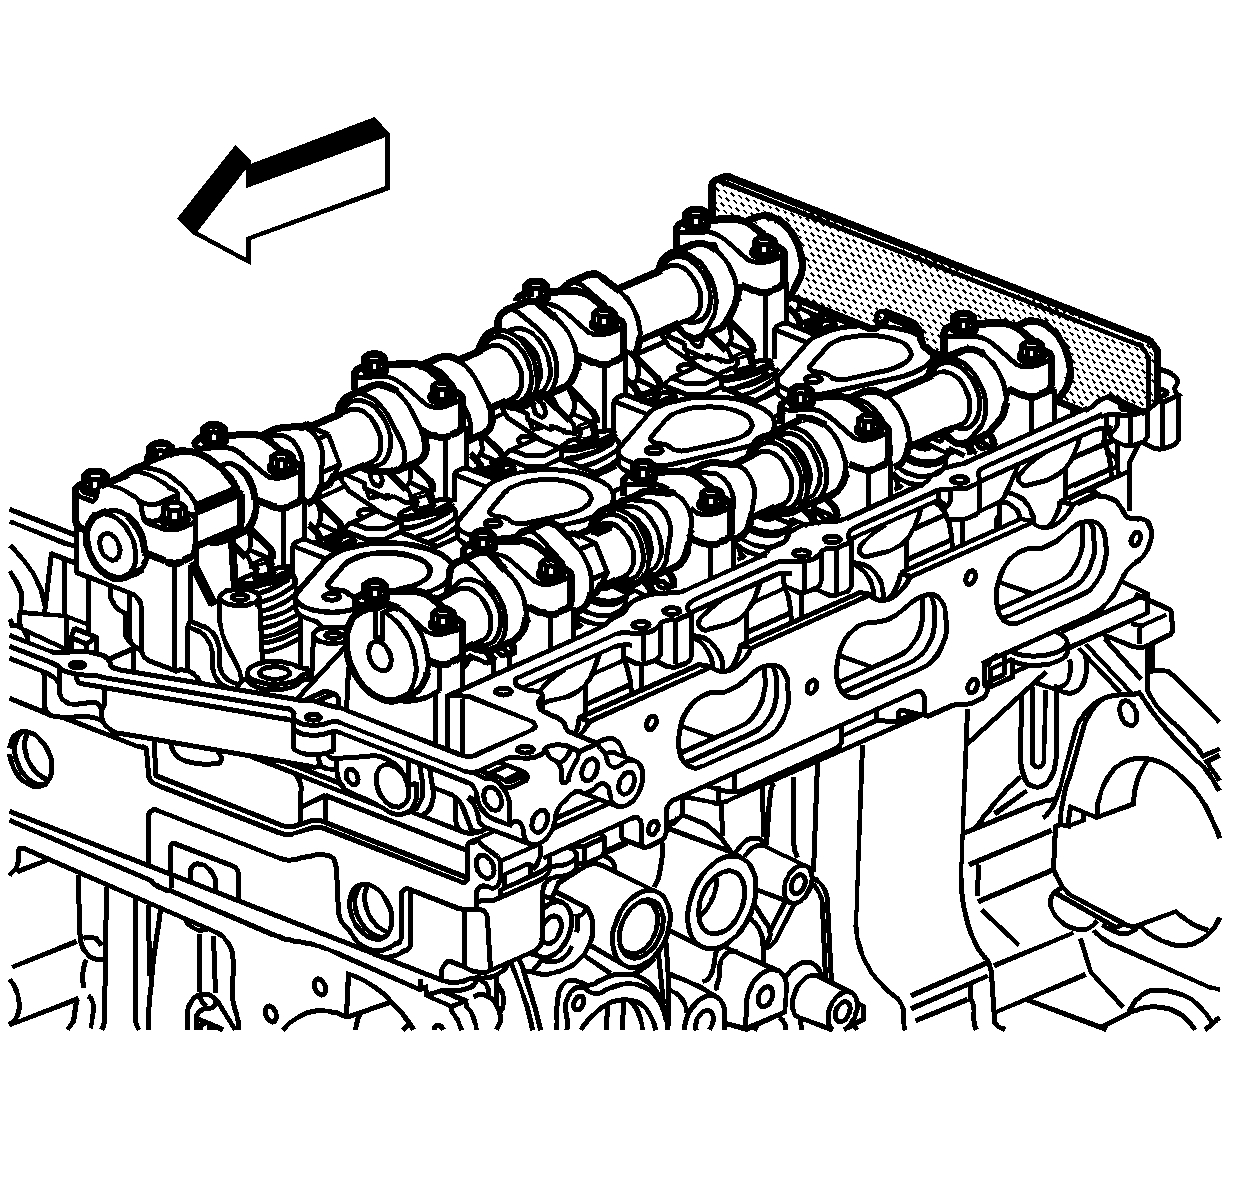
2. Remove the camshaft cover.
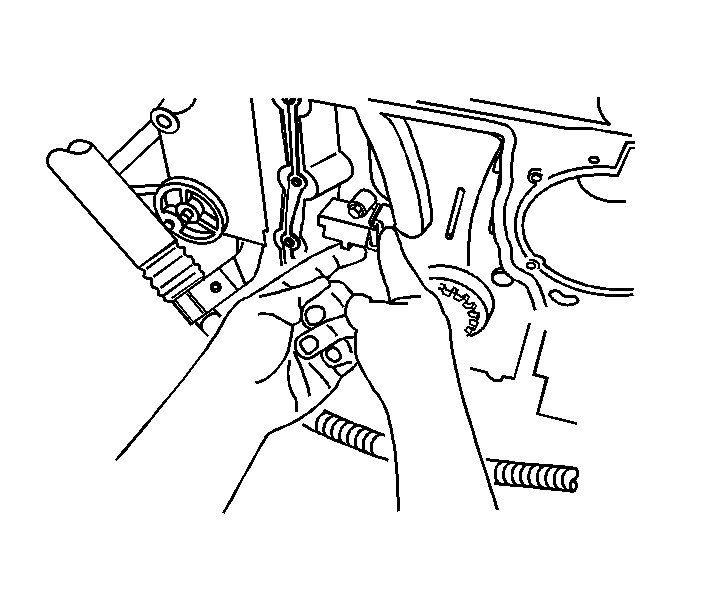
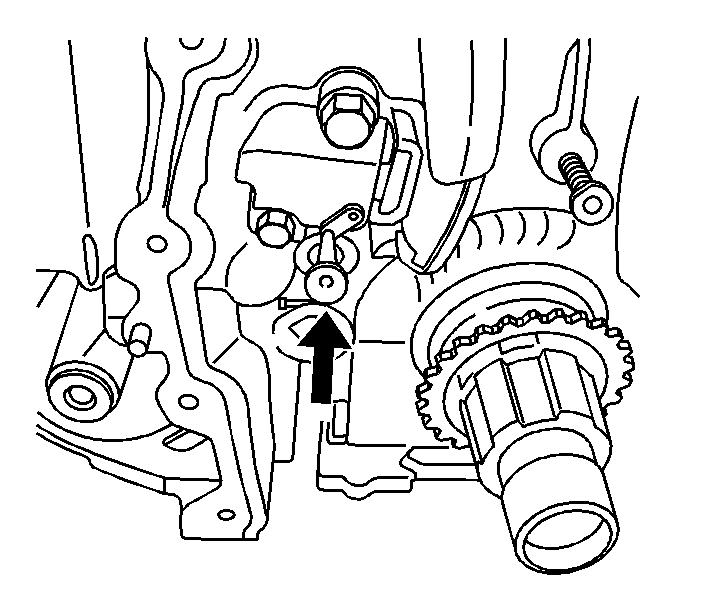
3. Remove the camshaft position (CMP) sensor.
4. Remove the engine front cover.
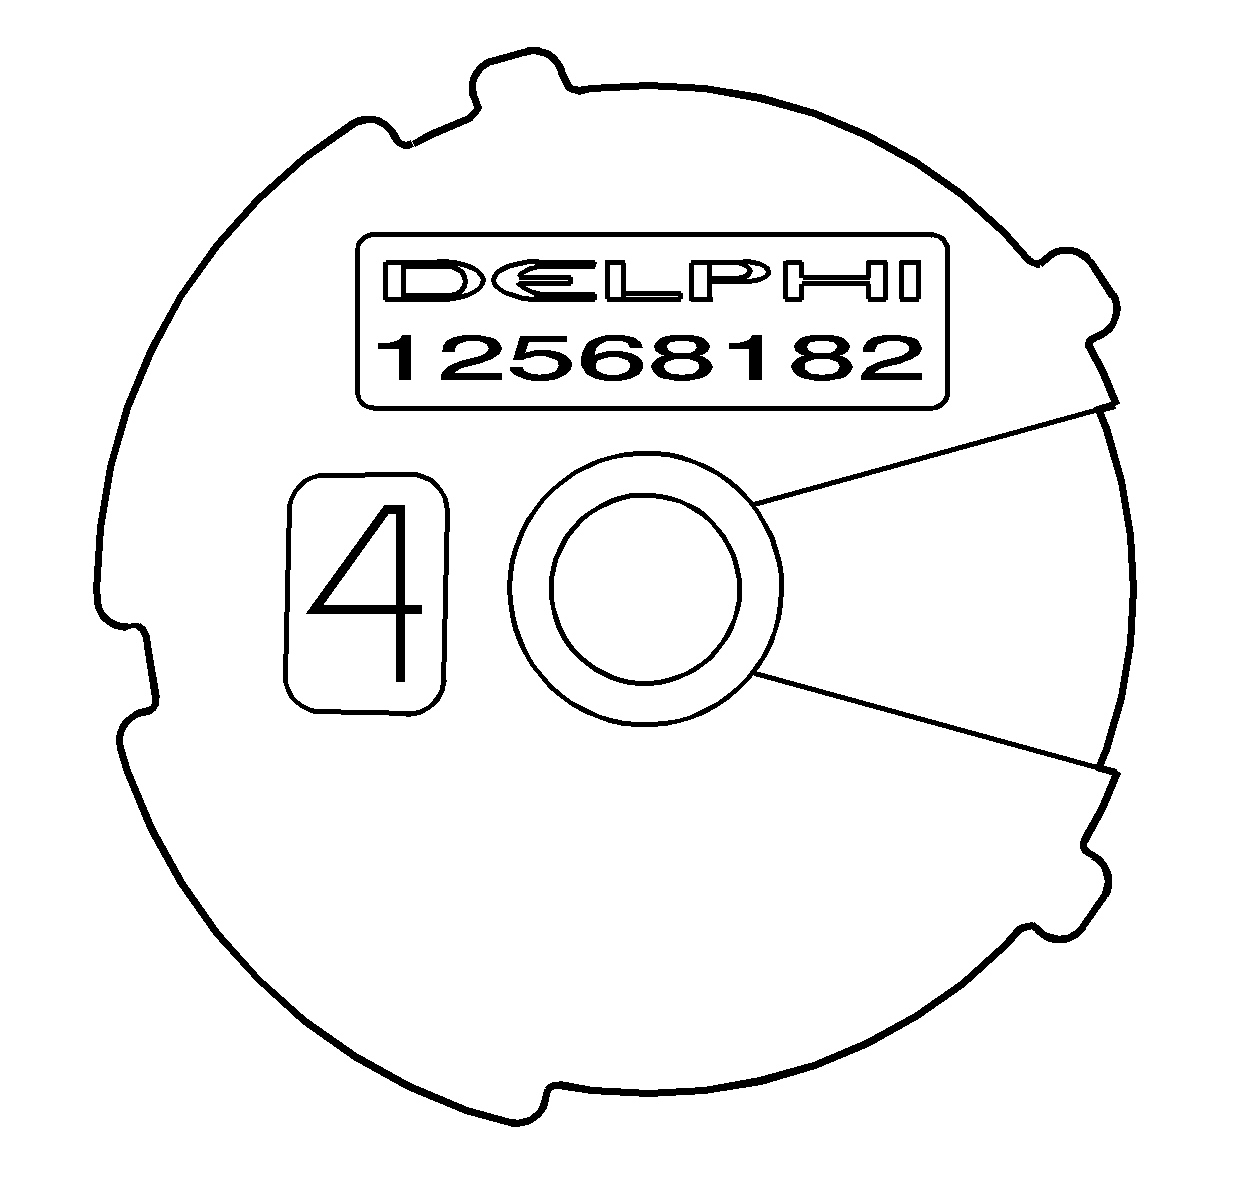
5. Rotate the crankshaft in the engine rotational direction clockwise, until the #1 piston is at top dead center (TDC) on the compression stroke.The word Delphi on the exhaust camshaft position actuator will be parallel with the cylinder head to cam cover mating surface.
6. Caution: Refer to Camshaft Holding Tool Caution in Service Precautions.

Install the J 44221 to the rear of the camshafts.
7. Release the tension on the timing chain by moving the tensioner shoe in.
8. Place the tee into the tensioner to hold the shoe in place.
9. Remove the exhaust camshaft position actuator bolt.Discard the bolt.
10. Remove the exhaust camshaft position actuator.
11. Remove the intake camshaft sprocket bolt.Discard the bolt.
12. Remove the intake camshaft sprocket.
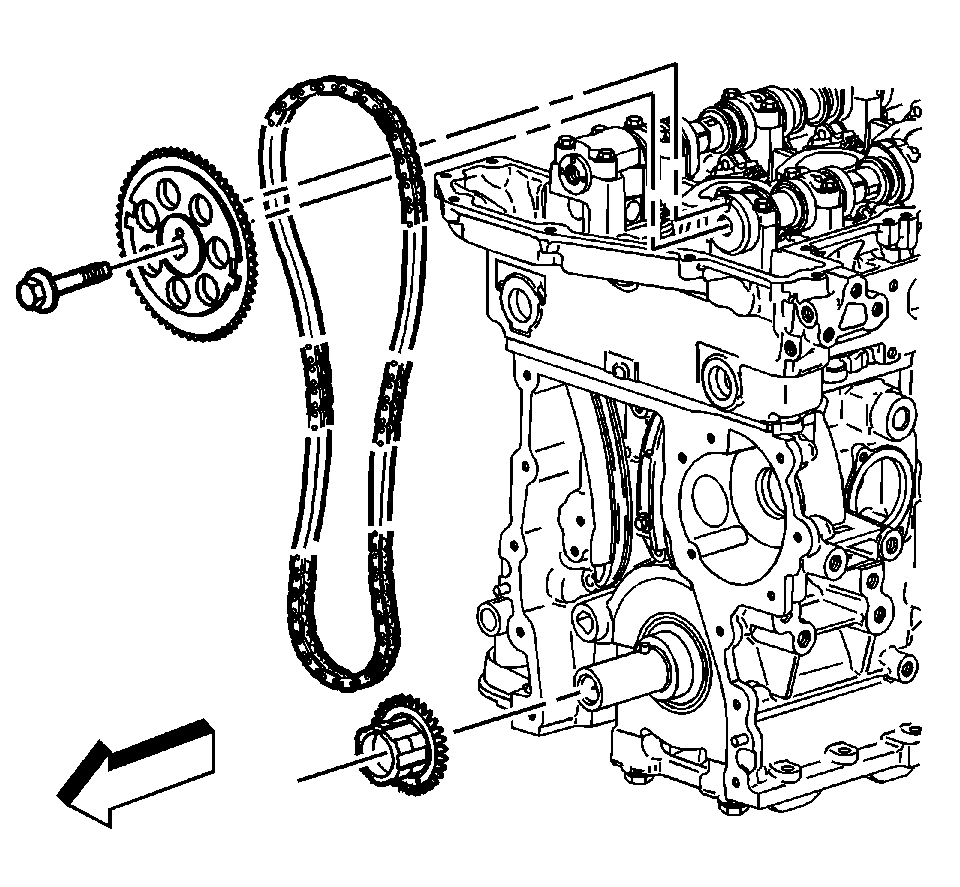
13. Remove the timing chain.
14. Remove the crankshaft sprocket.
15. Clean and inspect the timing chain and sprockets. Refer to Timing Chain and Sprockets Cleaning and Inspection.

Installation Procedure
1. Important: Ensure the #1 piston is at TDC. The pin on the crankshaft for the timing chain sprocket should be straight up.

Install the crankshaft sprocket to the crankshaft snout.

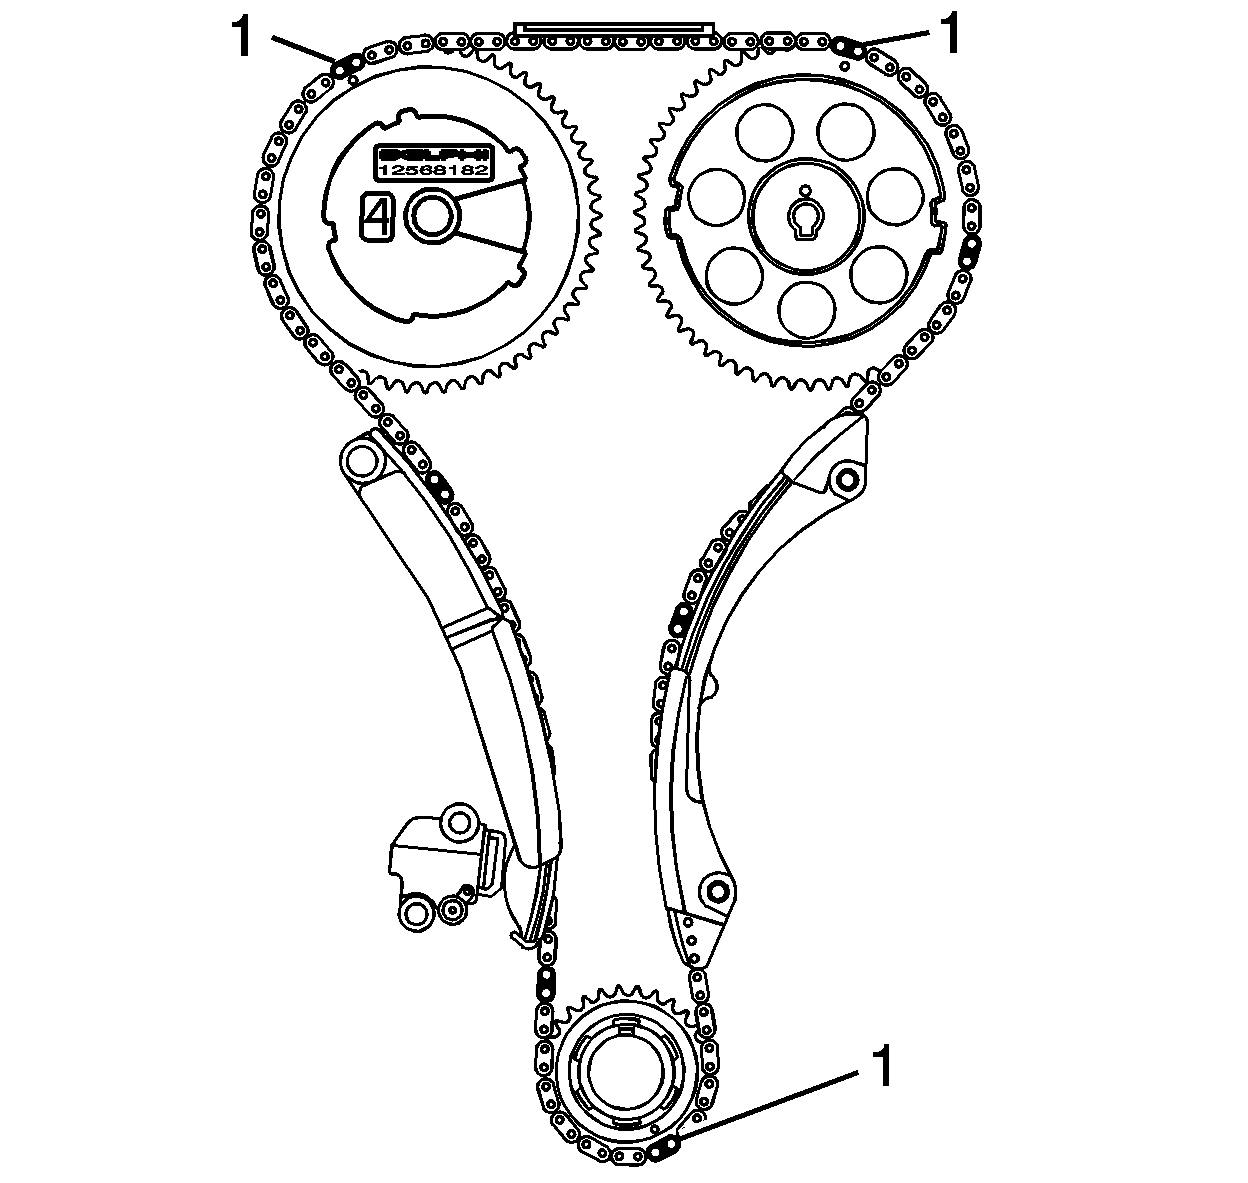
2. Important: Every 7th link of the timing chain is darkened to aid in aligning the timing marks.

Install the intake camshaft sprocket into the timing chain.Aligning the dark link (1) of the timing chain with the timing mark on the intake camshaft sprocket.
3. Feed the timing chain down through the opening in the cylinder head.
4. Install the timing chain on the crankshaft sprocket.Aligning the dark link (2) of the timing chain with the timing mark on to the crankshaft sprocket.

5. Important: Ensure the alignment pin is properly engaged with the camshaft

Install the intake camshaft sprocket onto the intake camshaft.
6. Notice: Refer to Fastener Notice in Service Precautions.

Install the new intake camshaft sprocket bolt.
1 Tighten the intake camshaft sprocket bolt to 20 Nm (15 ft. lbs.).
2 Use the J 45059 to rotate the intake camshaft sprocket bolt an additional 100 degrees.
7. Ensure the camshaft actuator is fully advanced prior to installation.
8. Install the exhaust camshaft actuator into the timing chain.Aligning the dark link (1) of the timing chain with the timing mark (1) on the exhaust camshaft position actuator sprocket.

9. Notice: The camshaft actuator must be fully advanced during installation. Engine damage may occur if the camshaft actuator is not fully advanced.

Important
To aid in aligning the actuator to the camshaft, use a 25 mm (1 inch) wrench on the hex of the camshaft to rotate
Ensure the alignment pin is properly engaged with the camshaft

Install the exhaust camshaft actuator onto the exhaust camshaft.
10. Install the new exhaust camshaft actuator bolt.
0 Tighten the exhaust camshaft actuator bolt to 25 Nm (18 ft. lbs.).
1 Use the J 45059 to rotate the exhaust camshaft actuator bolt an additional 135 degrees.
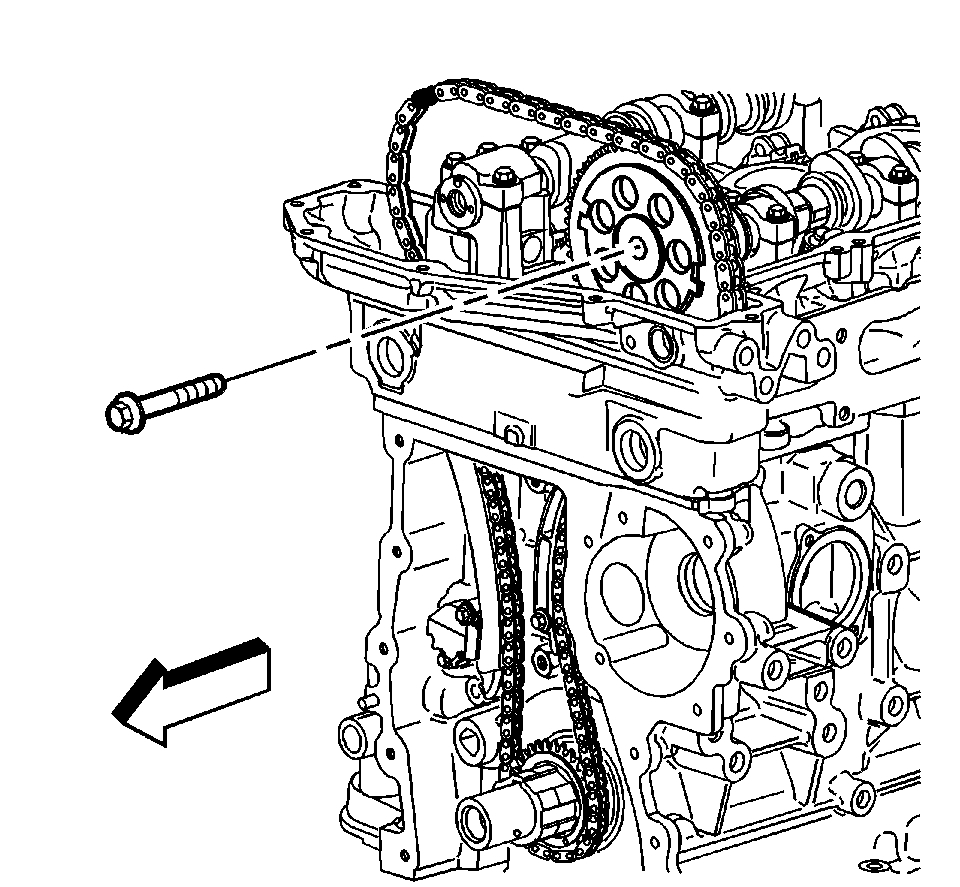
11. Remove the tee in the timing chain tensioner to regain tension on the timing chain.
12. Remove the J 44221 from the camshafts.
13. The dark links (1) on the timing chain should be aligned with the marks on the sprockets as shown.
14. Install the engine front cover.
15. Install the camshaft position (CMP) sensor.
16. Install the camshaft cover.
17. Install #1 cylinder spark plug.

_________________________________________

I added these directions just in case. It is not an easy one to do.

Let me know if this helps. Also, if you find the compression is low, do a wet compression test to confirm it is not a ring problem. Let me know what you find.

Take care,
Joe
Was this
answer
helpful?
Yes
No
+1
Saturday, August 18th, 2018 AT 7:30 PM
Tiny
CATCHINGPRIME
  • MEMBER
  • 6 POSTS
Thank you Joe, for the quick reply and the very detailed answer. I am not fully up to spec on the newer engines, I am showing my age here are I not? But always trying to learn something new. I am wondering about something, should I discover that this engine is indeed out of time and needs a new chain, I have been told that one must pull the rack and pinion then the oil pan to get to the last bolt or two that holds the timing cover on. Is that correct or have I been mislead? I certainly hope for the latter.
Was this
answer
helpful?
Yes
No
Sunday, August 19th, 2018 AT 10:31 AM
Tiny
JACOBANDNICKOLAS
  • MECHANIC
  • 108,366 POSTS
Hi again, and no, you are not showing your age. Lol I started in the late 1980's and things have surely changed; at times I question if it has been for the better.

As far as removing the rack, I do not remember it being an issue. Also, the directions I sent do not indicate it. If there is something that causes problems, Alldata (which is where the directions came from) usually will indicate it. However, things can be missed. Honestly, and I am going to show my age, it has been some years since I done one of these, but I do not recall that being an issue, especially on a 2wd. If I had to guess, the timing chain is not going to be the problem. You may have some stuck valves. A compression test (wet and dry) will indicate that for us.

Feel free to ask away. I will do my best to get you the answers you need.

Take care,
Joe
Was this
answer
helpful?
Yes
No
Sunday, August 19th, 2018 AT 6:45 PM
Tiny
CATCHINGPRIME
  • MEMBER
  • 6 POSTS
Hello again, I got time to get back to the truck today. Pulled the valve cover, (have new gasket set coming), turned engine by hand, all valves open and close; none stuck. I did notice something curious though. As the engine was turned by hand the top of the timing chain would gain slack between the two cams and then tighten up again. Could this be from the actuators being unpowered? Or could something else be wrong? When I get enough of it reassembled I will compression test, got gauge back now, and will repost with the results. Thanks for all the help and for your time.
Was this
answer
helpful?
Yes
No
Wednesday, August 22nd, 2018 AT 7:17 PM
Tiny
KEN L
  • MASTER CERTIFIED MECHANIC
  • 43,339 POSTS
It is normal for the chain to gain and lose tension. Here is a guide to help you do the compression test:

https://www.2carpros.com/articles/how-to-test-engine-compression

Please run down this guide and report back.

Cheers, Ken
Was this
answer
helpful?
Yes
No
Saturday, August 25th, 2018 AT 2:56 PM
Tiny
CATCHINGPRIME
  • MEMBER
  • 6 POSTS
Hi Ken, thank you for the response. No compression test yet as the engine is not reassembled to that point yet, I do however have an interesting situation. I have discovered that all the intake side valves are hanging open about 250th. There are no broken springs and you can reach in and remove the roller/rocker arms with your fingers, they are not touching anything until the cam lobes are almost fully engaged. And as the engine is rotated by hand the timing chain gets slack between the exhaust cam actuator cog and the intake cog, and then snaps back up against the top shoe. Now I have rotated it enough that the timing marks line up on the dark links, and they do line up, and the flats on the cams line up as well. I examined the intake side valves with a bore-scope and cannot see any dropped seats, so I am at a loss as to why these valves won't close. I am trying to avoid pulling this head at all costs, as you know it is a nightmare and the head bolts tend to twist off on these. But if anyone has any ideas on these valves please let me know. I have been doing valves and heads since I was 17, I am almost 58 and have never seen anything like this in my life. Thanks for all responses! Oh, one more thing, which way for sure does this engine rotate when running, from standing in front of the vehicle looking at the windshield?
Was this
answer
helpful?
Yes
No
Sunday, August 26th, 2018 AT 2:31 PM
Tiny
CATCHINGPRIME
  • MEMBER
  • 6 POSTS
Hey everyone, follow up post; figured out why all the valves are hanging open on the intake side. These rockers are setting on hydraulic lifters and all the lifters on that side have lost prime. I took a Mitchell1-diy subscription to try and find some information on this engine. But alas, that was the most useless $50.00 I have ever spent. It is impossible to find anything on that site, when you do a key word search, all you get back are headings that make no sense, then you click on one that seems to be what you want and you get some torque specs! I mean who came up with that nonsense anyway. Stick with AllData, I looked at their example and at least when you click engine mechanical you can find information on lifters, not torque specs and thread dimensions. Anyway, I found out that these lifters are hydraulic and I have started to spray them with cleaners to relieve them of gunk, then will change oil and add a qt of ATF and crank of and on for a while to finish cleaning and pump them up. Changed oil several times and hope the lifters come up to close the valves, if they do, reassemble and start her up. Run about five hundred miles and changed oil again, and yet once more again, until it comes out clean. Then go to full synthetic, and away we go!
Was this
answer
helpful?
Yes
No
Sunday, August 26th, 2018 AT 7:26 PM
Tiny
KEN L
  • MASTER CERTIFIED MECHANIC
  • 43,339 POSTS
Lol, yep, it sounds like you are on the right track make sure you use the correct oil weight (it matters). Please let us know what happens upload a video from your phone to your response of the truck running so we can see. ;)
Was this
answer
helpful?
Yes
No
Monday, August 27th, 2018 AT 10:13 AM
Tiny
CATCHINGPRIME
  • MEMBER
  • 6 POSTS
Hello everyone. Just wanted to update, got the bore scope in and discovered there is no damage to the valves, and the lifters are pumping up like they should. So decided it was time to stop messing around and tear it down, I am one bolt short of pulling the head then I will really be able to see what is going on. When I get it off I will post some pictures so everyone can see what has been going on with these valves. For information sake, if you pull one of these heads or the five cylinder, there mounted with TTY bolts, take a air hammer with a punch tool and rattle the heck out of um, crack um then rattle again until they do not crack any more then turn um out, did not brake any! Found this out from a mechanic who has done many of these and it really works. Will update again when I have more information. And thanks to all for your help.
Was this
answer
helpful?
Yes
No
Sunday, September 30th, 2018 AT 6:06 PM
Tiny
JACOBANDNICKOLAS
  • MECHANIC
  • 108,366 POSTS
Thanks for the tip. It is a good one. We will watch for your reply.

Take care,
Joe
Was this
answer
helpful?
Yes
No
Sunday, September 30th, 2018 AT 7:53 PM

Please login or register to post a reply.

Sponsored links