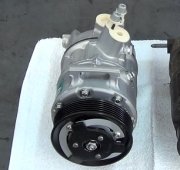
If the compressor is still good, then it must be the compressor clutch that has locked up. The best thing to do would be replace the A/C compressor clutch assembly. Here are directions. The attached pics correlate with the directions.
__________________________
1988 Chevrolet Corvette V8-350 5.7L
Removal
Vehicle Heating and Air Conditioning Compressor Clutch Service and Repair Procedures Nippondenso 10 Cylinder Compressor Clutch Assembly Replace Removal
REMOVAL
Fig. 1 Exploded view of compressor clutch assembly. Nippondenso 10 cylinder
1. Using socket and suitable holding device, remove shaft nut, Fig. 1.
2. Using socket and tool SST No. 07112-77010, or equivalent, remove pressure plate.
3. Remove shims from shaft.
4. Using suitable snap ring pliers, remove snap ring retaining pulley.
5. Remove pulley from shaft by carefully tapping with plastic hammer.
6. Disconnect stator lead wires from compressor housing.
7. Using suitable snap ring pliers, remove snap ring retaining stator, then remove stator.
8. Remove bearing snap ring from pulley.
9. Using SST No. 07110-77011 or equivalent, press out two bearings.
___________________________________________
1988 Chevrolet Corvette V8-350 5.7L
Installation
Vehicle Heating and Air Conditioning Compressor Clutch Service and Repair Procedures Nippondenso 10 Cylinder Compressor Clutch Assembly Replace Installation
INSTALLATION
Fig. 2 Installing bearings in rotor. Nippondenso
pic 2
1. Using SST No. 07110-77011 or equivalent, press shield ring and two new bearings into pulley boss until fully seated, Fig. 2.
2. Install bearing snap ring into groove in pulley.
3. Install stator on compressor and install snap ring retaining stator.
4. Connect stator lead wires to compressor housing.
5. Install pulley on compressor shaft and install snap ring retaining pulley.
6. Adjust clearance between pressure plate and pulley by installing shims on compressor shaft.
7. If clearance is not within.016-.028 inch, adjust it by adding or removing shims until correct clearance is obtained.
________________________________
Let me know if this helps.
Joe
Images (Click to make bigger)
Tuesday, April 21st, 2020 AT 5:00 PM