5.0L Engines
1. Drain the cooling system.
CAUTION
When draining the coolant, keep in mind that cats and dogs are attracted by ethylene glycol antifreeze, and are quite likely to drink any that is left in an uncovered container or in puddles on the ground. This will prove fatal in sufficient quantity. Always drain the coolant into a sealable container. Coolant should be reused unless it is contaminated or several years old.
2. Disconnect the battery ground.
3. Remove the upper radiator hose.
Click image to see an enlarged view
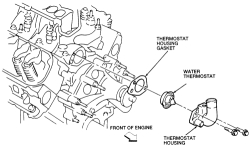
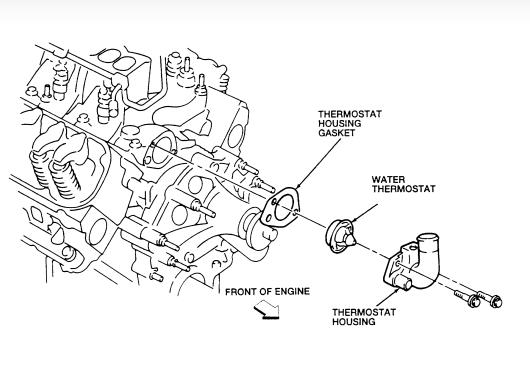
Fig. Exploded view of the 5.0L engine thermostat and related components
4. Remove the 2 thermostat housing attaching bolts.
5. Loosen the bypass hose at the water pump.
6. Remove the thermostat housing. You may have to tap it loose with a plastic mallet or your hand.
To install:
WARNING
Do not use a sharp metal tool for scraping. Damage to the sealing surfaces could result and cause a leak.
Click image to see an enlarged view
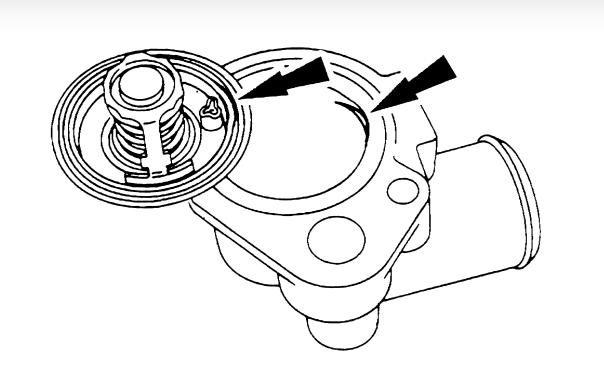
Fig. Align the air bleed hole on the thermostat with the notch in the housing, which is also the 12 o-clock position
1. Clean all mating surfaces thoroughly.
2. Position the thermostat in the housing making sure that the air release valve is in the up (12 o'clock) position.
3. Coat the mating surfaces of the housing and engine with an adhesive type sealer. Position the new gasket on the engine and place the housing on the engine. Tighten the bolts to 12-18 ft. lbs. (16-24 Nm).
Images (Click to enlarge)
Jun 24, 2019 at 6:59 PM
(Merged)