PRIMARY TIMING CHAIN & SPROCKETS
Remove upper radiator crossmember. Disconnect fan assembly connector. Remove fan assembly. Remove drive belts. Using Crankshaft Pulley Holder (8191), hold crankshaft pulley and remove center bolt. Using a 3-jaw puller, remove crankshaft pulley. Remove upper intake manifold. See INTAKE MANIFOLD. Remove electrical and vacuum harness retaining clips from valve cover studs. Remove ignition coils. Remove valve covers. Remove power steering pump, and set aside. Remove drive belt tensioner pulley and bracket. Remove timing chain cover. CAUTION:DO NOT turn camshaft. Rotate engine by turning crankshaft. Align crankshaft sprocket timing mark to mark on oil pump housing. Mark on oil pump housing is 60 degrees ATDC of number one cylinder. See Fig. 9. Fig. 9: Identifying Primary Timing Chain Aligning Marks Courtesy of CHRYSLER CORP. CAUTION:When timing chain is removed and cylinder heads are installed, DO NOT rotate camshafts or crankshaft without first locating proper crankshaft position. Remove primary timing chain tensioner from right cylinder head. Remove camshaft position sensor from left cylinder head. Remove chain guide access plug from left cylinder head. See Fig. 10. Remove right camshaft sprocket bolts and sprocket. When camshaft sprocket bolts are removed, camshaft will rotate clockwise. Remove left camshaft sprocket attaching bolts and sprocket. Remove lower chain guide and tensioner arm. Remove primary timing chain. Fig. 10: Exploded View Of Primary Timing Chain Components Courtesy of CHRYSLER CORP.
CAUTION:DO NOT turn crankshaft while removing crankshaft sprocket. Remove crankshaft sprocket by installing crankshaft pulley bolt. Using a 3-arm puller, remove crankshaft sprocket. DO NOT rotate crankshaft. Inspection Remove right valve cover. Looking through cylinder head timing drive cavity, inspect primary chain tensioner plunger. Rotate engine clockwise to remove any chain slack and to achieve maximum tensioner extension. If maximum wear indicator groove (machined groove) on plunger is visible, timing chain and/or related components are worn or stretched to service limits. See Fig. 11. Inspect all sprockets, tensioners and chain guides. Replace as necessary. Fig. 11: Resetting Primary Chain Tensioner Plunger Courtesy of CHRYSLER CORP.
Installation
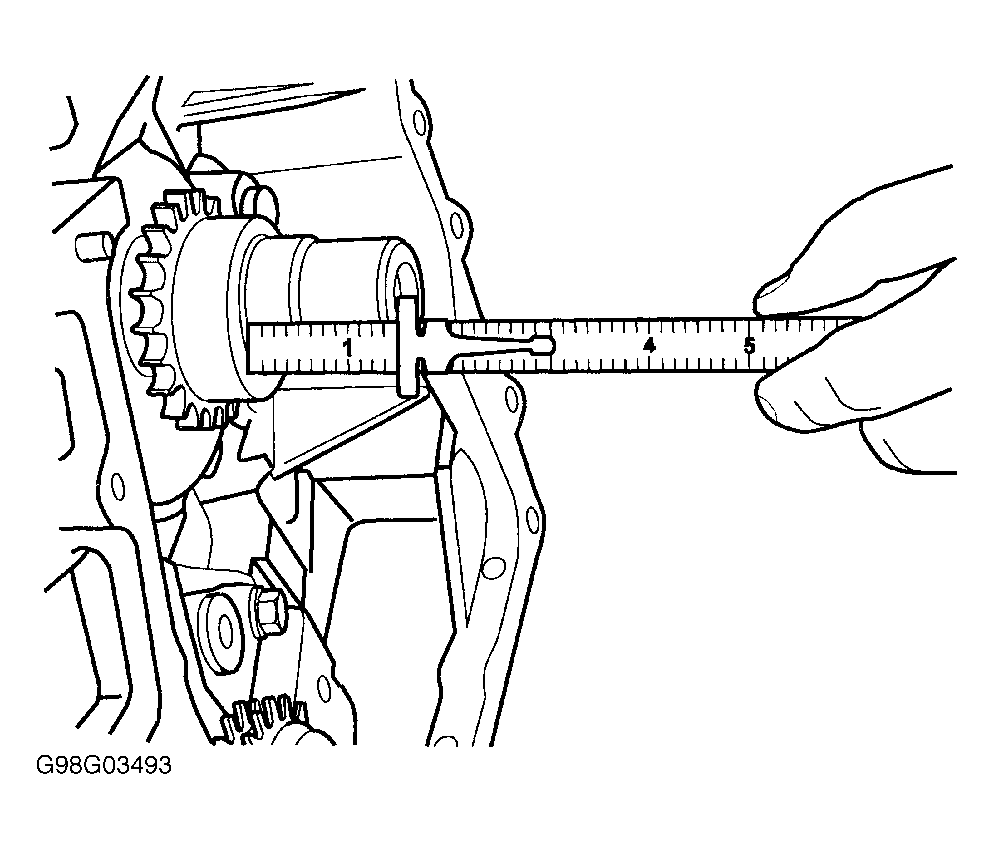
Using sprocket installer, install crankshaft sprocket until sprocket bottoms against crankshaft step flange. See Fig. 12. DO NOT rotate crankshaft. Measure crankshaft sprocket installed depth from sprocket outer face to end of crankshaft. See Fig. 13. Sprocket should be 1.535-1.539" (38.99-39.09 mm) below end of crankshaft. Align crankshaft sprocket timing mark to mark on oil pump housing. Lubricate primary timing chain and guides with engine oil. Place left primary timing chain sprocket onto chain so that timing mark on sprocket is located between 2 plated links on chain. See Fig. 9. Lower primary timing chain, with left sprocket, through left cylinder head opening. Loosely position left camshaft sprocket over camshaft hub. Allow camshaft sprockets to float on camshaft hub. Align plated link to crankshaft sprocket timing mark. Position chain onto water pump drive sprocket. Align right camshaft sprocket timing mark to plated link on timing chain and loosely position over camshaft hub. See Fig. 9. Ensure all plated links are properly aligned to timing marks on all sprockets. Install left lower chain guide and tensioner arm and tighten bolts to specification. See TORQUE SPECIFICATIONS. Inspect "O" ring on chain guide access plug before installing. Replace "O" ring if necessary. Install chain guide access plug and tighten to specification.
Fig. 12: Installing Crankshaft Sprocket Courtesy of CHRYSLER CORP. Fig. 13: Measuring Crankshaft Sprocket Installed Depth Courtesy of CHRYSLER CORP. Remove primary timing chain tensioner from tensioner housing. See Fig. 14. Place check ball end of tensioner into shallow end of Timing Chain Tensioner Resetting Gauge (8186). See Fig. 11. Using hand pressure, slowly depress tensioner until check ball unseats and oil is purged from cylinder. Reinstall tensioner into tensioner housing. Position cylinder plunger into deeper end of timing chain tensioner purging and resetting tool. Using hand pressure, slowly depress tensioner until tensioner body bottoms against top edge of timing chain tensioner purging and resetting tool. NOTE:Ensure tensioner is properly reset. Failure to properly reset tensioner will cause tensioner jamming. Install chain tensioner into right cylinder head. Using a 3/8" drive shaft and breaker bar, rotate right camshaft until camshaft hub aligns to camshaft sprocket. Install right camshaft sprocket and tighten bolts to specification. See TORQUE SPECIFICATIONS. Rotate left camshaft. Install left camshaft sprocket and tighten bolts to specification. Slightly rotate engine clockwise to remove timing chain slack, if necessary. Using a flat-blade screwdriver, gently pry tensioner arm toward tensioner slightly to release tensioner arm. See Fig. 15. Ensure tensioner extends. To complete installation, reverse removal procedure.
Images (Click to make bigger)
SPONSORED LINKS
Wednesday, November 24th, 2010 AT 6:53 PM