Camshaft timing

Tiny
HMAC300
  • MECHANIC
  • 48,601 POSTS
I am assuming iginition timing
Was this
answer
helpful?
Yes
No
Saturday, June 29th, 2019 AT 4:15 PM (Merged)
Tiny
YANNICRISANTOS
  • MEMBER
  • 131 POSTS
Thanks
Was this
answer
helpful?
Yes
No
Saturday, June 29th, 2019 AT 4:15 PM (Merged)
Tiny
JAFO104
  • MEMBER
  • 36 POSTS
  • 1993 MAZDA PROTEGE
  • 4 CYL
  • FWD
  • MANUAL
  • 191,000 MILES
I have a 1993 protege, with 1.8 SOHC. I just replaced the oil pump. When I put the timing belt and cranshaft pully back on the engine, I set the camshaft timing marks to the 12 and 3 position. I also set the crankshaft pully to the timing mark at the 12 position with the mark on the block. Just like the haynes manual said. The issue now is I can't get it in time. It is timed TDC at the timing mark on the block and not the timing mark on the timing belt cover "T". I checked TDC on #1 and the crankshaft pully needs to rotate about a 1/8 of a turn clockwise to hit TDC. Should I taked the timing belt back off and rotate the crankshaft pully forward so the crank is TDC? The car currently runs, just idles rough and very low. I've tried adjusting the distributor but the timing mark will not come clockwise enough to hit the "T" on the cover.

As always your help is much appreciated.
Was this
answer
helpful?
Yes
No
Saturday, June 29th, 2019 AT 4:16 PM (Merged)
Tiny
JNOVACK
  • MECHANIC
  • 723 POSTS
Here is sprocket diagrams and install procedure

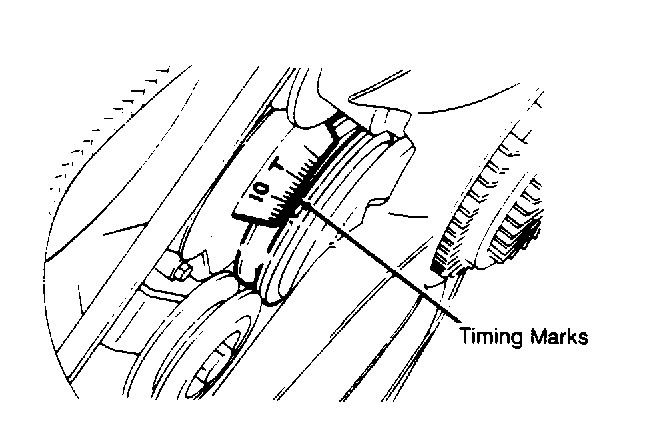
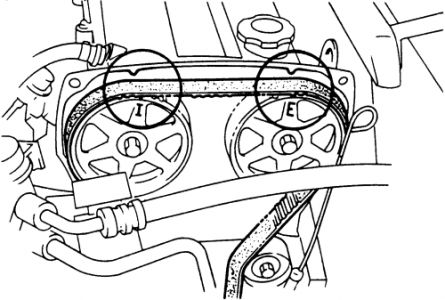
Crankshaft sprocket timing marks for the 1990-94 1.8L DOHC engine


https://www.2carpros.com/forum/automotive_pictures/52960_0900c152800397cc_1.jpg


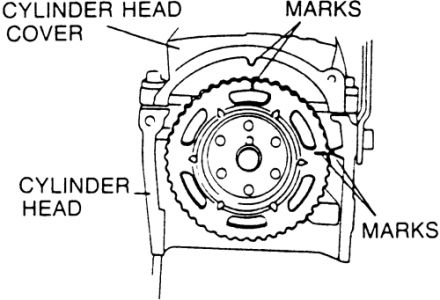
Camshaft sprocket timing marks for the 1990-94 1.8L DOHC engine


https://www.2carpros.com/forum/automotive_pictures/52960_0900c152800397cd_1.jpg


If removed, install the idler pulley and tighten the bolt to 38 ft. lbs. (52 Nm).
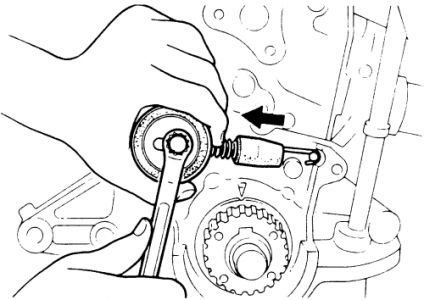
Install the tensioner and tensioner spring. Pry the tensione outward and temporarily tighten the tensioner lockbolt with the tensioner spring fully extended.

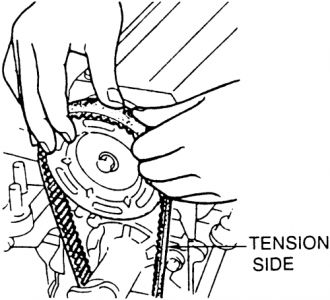
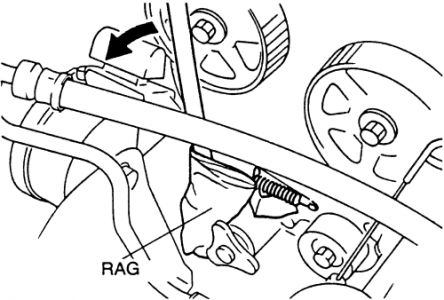
Pry the tensioner pulley (protect it with a rag) outward to fully extend the spring, then tighten the bolt to hold it in position


https://www.2carpros.com/forum/automotive_pictures/52960_0900c152800397ce_1.jpg


Make sure the crankshaft sprocket timing mark is aligned with the mark on the oil pump housing and the camshaft sprocket timing marks are aligned with the marks on the seal plate.
Install the timing belt so there is no looseness at the idler pulley side or between the camshaft sprockets. If reusing the old belt, make sure it is installed in the same direction of rotation.
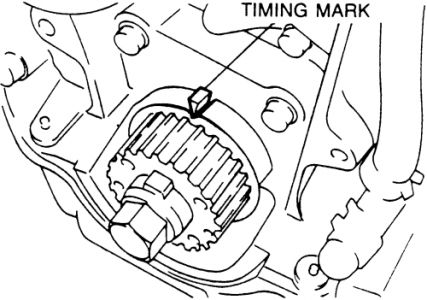
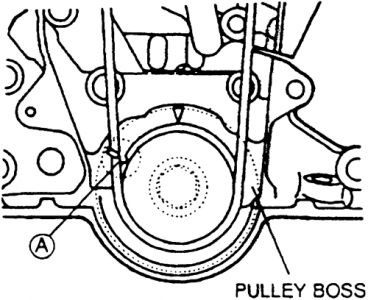
On 1993-94 vehicles, temporarily install the pulley boss and lockbolt.
Turn the crankshaft 2 turns clockwise and align the crankshaft sprocket timing mark. On 1993-94 vehicles, face the pin on the pulley boss upright. Make sure the camshaft sprocket timing marks are aligned.
Turn the crankshaft 15/6 turns clockwise and align the crankshaft sprocket timing mark with the tension set mark for proper belt tension adjustment. On 1992-94 vehicles, remove the lockbolt and pulley boss.

To properly set tension on the belt, turn the crankshaft 15/6 turns and align the tension set mark with the crankshaft sprocket


https://www.2carpros.com/forum/automotive_pictures/52960_0900c152800397cf_1.jpg


Make sure the crankshaft sprocket timing mark is aligned with the tension set mark. Loosen the tensioner lockbolt and allow the spring to apply tension to the belt. Tighten the tensioner lockbolt to 38 ft. lbs. (52 Nm).
On 1993-94 vehicles, install the pulley boss and lockbolt.
Turn the crankshaft 2-1/6 turns clockwise and make sure the timing marks are correctly aligned.

Check the deflection of the timing belt to ensure proper tension has been set on the belt


https://www.2carpros.com/forum/automotive_pictures/52960_0900c152800397d0_1.jpg


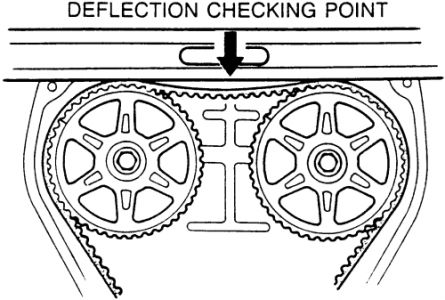
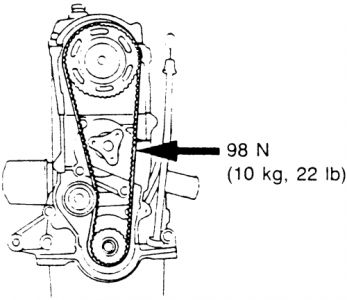
Apply approximately 22 lbs. pressure to the timing belt at a point midway between the camshaft sprockets. The belt should deflect 0.35-0.45 in. (9.0-11.5mm).
On 1993-94 vehicles, hold the boss with a suitable tool and tighten the lockbolt to 123 ft. lbs. (21 Nm).
Install the timing belt covers and tighten the bolts to 95 inch lbs. (11 Nm).
Install the engine oil dipstick.
Install the spark plugs and connect the spark plug wires.
Install the timing belt inner guide plate, if equipped. Make sure the dished side of the plate faces away from the timing belt. Install the outer guide plate, if equipped.
Install the crankshaft pulley and tighten the bolts to 13 ft. lbs. (17 Nm).
Install the water pump pulley and the accessory drive belts. Adjust the belt tension.
Install the engine side or undercover, as necessary. Connect the negative battery cable.
Start the engine and check for proper operation. Check the ignition timing
Was this
answer
helpful?
Yes
No
Saturday, June 29th, 2019 AT 4:16 PM (Merged)
Tiny
JAFO104
  • MEMBER
  • 36 POSTS
I have the crankshaft sprocket lined up like the first picture, which is currently causing my problem. Mine is a SOHC engine. The diagram you provided is for a DOHC, I have the SOHC.
Thank you
Was this
answer
helpful?
Yes
No
-1
Saturday, June 29th, 2019 AT 4:16 PM (Merged)
Tiny
JNOVACK
  • MECHANIC
  • 723 POSTS
I will send sohc install
12.Align the dowel on the camshaft with the dowel pin facing straight up. The dowel pin on the camshaft should also be facing upward.

13.Install the camshaft sprocket bolt. Hold the sprocket with the prybar and tighten the bolt(s) to 36-45 ft. lbs. (49-61 Nm).

14.Make sure the timing marks on the sprockets are properly aligned.


https://www.2carpros.com/forum/automotive_pictures/52960_0900c152800397c7_1.jpg


Fig. 1: Crankshaft sprocket timing marks for the 1.6L and 1.8L SOHC engines


https://www.2carpros.com/forum/automotive_pictures/52960_0900c152800397c8_1.jpg


Fig. 2: Camshaft sprocket timing marks for the 1.6L and 1.8L SOHC engines


https://www.2carpros.com/forum/automotive_pictures/52960_0900c152800397c9_1.jpg


Fig. 3: Install the timing belt tensioner and spring. Fully extend the tensioner spring then tighten the bolt to hold the tensioner pulley


https://www.2carpros.com/forum/automotive_pictures/52960_0900c152800397ca_1.jpg


Fig. 4: When installing the belt, ensure that there is no looseness on the tension side of the belt

15.Install the timing belt tensioner and spring. Temporarily tighten the bolt with the spring fully extended.
16.Install the timing belt so there is no looseness on the tension side. If reusing the old timing belt, make sure it is reinstalled in the same direction of rotation.
17.Turn the crankshaft 2 turns clockwise and check the timing mark alignment. If the marks are not aligned, repeat Steps 11-14.
18.Loosen the tensioner lockbolt to set the tension, then torque the bolt to 19 ft. lbs. (25 Nm).
19.Turn the crankshaft 2 turns clockwise and check the alignment of the timing marks. If they are not aligned, repeat Steps 11-16.


https://www.2carpros.com/forum/automotive_pictures/52960_0900c152800397cb_1.jpg


Fig. 5: Check timing belt deflection by applying pressure at the point shown, and measuring the deflection

20.Apply approximately 22 lbs. pressure to the timing belt on the side opposite the tensioner, at a point midway between the sprockets. The belt should deflect 0.43-0.51 in. (11-13mm). If the tension is not as specified, repeat Steps 14-17 or, if necessary, replace the tensioner spring.
21.Install the spark plugs and connect the spark plug wires.
22.Install the upper and lower timing belt covers. Tighten the bolts to 95 inch lbs. (11 Nm).
23.Install the crankshaft pulley boss and tighten the lockbolt to 123 ft. lbs. (21 Nm), while holding the pulley boss with a suitable tool.
24.Install the crankshaft pulley and baffle plate.
25.Install the undercover or side cover. Connect the negative battery cable.
26.Start the engine and check for proper operation. Check the ignition timing.
Was this
answer
helpful?
Yes
No
+4
Saturday, June 29th, 2019 AT 4:16 PM (Merged)
Tiny
JAFO104
  • MEMBER
  • 36 POSTS
After looking at the diagram, if I lined up the marks, but installed the belt incorrectly by failing to put the correct pressure on the belt as described during installation, could the camshaft slip off the marks?
Was this
answer
helpful?
Yes
No
Saturday, June 29th, 2019 AT 4:16 PM (Merged)
Tiny
JNOVACK
  • MECHANIC
  • 723 POSTS
It can, please read my last post its for the sohc follow exactly
Was this
answer
helpful?
Yes
No
Saturday, June 29th, 2019 AT 4:16 PM (Merged)
Tiny
JAFO104
  • MEMBER
  • 36 POSTS
Thanks for your help. That's why I keep coming back.
Was this
answer
helpful?
Yes
No
Saturday, June 29th, 2019 AT 4:16 PM (Merged)
Tiny
JNOVACK
  • MECHANIC
  • 723 POSTS
Any time we can help please come back thank you
Was this
answer
helpful?
Yes
No
+1
Saturday, June 29th, 2019 AT 4:16 PM (Merged)
Tiny
JAFO104
  • MEMBER
  • 36 POSTS
Well, after following the diagram exactly, I still cannot get it to time to the timing marks on the timing cover. The car runs, idles and seems to have plenty of power. I can't get the timing mark to come to 10 degrees before top dead center. The timing notch in the crank puley lines up at 12 o'clock straight up when the timing light is on. When I double checked all of the marks on the crank and cam they are still lined up.

The car has about 80,000 miles on the last timing belt. COuld the belt be stretching? If I didn't put it back on in the same direction it was runing before would the belt be unusally loose. I've checked the rotor and it is lined up with #1 cylinder when the cylinder is at TDC.

Or should I not worry about it if it's running fine?

Thanks
Was this
answer
helpful?
Yes
No
+1
Saturday, June 29th, 2019 AT 4:16 PM (Merged)
Tiny
2CP-ARCHIVES
  • MEMBER
  • 4,542 POSTS
  • 1993 MAZDA PROTEGE
  • 4 CYL
  • FWD
  • AUTOMATIC
  • 110,200 MILES
1993 Mazda Protege 1.8 DOHC mileage: 110,200. The timing belt stripped. I bought a repair manual and aligned the timing marks as required, attempted to start the car but it would not start. A relative told me that the head was no good now as the pistons bent the valves. The Mazda dealership mechanic said that my motor is a non-interference motor and the valves should be fine. I even was allowed to copy the timing procedure from their repair manual. Their procedure is the same one I followed in the Haynes repair manual I had bought which brings me back to square one! Is there a flaw in the manual I was not told about or am I timing it incorrectly? Please help! Thank you!
Was this
answer
helpful?
Yes
No
Saturday, June 29th, 2019 AT 4:16 PM (Merged)
Tiny
JNOVACK
  • MECHANIC
  • 723 POSTS
Ok now when you put the belt back on as you look at the front of motor was the belt tight on the right side if so great you did it now how does it run smooth? Or still running rough I will still do some checking to see how to get the timing correct I have a friend at a mazda dealer thats were I got the diagrams for you so he'll help with this
Was this
answer
helpful?
Yes
No
Saturday, June 29th, 2019 AT 4:16 PM (Merged)
Tiny
2CP-ARCHIVES
  • MEMBER
  • 4,542 POSTS
Try checking the compression; that will tell you if the valves are bent. Also, check for spark at the proper time.
Was this
answer
helpful?
Yes
No
Saturday, June 29th, 2019 AT 4:16 PM (Merged)
Tiny
JAFO104
  • MEMBER
  • 36 POSTS
I got it as tight as I could without causing the crankshaft sproket to turn and coming off my marks. I ran the car with the top ocver off and it looks like there is play in the belt, maybe that's an optical illusion from the flashlight.

My son drove the car this weekend and said the only thing he noticed was coming to a stop when the car would come to a very low idle the oil light would blink, like it does when it's about to die. Other than that ran ok.

Thanks for the continued help, I've heard these things can be tough to get in time.
Was this
answer
helpful?
Yes
No
Saturday, June 29th, 2019 AT 4:16 PM (Merged)

Please login or register to post a reply.

Sponsored links