Good afternoon,
I attached the removal procedure for the axle for you.
I also posted some pictures.
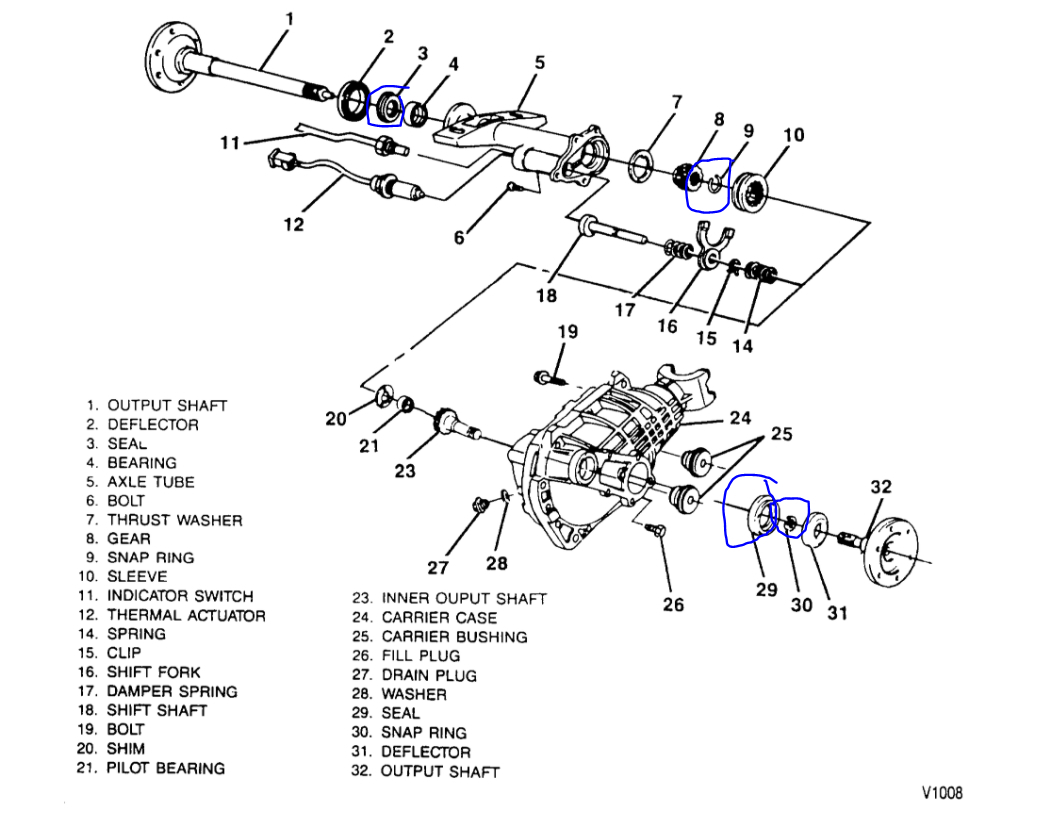
The inner seals will require disassembly of the differential as the C clips I circled need to be released to get the output shafts out to replace the seal.
https://www.2carpros.com/articles/how-a-differential-works
Roy
FRONT DRIVE AXLE
Remove or Disconnect
Tools Required:
- J 36605 Front Knuckle Seal Installer
- Raise vehicle and support it with safety stands.
1. Wheel and tire assembly.
imageOpen In New TabZoom/Print
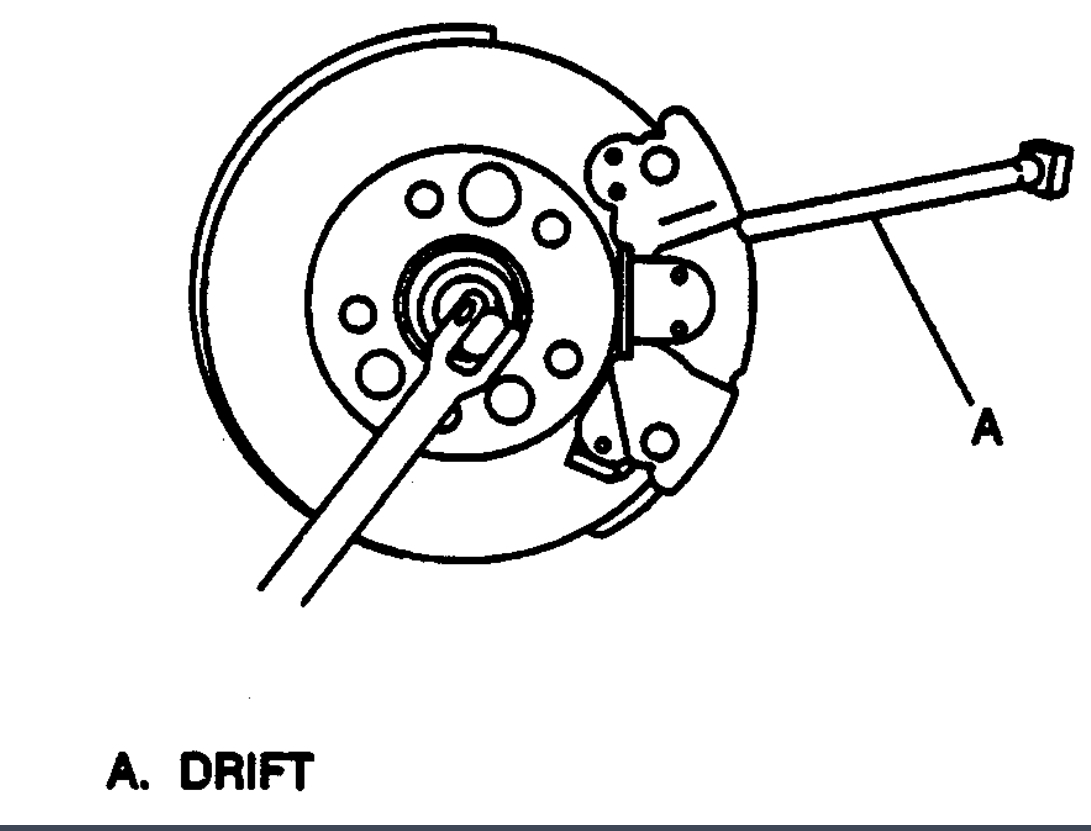
- Insert a drift or large screwdriver through the brake caliper into one of the brake rotor vanes to prevent drive axle from turning.
imageOpen In New TabZoom/Print
2. Drive axle hub nut (203) and washer (202).
3. Stabilizer link..
Important
- Turn steering knuckle to the right or left to obtain enough clearance to remove the stabilizer link.
4. Bolts from inboard joint flange.
- Support inboard end of drive axle. Move knuckle and hub assembly outward to free splined shaft from the hub.
5. Skid plate (if equipped).
6. Drive axle assembly.
Important
- Cover the shock mounting bracket and ball stud on the lower control arm with a shop towel to prevent possible drive axle damage during removal and installation.
- It may be necessary to raise the lower control arm with a jack to ease drive axle removable.
- Wipe the wheel bearing seal area on the knuckle clean.
Inspect
- Seal for cuts or tears.
Important
- Lubricate the seal lip. If seal is cut or torn, inspect the wheel bearing for damage. Replace the seal as follows:
- Pry old seal from knuckle and discard.
- Lubricate the new seal lip.
- Use J 36605 to install the seal in the knuckle.
Install or Connect
- Position drive axle spline shaft and outer CV joint into hub.
- Align bolt holes of inboard CV joint to companion flange.
- Cover the shock mounting bracket and ball stud on the lower control arm with a shop towel to prevent possible drive axle damage during removal and installation.
1. Bolts into CV joint companion flange.
Tighten
- Bolts to 80 Nm. (60 lb ft.).
2. Remove floor jack or stand from beneath lower control arm.
3. Hub washer and nut.
Tighten
- Nut to 237 Nm (175 lb ft).
4. Stabilizer link..
5. Skid plate.
6. Wheel and tire assembly.
Remove or Disconnect
- Raise the vehicle. Support with jack stands.
- Place a drain pan under the axle to catch oil.
1. Lift drive axle.
2. Lower carrier mounting bolt.
- Carefully pry against the lower carrier to provide clearance for output shaft removal. Take care not to damage the carrier case.
3. Output shaft (32). Attach a slide hammer with adapter to the output shaft and pull it from the carrier case. Take care not to damage the carrier case.
4. Deflector (31).
5. Seal (29). Pry out with a screwdriver.
6. Bearing using slide hammer J 23907.
Install or Connect
- It may be necessary to attach a 1/2 inch by 13 inch long extension handle onto the slide hammer for easier pulling of the bearing.
Tools Required:
- J 36600 Seal Installer (K2 models)
- J 22833 Seal Installer (K3 models)
1. Bearing (square shoulder in) using J 22761.
2. New seal (29). Use J 36600 (K2 models) or J 22833 (K3 models). Lubricate the seal lips with grease.
3. Deflector (31).
4. Output shaft (32). Carefully pry against the lower carrier to provide clearance. Take care not to damage the carrier case. Tap the output shaft into place with a soft mallet.
5. Lower carrier mounting bolt, washers, and nut.
Tighten
- Bolts to 110 Nm (80 lb ft).
6. Left drive axle.
7. Tire and wheel.
- Add lubricant as required to the axle.
Images (Click to enlarge)
Feb 4, 2021 at 1:27 PM