We dont' have diagrams either.
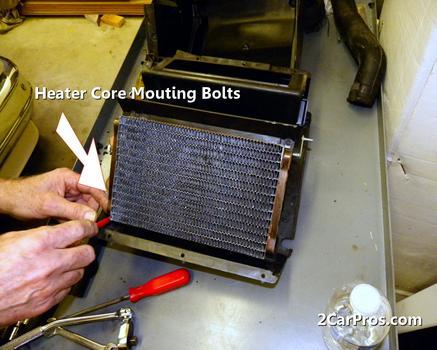
Disconnect battery ground. Drain cooling system. Disconnect heater hoses from heater core and plug openings.
Remove 2 screws from steering column cover and remove cover. Remove steering column trim shrouds. Disconnect all electrical connections from steering column switches.
Remove snap-in lower cluster finish panel(s) to expose 2 screws and 5 bolts. Remove 5 cluster opening finish panel retaining screws and pull panel rearward.
Remove 2 retaining bolts on each side of steering column and remove column opening reinforcement. Disconnect speedometer cable at transaxle. Remove 4 screws retaining cluster and carefully pull rearward enough to remove speedometer cable. Loosely install 2 screws to retain cluster during instrument panel removal.
Remove one bolt and nut at "U" joint and 4 screws at steering column bracket. Remove steering column. Open glove box and depress sides of bin, allowing stops to move beyond instrument panel walls. Allow glove box door and bin to fall to vertical position.
Disconnect all electrical connectors, vacuum hoses, heater control cables and antenna cable. Disconnect all underhood electrical connectors of main wiring harness. Disengage rubber grommet from dash panel and push wire and connectors into instrument panel area.
Remove one instrument panel-to-steering column support bracket retaining nut, accessible through steering column opening. Remove one left and one right lower instrument panel-to-cowl side retaining screws.
Remove 2 instrument panel vertical brace retaining screws. Remove 4 instrument panel cowl top retaining screws. Remove instrument panel from vehicle.
Disconnect connector to blower motor resistor. Remove one screw attaching bottom of heater case to firewall. Remove instrument panel brace from cowl top panel. Remove 2 nuts attaching heater case to firewall in engine compartment.
Loosen sound insulation from cowl top panel in area around air inlet opening. Remove 2 screws attaching support bracket and brace to cowl top panel. Pull heater case away from firewall. To install, reverse removal procedure
SPONSORED LINKS
Tuesday, January 7th, 2014 AT 3:33 PM