Vehicle original color

Tiny
PCULQUI
  • MEMBER
  • 2005 TOYOTA SIENNA
  • 3.3L
  • V6
  • 4WD
  • AUTOMATIC
  • 105,700 MILES
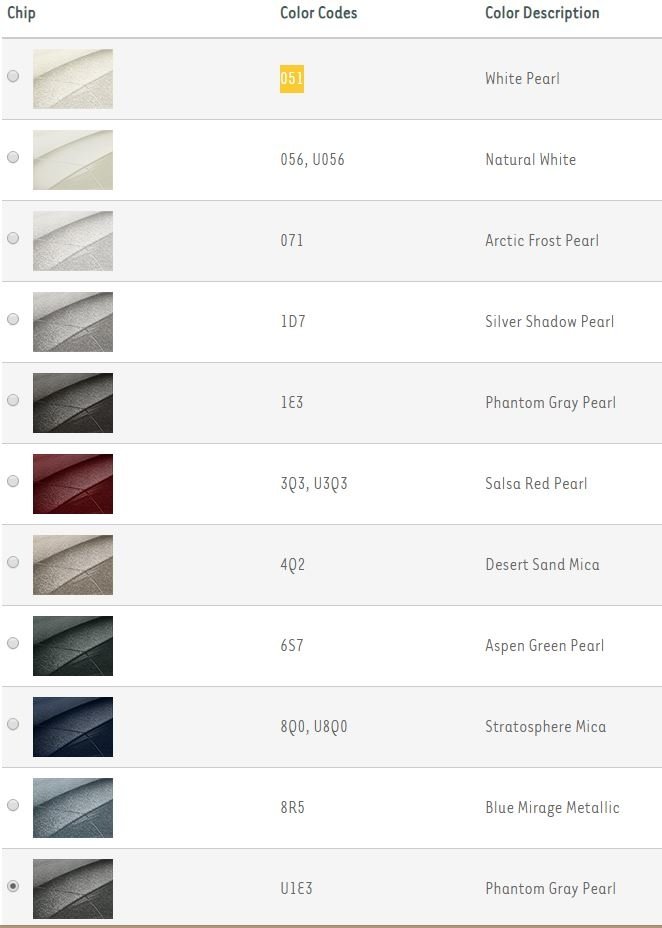
How can I tell the original color of the vehicle? The color code is 08C7V. Now, it doesn't necessarily mean that the color the car has now is the factory color. If I have to fix rust spots, I would like to match the color of the car exactly.
Saturday, March 7th, 2020 AT 11:20 AM

14 Replies

Tiny
STEVE W.
  • MECHANIC
  • 13,002 POSTS
As someone who has done a lot of bodywork over the years, you will never exactly match the existing paint unless you have paint made to match the current color. That is because the UV from sunlight, chemicals in the air and age all work together to alter the color. To get the best match possible a good paint store or shop can start with the OEM color code and use a special camera to take an image and then tune the color to match. However even then it may not match exactly because the factory uses robots and an electrically charged spray system to apply the paint. That causes the pigments and any metallic or pearl additives to stand on edge, because the average spray gun doesn't have this ability the color flop will change as you move and view the repair from other angles.
To add to this, how you do any repairs will also change the colors unless you use the same materials the factory used. Say the OEM used a light gray primer, then 2 coats of base color and a heavy coat of clear. If you try using a dark primer or different color or spray 3 coats of base color, it may not match.
I do not find that as an exterior color on the Sienna, It should be a 3 or 4 digit code like shown in the image. The code is on the data plate on the door, the first three or four are the exterior color the other code is the interior color.
If you want the paint exact use a local paint and body shop, if you want it very close one of the online paint places would likely work like automotivetouchup. Com. Then decide how you want to apply the paint. For 99.9 percent of repairs you will want to spray the paint and the clear coat. Brush applied will never match exactly, it would somewhat work on a solid color but on anything else, spray is the way to go. Or talk to a local body shop about their pricing to paint or even repair spots.
Was this
answer
helpful?
Yes
No
Saturday, March 7th, 2020 AT 12:52 PM
Tiny
PCULQUI
  • MEMBER
  • 354 POSTS
Thanks. I found it it's the IE3 Phantom Gray Pearl. So I would have to purchase the paint and have a professional like yourself see if it's a match.
Was this
answer
helpful?
Yes
No
Saturday, March 7th, 2020 AT 4:35 PM
Tiny
STEVE W.
  • MECHANIC
  • 13,002 POSTS
Being a pearl it will be very hard to match, however it isn't impossible. If you have rust repairs to do now I would probably start by washing the vehicle very well, then use a wax and grease remover. From there I would talk to someone or more than one body shop or automotive paint store, preferably both. Then see what the folks local to you can do with the paint. Get some solid numbers of what the shop would charge you to repair and paint the rusty spots. Then compare that to what the paint and supplies to do the repairs will end up costing for you to do it yourself. Not saying you cannot DIY it, but unless you have a lot of the tools needed you can run up a big bill really quick and a shop might be cheaper overall.
Was this
answer
helpful?
Yes
No
Saturday, March 7th, 2020 AT 6:40 PM
Tiny
PCULQUI
  • MEMBER
  • 354 POSTS
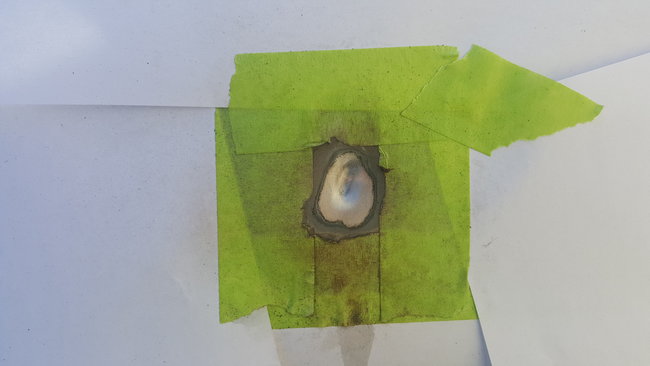
I was able to clean the rust of the dent.
2 questions. Can I leave the area exposed without filler and primer and just covered with automotive masking tape for a day?
2nd. Question: How do I fill in the dent in the area to be painted. It's about 1/4" deep or a little less but there is no hole opening. You really can't see the depth of the dent in the picture.
Was this
answer
helpful?
Yes
No
Sunday, March 8th, 2020 AT 4:04 PM
Tiny
STEVE W.
  • MECHANIC
  • 13,002 POSTS
Could you take a wider picture please? Hard to tell where that is to determine how to repair it and if it's a panel that is easy to get behind. You will also need to go farther out with the sanding and clean the area. As for filling it, It depends on the dent. Ideally you don't want filler very thick as it can crack. You can leave it that way for a while it will not really hurt it, just rust or corrode a bit. In a shop it depends on who is doing the work. If the panel it accessible from behind I'd probably go in with a shrinking hammer and dolly to see if I could take most of the ding out. Then rough it up good and apply a thin coat of a good filler, scuff it and apply another, then sand off as much as needed to get the surface back to original. Then epoxy prime it. Sand that and shoot the color and clear. The problem is that it depends on what panel that is and where the ding is as to how much it will show.
Was this
answer
helpful?
Yes
No
Sunday, March 8th, 2020 AT 4:17 PM
Tiny
PCULQUI
  • MEMBER
  • 354 POSTS
It's on towards the edge of the hood and is right by the indentation design the hood has on both sides. Underneath the hood is another layer of sheet metal that's welded covering the underneath of the hood with the issue.
I guess I can apply filler, thin layer, let it dry (harden), then keep applying thin layers of filler until the dent levels out with the rest of the hood and prime it, paint it, clear coated, wait 48 hours and apply rubbing compound.
Was this
answer
helpful?
Yes
No
Sunday, March 8th, 2020 AT 6:51 PM
Tiny
PCULQUI
  • MEMBER
  • 354 POSTS
How long will this DIY process last?
Was this
answer
helpful?
Yes
No
Sunday, March 8th, 2020 AT 6:52 PM
Tiny
STEVE W.
  • MECHANIC
  • 13,002 POSTS
Good luck, it sounds like you have a plan. That area is a pain to repair without a stud gun or similar because of the double layers. As for how long it will last, that all depends on how well it is prepped and how good the materials used are, I have seen rush jobs that lasted a month and others where they actually cared and used good materials last 10 or more years.
For filler to stick you want a roughened surface, I generally apply filler over an 80 grit scratch. Then you want to sand between the layers of filler to remove the chemicals that will rise as it hardens. Once you get it to a good shape then start with 120 and get it close. Now apply a guide coat, basically a very thin, like a hardly sprayed spritz of cheap black lacquer spray paint. For a DIY job the black duplicolor can stuff works okay. Then sand it to final shape and contour. The guide coat will show you if it's low or smooth. Blow it off and sand with 200 grit. Apply a coat of primer, let it cure and sand again. Now if at all possible let it set for a couple days with just a coat of primer. That lets the filler shrink if it's going to and then give it a final sanding and spray on the color and then clear. Now let it set for at least a couple days before you do anything else. You will likely need to wet sand the clear to get it even and smooth. Then you can compound it.
Was this
answer
helpful?
Yes
No
Sunday, March 8th, 2020 AT 9:09 PM
Tiny
PCULQUI
  • MEMBER
  • 354 POSTS
So once the primer is sprayed on, let it set for a few days and after the actual paint color is sprayed, also let that set for a few days? Now, can I use the vehicle while the primer is setting and the paint is setting? How about if it rains.
What would happen if I applied the primer and let it set for a few hours and then paint it.
Was this
answer
helpful?
Yes
No
Monday, March 9th, 2020 AT 6:49 AM
Tiny
STEVE W.
  • MECHANIC
  • 13,002 POSTS
The reason for letting it set is to allow as much cure time for the filler and primer to evaporate the solvents. Rain won't really hurt it, You can opt to prime it and paint as soon as it flashes off if you want to go that route. The paints used will dictate the outcome, but you don't want to trap any solvent.
Was this
answer
helpful?
Yes
No
Monday, March 9th, 2020 AT 10:02 AM
Tiny
PCULQUI
  • MEMBER
  • 354 POSTS
When will it be good to sand the primer with 320 grit sandpaper, an hour after applying the primer or a few days after.
Also, when I applied the gray primer, I masked the surrounding area. I know it's going to create sharp lines all around. I can blend that after spraying the paint color of the car?
Also, there's small rich chips with rust. If I spray the color of the car with paint it will cover these rock chips rusted.
Should I sand them down first before painting?
Was this
answer
helpful?
Yes
No
Monday, March 9th, 2020 AT 4:24 PM
Tiny
STEVE W.
  • MECHANIC
  • 13,002 POSTS
I usually wait for the primer to set at least a few hours. You won't be able to blend a sharp edge, you want to feather the edges out so it fades into the original surface, any edge will show up. For the chips you need to remove any loose paint and rust, then sand the area so it feathers out, then you can apply primer and paint. Never paint over rust or dirt or anything other than a prepped surface.
Was this
answer
helpful?
Yes
No
Monday, March 9th, 2020 AT 6:10 PM
Tiny
PCULQUI
  • MEMBER
  • 354 POSTS
Can I wet sand the edges of the primer so they feather out the edges?
Was this
answer
helpful?
Yes
No
Monday, March 9th, 2020 AT 7:49 PM
Tiny
STEVE W.
  • MECHANIC
  • 13,002 POSTS
Should be able to do that, just watch that you match the contour of the hood as you sand so you don't have a flat area on a rounded surface. A trick to use to be sure it's sanded enough is to wipe it all down, then close your eyes and lightly run your fingers over the area, you will feel any differences that still need work.
Was this
answer
helpful?
Yes
No
Tuesday, March 10th, 2020 AT 3:47 AM

Please login or register to post a reply.

Related General Content

Sponsored links