Read the codes, then clear em, see if it resets, then read and post the code(s) here. Here's how.
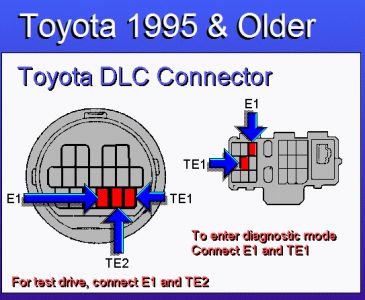
PROCEDURES FOR READING TOYOTA TROUBLE CODES 1982-87: 1. Turn ignition switch to On position. Start engine and observe "Check Engine" light. 2. If lamp fails to light with ignition switch on (engine stopped), or if lamp fails to go out or flash a diagnostic trouble code after engine starts, check diagnosis circuit. 3. Run engine until it reaches normal operating temperature, then stop engine. 4. Ensure that battery voltage is at least 11 volts, throttle valve is fully closed, A/C is off and that transmission selector is in park or neutral. Turn ignition switch on but do not start engine. 1984 5M.GE Engine 1. Short terminals of check engine connector, using a jumper wire, and connect a suitable analog voltmeter to EFI connector, using harness 09842-14010. Use a analog voltmeter with a high (10K ohm) impedance. 2. Diagnostic trouble codes will be indicated by voltmeter deflection in the 0-25 volt and 2.5-5.0 volt ranges. Except Cressida & Supra Equipped w/Super Monitor Display 1. Short terminals of check engine connector or service connector (depending on model) with suitable jumper wire. 2. Diagnostic trouble codes will be indicated by the number of flashes of the "Check Engine" lamp. Cressida & Supra Equipped w/Super Monitor Display: 1. With ignition ON and engine not running, simultaneously depress and hold Select and Input M keys of Super Monitor display for at least three seconds. 2. The letters DIAG will appear on the display. After a short pause, depress and hold Set key for at least three seconds. If there are no codes stored in the computer, the display will read E/G OK or ENG-OK (depending on models). If there are codes stored in the computer, the code number will appear on the display. If there is more than one code, there will be a three second pause between codes. 3. After accessing diagnostic trouble codes, clear display by turning OFF ignition switch or depress the Super Monitor Display key so the time appears. 1988-95: Use a scan tool, or 1. Short terminals of Check Engine connector or service connector (depending on model) with suitable jumper wire. Make the jumper connection between terminals E1 and TE1. Some Check Engine diagnostic connectors are round and are located under the instrument panel. Others are rectangular and are usually located in the engine compartment. 2. Turn the ignitiion ON. Trouble codes will be indicated by flashes of the Check Engine light. Count the flashes to determine the code. If more than one code is present, codes will be separated by a long pause. Codes will continue to repeat as long as the jumper connection remains in the diagnostic connector. NOTE: If the light flashes on and off 4 times a second, there are no codes. DRIVING TEST MODE When a fault is first detected, a code is temporarily stored in the computer's memory. If the same problem is detected again during a second trip, the Check Engine light will come on. In order for this mode to store codes, the ignition switch must be turned OFF between the first and the second test. 1. Make sure the battery voltage is at least 11 volts, the throttle is fully closed, the transmission is in neutral and all accessories are off. 2. Use a jumper wire to connect terminals E1 and TE2 on the diagnostic connector, then turn the ignition ON. The Check Engine lamp should illuminate. NOTE: Test mode may not be entered if terminals TE2 and El are shorted after ignition switch is turned ON 3. Start engine and drive vehicle at 10 mph or higher. If vehicle is not driven vehicle speed signal code 42 and 43 may be set. 4. Simulate driving conditions that originally set code (if possible). 5. Turn vehicle off, remove jumper wire. The rejump terminals E1 and TE1 to read any codes that were set during the test drive. HOW TO CLEAR CODES Disconnect the computer fuse for 10 seconds, or use a scan tool to clear codes. Page 1
Oct 19, 2008 at 7:19 AM