1996 Toyota Corolla starter

1996 TOYOTA COROLLA
Avatar
WALLY29GATOR
  • MEMBER
  • 1 POST
Engine Mechanical problem
1996 Toyota Corolla 4 cyl Front Wheel Drive Automatic

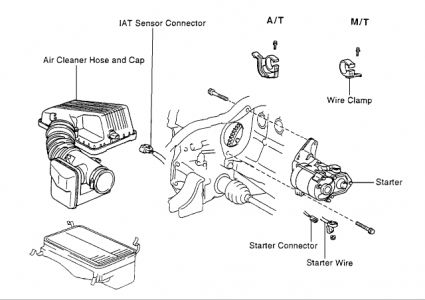
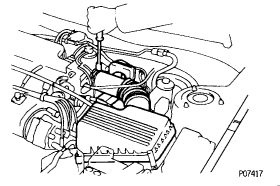
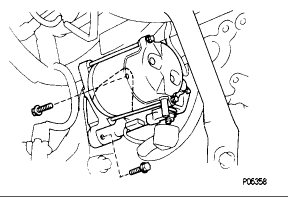
Hi, I need to replace my sons starter on his 1996 Toyota Corolla, I've never done it,so I dont know where to start,can you help me out? Do you know any sites I can go to to download the directions?
Jul 1, 2010 at 9:20 PM
Advertisement
Avatar
BLUELIGHTNIN6
  • CAR REPAIR CONTRIBUTOR
  • 16,542 POSTS
4A-F, 4A-FE and 7A-FE Engines

Disconnect the negative battery cable.
Remove the air cleaner assembly (with hose).
Disconnect all the wiring from the starter terminals.
Remove the starter mounting bolts. Remove the starter. (be careful, it's much heavier than it looks!)


To install:

Attach the connector to the terminal on the solenoid switch. Connect the cable from the battery to the starter and secure with the nut.
Place the starter in the flywheel bellhousing, tighten the mounting bolts to 29 ft. lbs. (39 Nm).
Install the air cleaner assembly.
Connect the negative battery cable.
Check the starter for proper operation.


4A-GE Engine

Disconnect the negative battery cable. Remove the both engine under covers.
Remove the front exhaust pipe.
Remove the electric cooling fan.
Disconnect all the wiring from the starter terminals.
Remove the starter mounting bolts. Remove the starter.


To install:

Attach the connector to the terminal on the starter solenoid. Connect the cable from the battery to the terminal on the switch and secure with the nut to 29 ft. lbs. (39 Nm)..
Install the electric cooling fan.
Install the front exhaust pipe.
Install the left and right engine under covers.
Connect the negative battery cable.
Check that the starter works properly.
Jul 1, 2010 at 9:44 PM
Avatar
RASMATAZ
  • CAR REPAIR CONTRIBUTOR
  • 75,992 POSTS
1996 Toyota Corolla Sedan L4-107.5 1762cc 1.8L DOHC (7A-FE) Removal:


https://images.2carpros.com/forum/automotive_pictures/12900_s1_51.jpg

1.Disconnect the IAT sensor connector.


https://images.2carpros.com/forum/automotive_pictures/12900_s2_4.gif

2.Loosen the air cleaner hose clamp bolt. 3.Disconnect the four air cleaner cap clips. 4.Disconnect the air cleaner hose from the throttle body. 5.Remove the air cleaner cap together with the air cleaner hose. 6.Remove the wire clamp. 7.Disconnect the starter connector. 8.Remove the nut and disconnect the starter wire.


https://images.2carpros.com/forum/automotive_pictures/12900_s3_2.gif

9.Remove the two bolts and starter. Installation: 1.Position starter and install the two mount bolts. 2.Torque bolts to 39 Nm (29 ft.lbs). 3.Connect the starter wire and secure with mounting nut. 4.Connect the starter connector. 5.Install the wire clamp. 6.Install the air cap and hose. 7.Connect the four air cleaner cap clips. 8.Tighten the air cleaner hose clamp bolt. 9.Connect the IAT sensor connector. 10.Start vehicle and check for air leaks, repair as necessary. https://www.2carpros.com/kpages/auto_repair_manuals_alldata.htm
Jul 1, 2010 at 10:03 PM
Repair Safety Notice: This information is for general instructional purposes only. Vehicle repair can be dangerous. Verify all information, follow manufacturer service procedures, use proper tools and safety equipment, and consult a qualified repair shop when needed.