Here are the description and diagnostic procedures for the code. Seems the fuel tank cap is the most likely cause.
DTC P0440 & DTC P0442 : EVAPORATIVE EMISSION CONTROL SYSTEM MALFUNCTION
Circuit Description
Vapor pressure sensor, canister closed valve VSV and pressure switching valve VSV are used to detect faults in EVAP system. DTC is set if EVAP system leak is detected or vapor pressure sensor malfunctions. Possible causes are:
ï¬ Damaged, disconnected or blocked vacuum hose(s).
ï¬ Fuel tank cap is installed incorrectly.
ï¬ Defective fuel tank cap.
ï¬ Damaged, cracked or disconnected vacuum hoses.
ï¬ Damaged fuel tank.
ï¬ Defective charcoal canister.
ï¬ Vapor pressure sensor circuit is open or shorted.
ï¬ Defective vapor pressure sensor.
ï¬ Defective fuel tank overfill valve.
ï¬ Defective ECM.
Diagnostic Aids
Ask customer if fuel tank cap has been left off or not completely tightened recently. This may cause DTC to be set. Using scan tool, read FREEZE FRAME data. Freeze frame data records engine conditions when malfunction is detected.
Diagnosis & Repair
1. Select ACTIVE TEST mode on hand -held tester. Disconnect vacuum hose from VSV for EVAP. Start engine. Select EVAP VSV (ALONE) in ACTIVE TEST and operate VSV for EVAP. When VSV for EVAP is operated by hand-held tester, apply disconnected hose to your finger to check suction. If VSV is on, disconnected hose should suck. If VSV is off, disconnected hose should not suck. Select item INTAKE CTL VSV1 in ACTIVE TEST and operate VSV for CCV. Check VSV for CCV operation when it is operated by hand -held tester.
If VSV is on, disconnected hose should suck. If VSV is off, disconnected hose should not suck. Select item TANK BYPASS VSV in ACTIVE TEST and operate VSV for pressure switching valve. Check VSV for pressure switching valve operation when it is operated by hand-held tester. If VSV is on, disconnected hose should suck. If VSV is off, disconnected hose should not suck.
2. Connect hand-held tester to DLC No. 3. Select EVAP SYS CHECK mode on hand -held tester.
Perform EVAP SYS CHECK. If scan tool detects a leak on fuel tank side, go to next step. If scan tool detects a leak on canister side, go to step 6 . If scan tool does not detect a leak in EVAP system, check vacuum hose.
3. Check if fuel tank cap is properly installed. If problem exists, install fuel tank cap properly and
perform EVAP SYS CHECK by hand -held tester. If fuel tank cap is properly installed, go to next step.
4. Check for damaged fuel tank cap and gasket. If problem exists, replace fuel tank cap with OEM cap. If problem does not exist, go to next step.
5. Remove fuel tank cap. Visually inspect fuel tank filler neck for damage. If problem exists, replace fuel tank filler neck as necessary. If problem does not exist, check vacuum hoses between vapor pressure sensor and fuel tank, and between charcoal canister and pressure switching valve VSV. Check hoses for correct installation, looseness and damage. If problem
exists, repair vacuum hoses as necessary. If problem does not exist, go to next step.
6. Check hose and tube between fuel tank and charcoal canister for correct installation and damage. If problem exists, repair as necessary. If problem does not exist, go to next step.
7. Check charcoal canister for damage. If problem exists, repair or replace as necessary. If problem does not exist, go to next step.
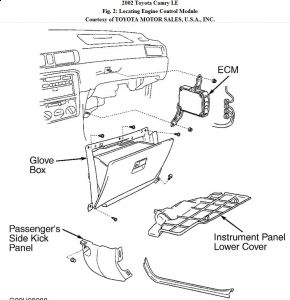
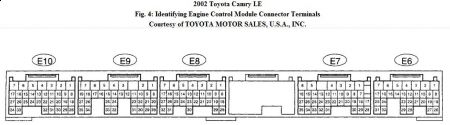
8. Access ECM behind glove box. See Fig. 2 . Turn ignition on. Using DVOM, backprobe ECM harness connector and measure voltage between terminals No. 18 (Yellow wire) and No. 28 (Brown wire) at ECM harness connector E10. See Fig. 4 . Voltage should be 4.5 - 5.5 volts. If voltage is not as specified, replace ECM. If voltage is as specified, go to next step.
9. Remove fuel tank cap. Turn ignition on. Using DVOM, backprobe ECM harness connector and measure voltage between terminal No. 21 (Pink wire) at ECM harness connector E6 and terminal No. 28 (Brown wire) at ECM harness connector E10. If voltage is 3.0 - 3.6 volts, go to step 10 . If voltage is not 3.0 - 3.6 volts, check harness and vapor pressure sensor connector.
Repair harness as necessary. If harness is okay, replace vapor pressure sensor assembly.
10. Check fuel tank and fuel tank overfill valve for damage. If problem exists, repair or replace fuel tank or fuel tank overfill valve as necessary. If problem does not exist, no fault is indicated at this time. Probable cause of DTC to set was an incorrectly installed fuel tank cap.
Aug 19, 2009 at 11:41 AM
