Good evening,
Procedure below with pictures.
Roy
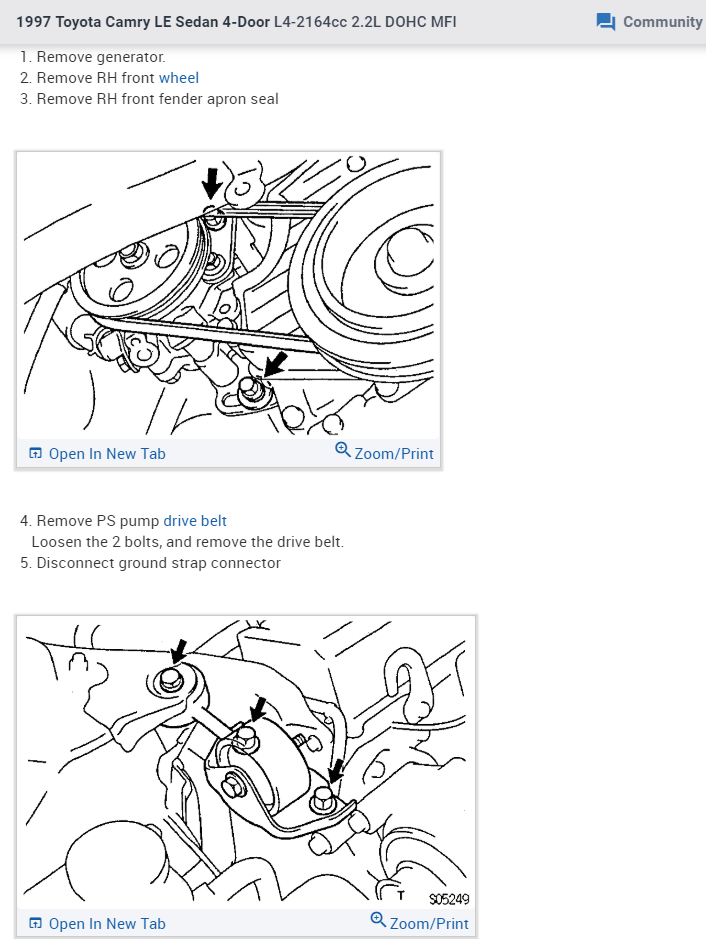
1. Remove generator.
2. Remove RH front wheel
3. Remove RH front fender apron seal
imageOpen In New TabZoom/Print
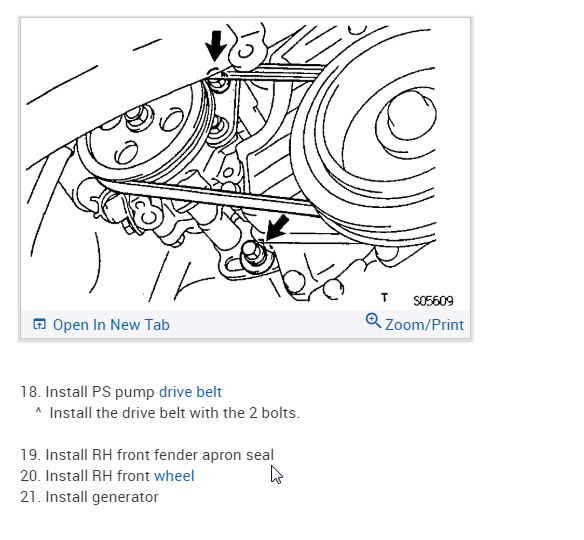
4. Remove PS pump drive belt
Loosen the 2 bolts, and remove the drive belt.
5. Disconnect ground strap connector
imageOpen In New TabZoom/Print
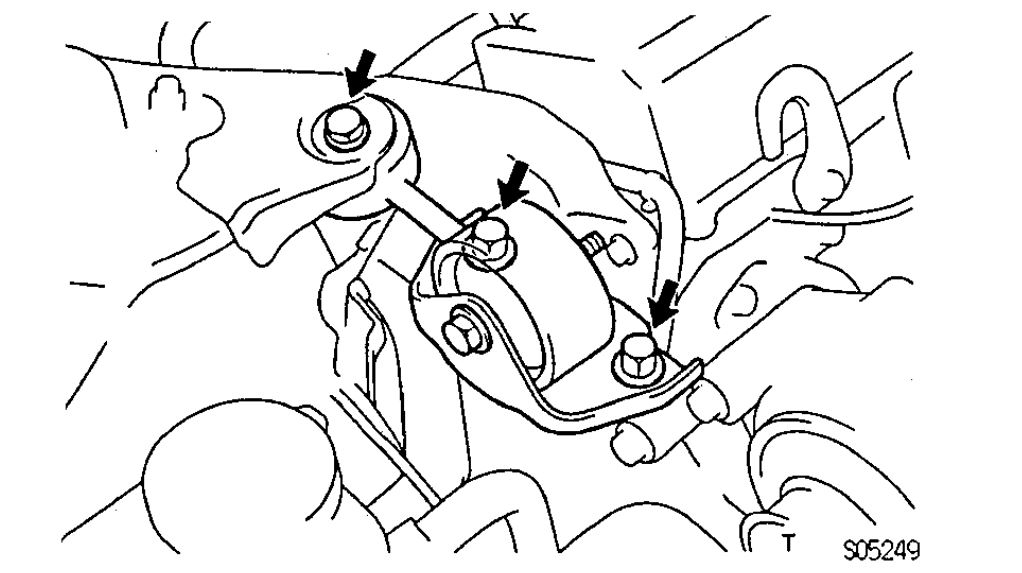
6. Remove engine moving control rod
Remove the 3 bolts and control rod.
ImageOpen In New TabZoom/Print
7. Remove no.2 RH engine mounting bracket
Remove the 3 bolts and mounting bracket.
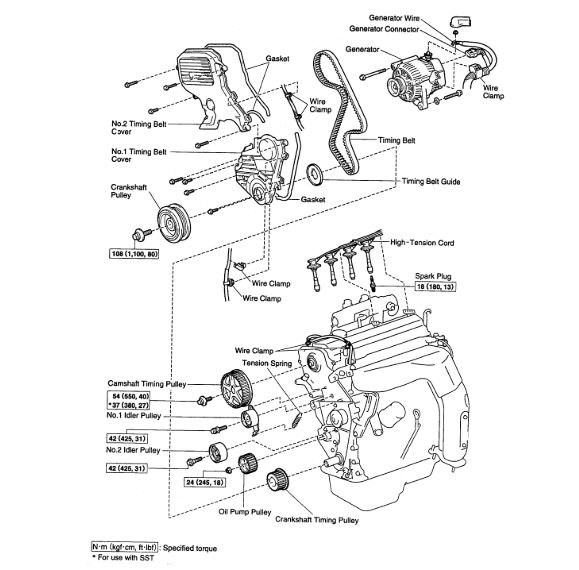
8. Remove spark plugs
a. Disconnect the 4 high-tension cords from the clamps on the cylinder head cover.
B. Disconnect the 4 high-tension cords from the spark plug.
C. Remove the 4 spark plugs.
ImageOpen In New TabZoom/Print
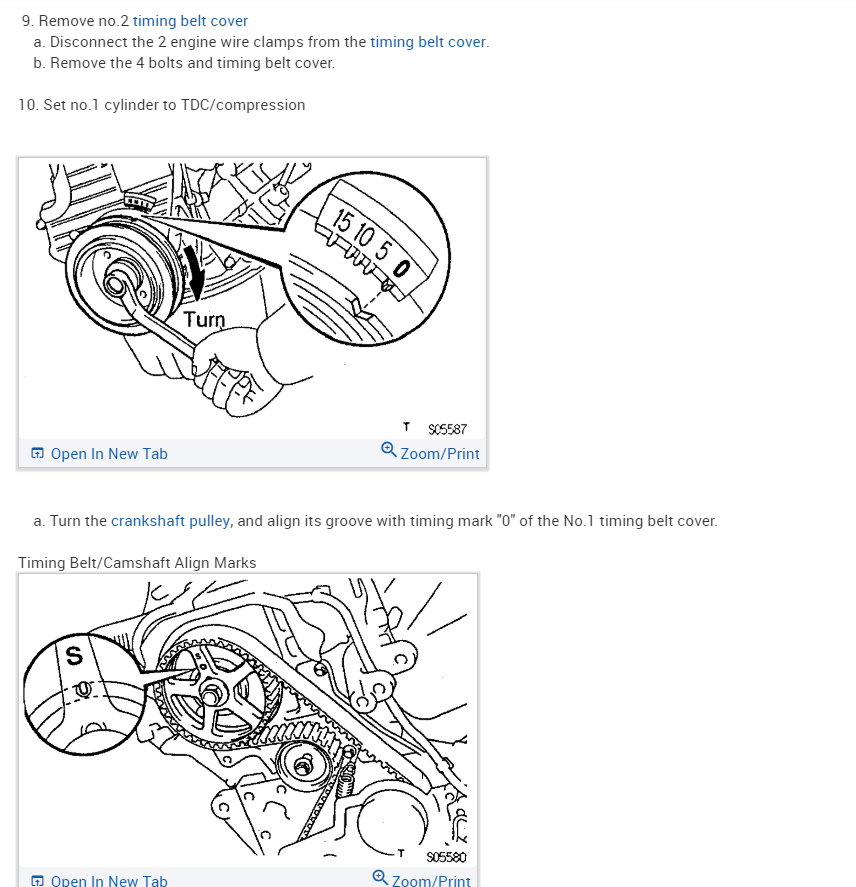
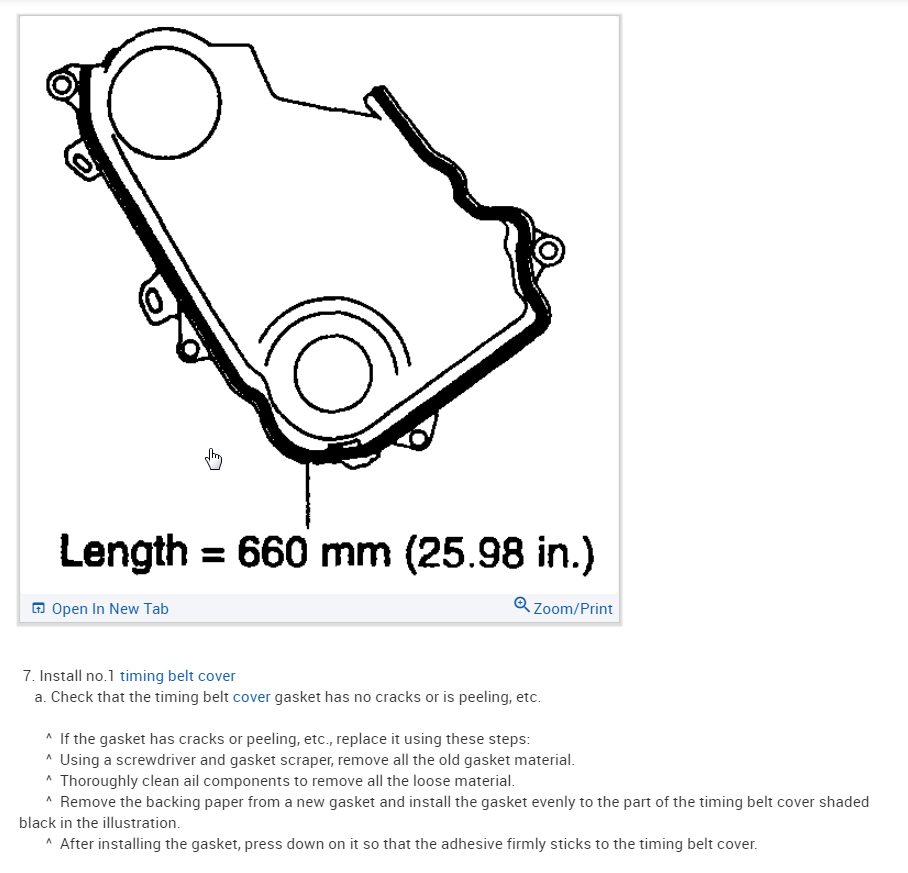
9. Remove no.2 timing belt cover
a. Disconnect the 2 engine wire clamps from the timing belt cover.
B. Remove the 4 bolts and timing belt cover.
10. Set no.1 cylinder to TDC/compression
imageOpen In New TabZoom/Print
a. Turn the crankshaft pulley, and align its groove with timing mark "0" of the No.1 timing belt cover.
Timing Belt/Camshaft Align Marks
imageOpen In New TabZoom/Print
b. Check that the hole of the camshaft timing pulley is aligned with the timing mark of the bearing cap. If not, turn the crankshaft 1 revolution (360°).
11. Remove timing belt from camshaft timing pulley
Timing Belt/Camshaft Align Marks
imageOpen In New TabZoom/Print
NOTE: When re-using timing belt, place the matchmarks on the timing belt and camshaft timing pulley, and place match marks on timing belt to match portion A of the No.1 timing belt cover.
ImageOpen In New TabZoom/Print
a. Loosen the mounting bolt of the No.1 idler pulley, and shift the pulley toward the left as far as it will go, and temporarily tighten it.
B. Remove the timing belt from the camshaft timing pulley.
ImageOpen In New TabZoom/Print
12. Remove camshaft timing pulley
a. Using SST, loosen the pulley bolt.
SST 09249-63010, 09960-10010 (09962-01000, 09963-01000)
b. Remove the bolt and timing pulley.
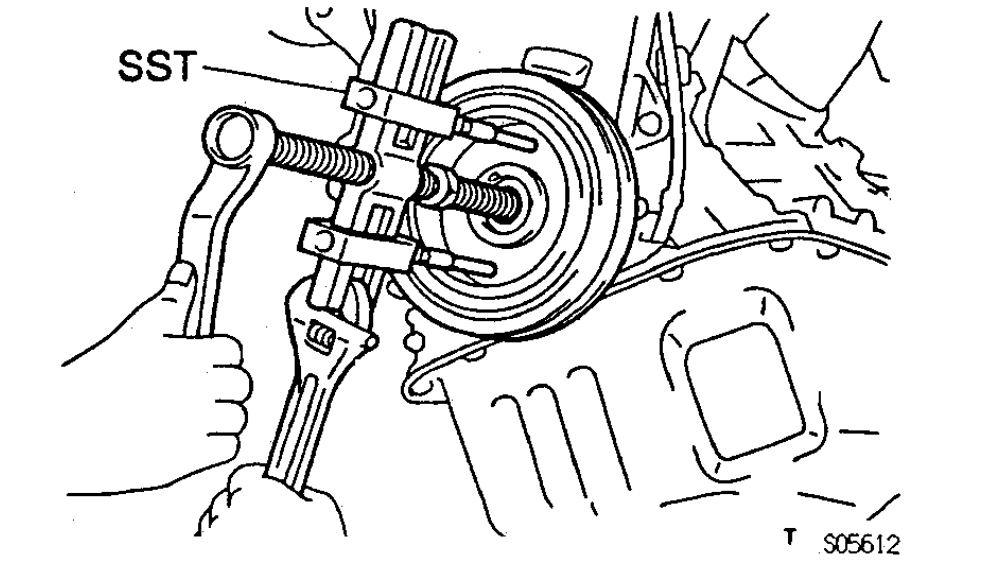
13. Remove crankshaft pulley
imageOpen In New TabZoom/Print
a. Using SST (and bolt), loosen the pulley bolt.
SST 09213-54015 (91651-60855 for type A), 09330 - 00021
NOTE:
Either of 2 types of pulley may be used, each with its own bolt size, type A and type B. When using bolt type B. A plate washer must be inserted between the bolt and SST.
ImageOpen In New TabZoom/Print
When re-using timing belt, after loosening the crankshaft pulley bolt, check that the timing belt match marks aligns with portion A of the No.1 timing belt cover when the crankshaft pulley groove is aligned with the timing mark "O" of the No. 1 timing belt cover. If the match marks does not align, align as follows:
imageOpen In New TabZoom/Print
When match marks is misaligned clockwise:
Align the match marks by pulling the timing belt up on the water pump pulley side while turning the crankshaft pulley counterclockwise.
ImageOpen In New TabZoom/Print
After aligning the match marks, hold the timing belt. And turn the crankshaft pulley clockwise, and align its groove with timing mark "O" of the No.1 timing belt cover.
ImageOpen In New TabZoom/Print
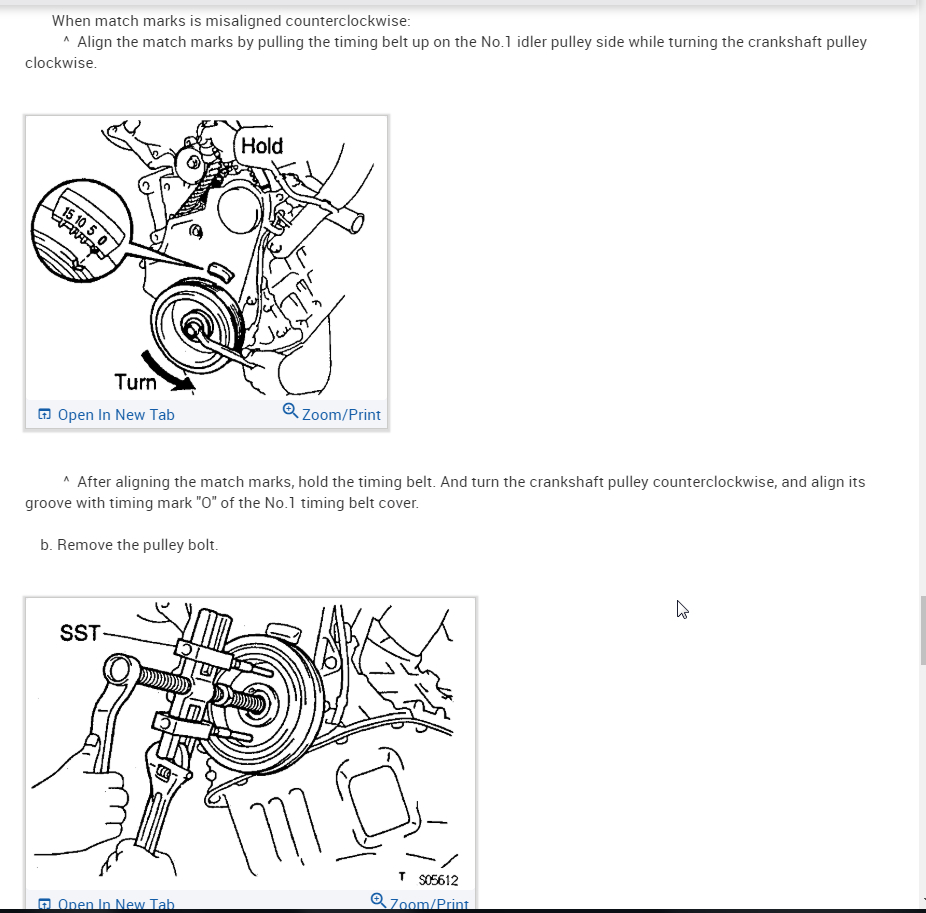
When match marks is misaligned counterclockwise:
Align the match marks by pulling the timing belt up on the No.1 idler pulley side while turning the crankshaft pulley clockwise.
ImageOpen In New TabZoom/Print
After aligning the match marks, hold the timing belt. And turn the crankshaft pulley counterclockwise, and align its groove with timing mark "O" of the No.1 timing belt cover.
B. Remove the pulley bolt.
ImageOpen In New TabZoom/Print
c. Using SST, remove the pulley. SST 09950 - 50010 (09951 - 05010, 09952-05010, 09953-05010, 09953-05020, 09954-05020 for type A, 0995W5010 for type B)
NOTE: Either of 2 types of pulley may be used, each with its own bolt size, Type A and type B. When re-using timing belt: Remove the pulley without turning it.
ImageOpen In New TabZoom/Print
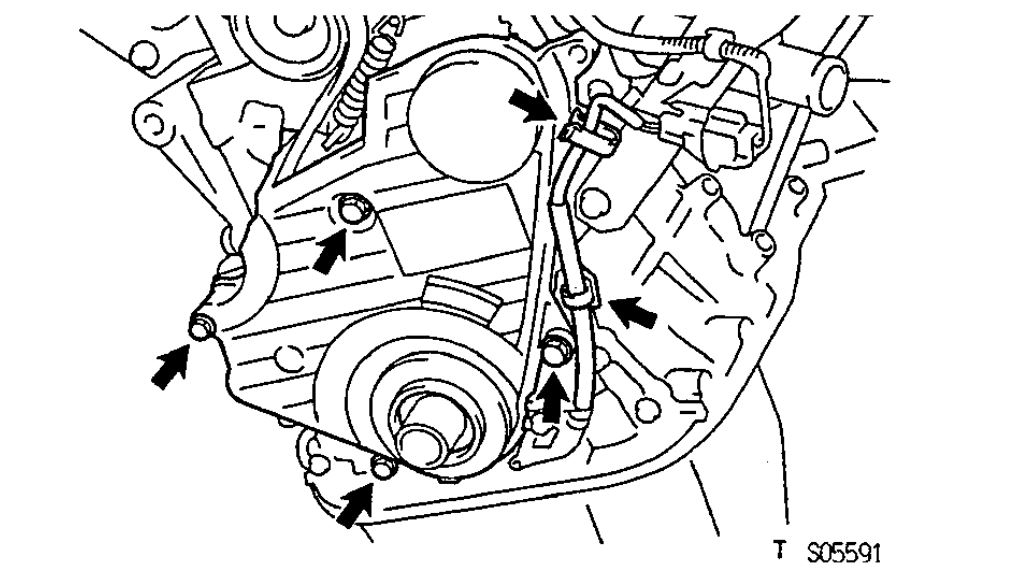
14. Remove no.1 timing belt cover
a. Disconnect the crankshaft position sensor wire from the clamp on the timing belt cover.
B. Disconnect the clamp of the crankshaft position sensor wire from the timing belt cover.
C. Remove the 4 bolts and timing belt cover.
15. Remove timing belt guide
imageOpen In New TabZoom/Print
16. Remove timing belt hint When re-using timing belt, draw a direction arrow on the timing belt (in the direction of engine revolution), and place matchmarks on the timing belt and crankshaft timing pulley.
ImageOpen In New TabZoom/Print
17. Remove no.1 idler pulley and tension spring
Remove the bolt, pulley and tension spring.
18. Remove no.2 idler pulley remove the bolt and pulley.
ImageOpen In New TabZoom/Print
19. Remove crankshaft timing pulley
If the pulley cannot be removed by hand, use SST to remove the timing pulley.
SST 09950 - 50010 (09951 - 5010, 09952-05010, 09953 - 05010, 09953-05020, 09954-05010)
NOTE: Do not scratch the angle sensor of the timing pulley.
Image
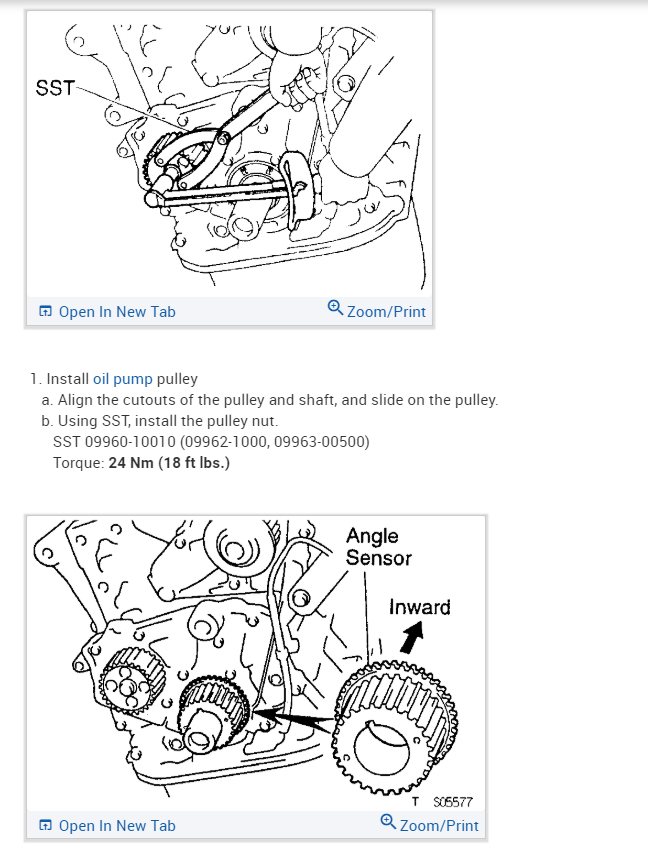
20. Remove oil pump pulley
a. Using SST, loosen the pulley nut.
SST 09960 - 1 0010 (09962-1000, 09963-0500)
b. Remove the nut and pulley.
Images (Click to make bigger)
SPONSORED LINKS
Thursday, June 27th, 2019 AT 5:28 PM