1996 Subaru Outback Replacing head gasket(s) on 1996 Subaru

Tiny
NEWSIBERIAN
  • MEMBER
  • 1996 SUBARU OUTBACK
  • 4 CYL
  • AWD
  • AUTOMATIC
  • 17,300 MILES
Hi,

I've been working on my car(s) as a hobby/money saver over the years. I've just figured out, by the oily pool in my coolant overflow, that I need to replace the head gaskets. I can't afford to have a mechanic do the job, so I'm going to give it a go. If someone could recommend a good info/manual source that would be helpful. We have another car, so there will be no rush. I appreciate any info/tips you may provide.

thx!

Brendan
Friday, February 13th, 2009 AT 4:41 PM

8 Replies

Tiny
BLUELIGHTNIN6
  • MECHANIC
  • 16,542 POSTS
Hello
Thanks for the donation.

I am going to post the replacement procedures for the 2.2L engine model's head gasket(s). I can post specific pictures and procedures for your engine size if it is different than the 2.2L engine. Just let me know..

REMOVAL:
Disconnect the negative battery cable.
Remove the drive belt.
Remove the power steering pump, alternator and bracket.
Remove the valve rocker cover.
Tag and disconnect the PCV hose and spark plug wires.
Remove the connector bracket attaching bolt.
Remove the crank angle and cam angle sensors.
Disconnect the oil pressure switch. Remove the knock sensor.
Disconnect the blow-by hose.
Relieve the fuel system pressure and disconnect the fuel pipes.
Remove the intake manifold and gasket. Remove the water pipe.
Remove the timing belt, camshaft sprocket and related components.
Remove the oil level gauge guide attaching bolt on the left cylinder head.
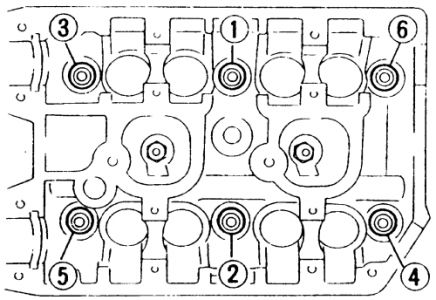
Remove the cylinder head bolts in the proper sequence. Leave bolts 1 and 3 installed loosely to prevent the cylinder head from falling.
Separate the cylinder head from the block, Use a plastic-faced hammer, if needed, to separate the head from the cylinder block.
Remove bolts 1 and 3. Remove the cylinder head and gasket.
Clean all gasket material from both mating surfaces.

(((Cylinder head bolt loosening sequence-2.2L engine)))


https://www.2carpros.com/forum/automotive_pictures/261618_0900c15280066d61_2.jpg


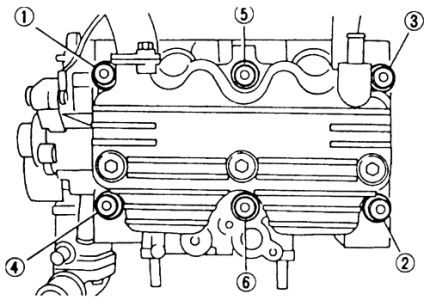
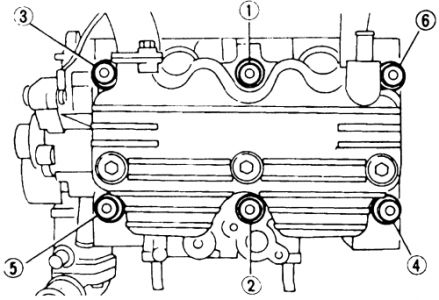
(((Cylinder head bolt tightening sequence-2.2L engine)))


https://www.2carpros.com/forum/automotive_pictures/261618_0900c15280066d61_1.jpg


INSTALLATION:
Inspect the cylinder head for warpage. Warpage should not exceed 0.0020 in. (0.05mm).
Install the cylinder head on the block using a new gasket. Secure in place with the mounting bolts. Coat each bolts with clean engine oil, and hand-tighten.
Tighten the cylinder head bolts to the following specifications:
Tighten all bolts in sequence to 22 ft. lbs. (29 Nm).
Tighten all bolts in sequence to 51 ft. lbs. (69 Nm).
Loosen all bolts by 180 °, then loosen an additional 180 °.
Tighten bolts 1 and 2 to 25 ft. lbs. (24 Nm) for non-turbo engines and 27 ft. lbs. (37 Nm) for turbo engines.
Tighten bolts 3, 4, 5 and 6 to 11 ft. lbs. (15 Nm) for non-turbo engines and 14 ft. lbs. (20 Nm) for turbo engines.
Tighten all bolts in sequence 80-90 °.
Tighten all bolts in sequence an additional 80-90 °.
Do not exceed 180 ° total tightening.
Install the oil level gauge guide attaching bolt on the left cylinder head.
Install the timing belt, camshaft sprocket and related components.
Install the water pipe.
Install the intake manifold and tighten bolts to 21-25 ft. lbs. (28-34 Nm). Connect the fuel delivery pipes.
Connect the blow-by hose. Install the knock sensor.
Connect the oil pressure switch connector.
Install the crank and cam angle sensors.
Install the connector bracket attaching bolt.
Connect the spark plug wires. Connect the PCV hose.
Install the valve rocker cover and tighten bolts to 4 ft. lbs. (9 Nm).
Install the alternator, power steering pump and accessory drive belt.
Connect the negative battery cable. Start the engine and allow it to reach operating temperature. Check for leaks.

Let me know if you need further assistance..

Thanks for using 2CarPros.com!
Was this
answer
helpful?
Yes
No
+2
Friday, February 13th, 2009 AT 7:31 PM
Tiny
NEWSIBERIAN
  • MEMBER
  • 5 POSTS
Thx very much for your detailed response. One question: are the cylinder head bolt loosening/tightening sequences the same for a 2.5L engine, such as mine?

Thx again!

-Brendan
Was this
answer
helpful?
Yes
No
Saturday, February 14th, 2009 AT 8:31 PM
Tiny
BLUELIGHTNIN6
  • MECHANIC
  • 16,542 POSTS
Cylinder head bolt loosening sequence-2.5L engine


https://www.2carpros.com/forum/automotive_pictures/261618_0900c15280216410_2.jpg


Cylinder head bolt tightening sequence-2.5L engine


https://www.2carpros.com/forum/automotive_pictures/261618_0900c15280216410_3.jpg


2.5L engine Torque Specifications
Tighten the cylinder head bolts to the following specifications:
Tighten all bolts in sequence to 22 ft. lbs. (29 Nm).
Tighten all bolts in sequence to 51 ft. lbs. (69 Nm).
Loosen all bolts by 180 °, then loosen an additional 180 °.
Tighten bolts 1 and 2 to 25 ft. lbs. (24 Nm).
Tighten bolts 3, 4, 5 and 6 to 11 ft. lbs. (15 Nm).
Tighten all bolts in sequence by 80-90 °.
Tighten all bolts in sequence an additional 80-90 °.
Do not exceed 180 ° total tightening.

Tighten the intake manifold bolts to 21-25 ft. lbs. (28-34 Nm).

Install the valve rocker cover and tighten bolts to 4 ft. lbs. (9 Nm).

If you need further assistance just let me know..

Thanks for using 2CarPros.com!
Was this
answer
helpful?
Yes
No
+2
Saturday, February 14th, 2009 AT 8:40 PM
Tiny
NEWSIBERIAN
  • MEMBER
  • 5 POSTS
Hey thanks again for your quick response. I'll try not to ask too many more questions - I'm usually fairly good at figuring it out on my own, but.

With this project, would there be anything in particular that I should look out for. Particularly I'm concerned about the overhead cams and the timing belt. Will it be difficult to maintain their proper position during this process?

Thx for any info you can provide on that and any other 'gotchas' I need to be aware of. Pulling her into the garage now.

Best rgds - Brendan
Was this
answer
helpful?
Yes
No
Monday, February 16th, 2009 AT 8:03 AM
Tiny
BLUELIGHTNIN6
  • MECHANIC
  • 16,542 POSTS
Most do it yourselfers doing a job like this for the first time will normally bump the timing out of alignment. It's not that big of deal though. That's why there are timing marks. I having diagrams and instructions on setting the timing back as well so if you do accidentally nudge one a bit just let me know ;) Best advice is to take your time, don't rush or you'll end up with a bigger problem usually than what you start with. Oh and lubricate those head bolts good with WD 40 before trying to remove them, a lot of people breakt the bolt off and have to drill it out with an easy out. Again, patience is needed here

Just let me know if you need anymore help, that's what we are here for :)

Thanks for using 2CarPros. Com!
Was this
answer
helpful?
Yes
No
Monday, February 16th, 2009 AT 9:31 AM
Tiny
NEWSIBERIAN
  • MEMBER
  • 5 POSTS
One Q I forgot to ask is, are there any other parts such as cam sensor, timing belt pulleys, that I should replace without question while everything is accessible?

I've recently replaced the water pump, alternator, starter. I'll have to check to see when the timing belt was replaced. Usually every 60k but I think I had them change it 2 yrs ago when the water pump went.

Thx again!

Brendan
Was this
answer
helpful?
Yes
No
Monday, February 23rd, 2009 AT 8:31 AM
Tiny
BLUELIGHTNIN6
  • MECHANIC
  • 16,542 POSTS
You really don't need to replace anything there unless it is just causing issues. Those parts aren't really meant to be replaced at any certain interval, only when they fail do they need replaced.

Thanks for using 2CarPros. Com!
Was this
answer
helpful?
Yes
No
+1
Monday, February 23rd, 2009 AT 1:51 PM
Tiny
NEWSIBERIAN
  • MEMBER
  • 5 POSTS
Hi - I was discussing this with an acquaintance who said he'd tried to do this procedure without pulling the engine. He said he ended up having to pull the engine out because there wasn't enough room in the engine compartment to pull the cylinder head bolts all the way out.

Is he correct? Everything I've read so far leads me to believe this can be done WITHOUT pulling the engine out of the compartment.

Thanks! Just want to be sure before I get too far in. Spring is almost here.

B rgds,

Brendan
Was this
answer
helpful?
Yes
No
Tuesday, March 9th, 2010 AT 1:38 PM

Please login or register to post a reply.

Sponsored links