Fuse 12 in the engine compartment keeps blowing?

Tiny
GMBRUSCA
  • MEMBER
  • 2010 ACURA RDX
  • 4 CYL
  • TURBO
  • 4WD
  • AUTOMATIC
  • 136,000 MILES
The result is that the RDX cannot be shifted out of park. Replacing the fuse works for a few days. I am aware of the hack to be able to shift gears by manipulating the area right next to the shifter with a screwdriver. What I want is for the fuse to stop blowing. Presumably, there is a short somewhere. How do I figure out where it is? Can I narrow it down to either the Horn or the Brakes? The brake lights do not work when the fuse is blown, but that seems logical. Is there any type of test I can do to isolate the problem? Would I have to do the test while the fuse is blown, or only when the fuse is replaced and working?

Thank you for any help you can provide.
Monday, March 25th, 2024 AT 5:35 PM

14 Replies

Tiny
CARADIODOC
  • MECHANIC
  • 33,743 POSTS
As you've figured out, both systems are powered from the same fuse 12. Probably the more likely failure would be a shorted horn. See if the fuse blows when you use the horn or if it sounds weird. If that's the short, the fuse won't blow until you use the horn, or the theft system chirps it when you lock the doors. Remove the horn relay, then the fuse won't blow. Beyond that, it's hard to diagnose a problem like this unless it becomes a permanent short, then we'd have something to look for.

Try the horn relay first, then tell me what you find.
Was this
answer
helpful?
Yes
No
Monday, March 25th, 2024 AT 6:58 PM
Tiny
GMBRUSCA
  • MEMBER
  • 8 POSTS
Thank you for the prompt reply!
I have no idea how to find the horn relay. The diagrams you included appear to
refer to a different diagram. Where can I get that diagram?
Also, what test should I perform with the horn relay? Should I remove it?
If so, what do I do afterwards?

Thanks.
Was this
answer
helpful?
Yes
No
Monday, March 25th, 2024 AT 7:15 PM
Tiny
CARADIODOC
  • MECHANIC
  • 33,743 POSTS
On most newer models like yours, there is a built-in anti-theft system, and they can usually be programmed to give a short horn chirp when you lock the doors with the key fob. If one of the horns is shorted, fuse 12 will blow during that chirp. I posted the diagrams for the brake lights and for the horn to show that both systems use the same fuse 12, so once it blows, the brake lights won't work either.

There can be other causes for fuse 12 to blow, but back in the 1990s, I ran into a lot of shorted horns at the dealership I worked for. To save their customers money, the parts department offered universal aftermarket replacements with multiple mounting brackets. They sounded and worked fine. Like most cars, yours has a low note and a high note horn. You need both for the horn to sound right, but you only need to replace the one that is shorted.

I do have a trick for finding shorts that involves replacing the blown fuse with a light bulb, but this works best when the short is there all the time. The bulb will be full brightness, then go out or dim when you do something to remove the short. This trick allows you to power up the circuit without constantly blowing more fuses. Unfortunately, it doesn't work well for intermittent problems that act up so seldom. My test bulb will reduce by a lot the brightness of the brake lights.

If the problem acts up more often, I have drawings and I can explain how my light bulb trick works, but a different approach is better for now. That is to remove the horn relay. Understand you will not have a horn if you need it to warn someone. With the relay removed, if fuse 12 still blows intermittently, we will know the horns were not the reason, then we need to look at the brake light circuit. If it comes to that, I have other methods to track down the short, but they require a lot of typing, so I'll wait with that until it's needed.

I gotta stop here as I found I made a mistake. It appears the horn relay is built into the under-dash fuse box and can't be removed. In the second diagram, my red arrow is pointing to a switching transistor which supports my belief the horn can be programmed to chirp when the doors are locked. The horn relay can be turned on by two means. One is with the horn button on the steering wheel and the other is through the computer circuitry, (theft alarm system).

So now, there's a few different ways we can go. The first thing I would do is to blow the horn repeatedly to see if the fuse blows. Your neighbors won't mind if you do that late at night! If we're lucky, the fuse will blow and we'll have this narrowed down in short order.
If the horn works properly and the fuse doesn't blow at this time, since we can't unplug the horn relay, we could unplug both horns under the hood. If fuse 12 still blows some time later, we can eliminate the horns as the cause.

If you don't mind risking blowing a lot of fuses, another way to approach this is to unplug just one of the horns. That may leave you with one sick-sounding horn, but you'll have a horn. If the fuse no longer blows, say after a week or two, it's a good bet the one that's unplugged has been shorting intermittently. On the other hand, if the fuse still blows, reconnect that horn, then unplug the other one and try again.

I'm sorry that I made this sound so complicated. The procedure is actually very easy and takes less than a minute for each step, but I included as much detail as possible to avoid any confusion. The hardest part might be simply finding the horns and getting to them. The first drawing shows where they are, but I can't tell if you can reach them from up on top or if you have to crawl under the front of the car.

Let me know if I need to clarify anything up to this point.
Was this
answer
helpful?
Yes
No
+1
Tuesday, March 26th, 2024 AT 3:44 PM
Tiny
GMBRUSCA
  • MEMBER
  • 8 POSTS
Thanks for that in-depth reply! I got the car back to my house, so I am going to look into it right now.
Was this
answer
helpful?
Yes
No
Friday, March 29th, 2024 AT 10:41 AM
Tiny
GMBRUSCA
  • MEMBER
  • 8 POSTS
Well, the fuse blows consistently now.
I replaced the fuse with the doors unlocked, got in, started the car, and it blew.

Accessing the horns is not trivial - each one is behind an inner fender liner.
If the fuse blew with (presumably) no chirping from the alarm, does that mean
that the horns are not the problem?
I guess I am interested in your light bulb trick!
Was this
answer
helpful?
Yes
No
Friday, March 29th, 2024 AT 11:10 AM
Tiny
CARADIODOC
  • MECHANIC
  • 33,743 POSTS
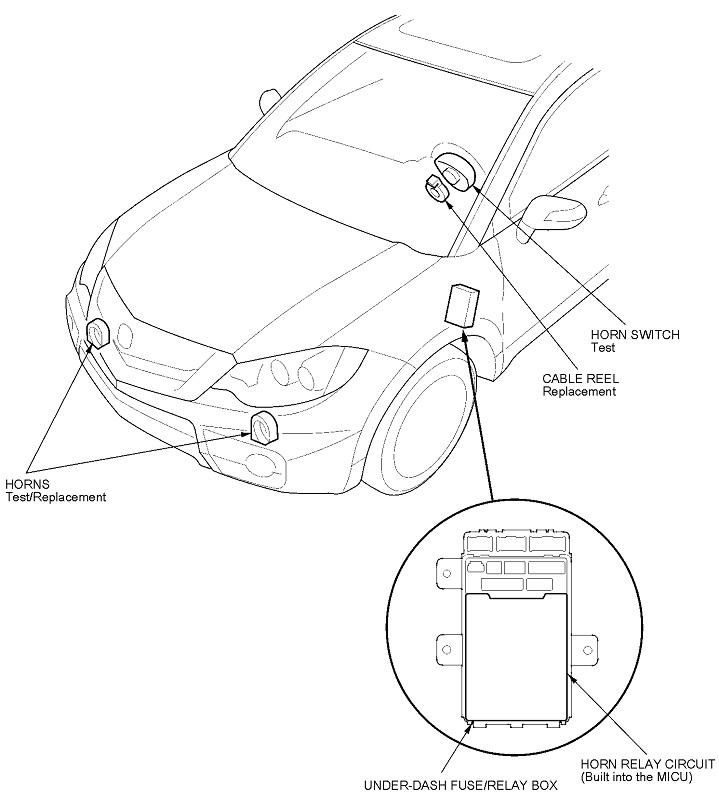
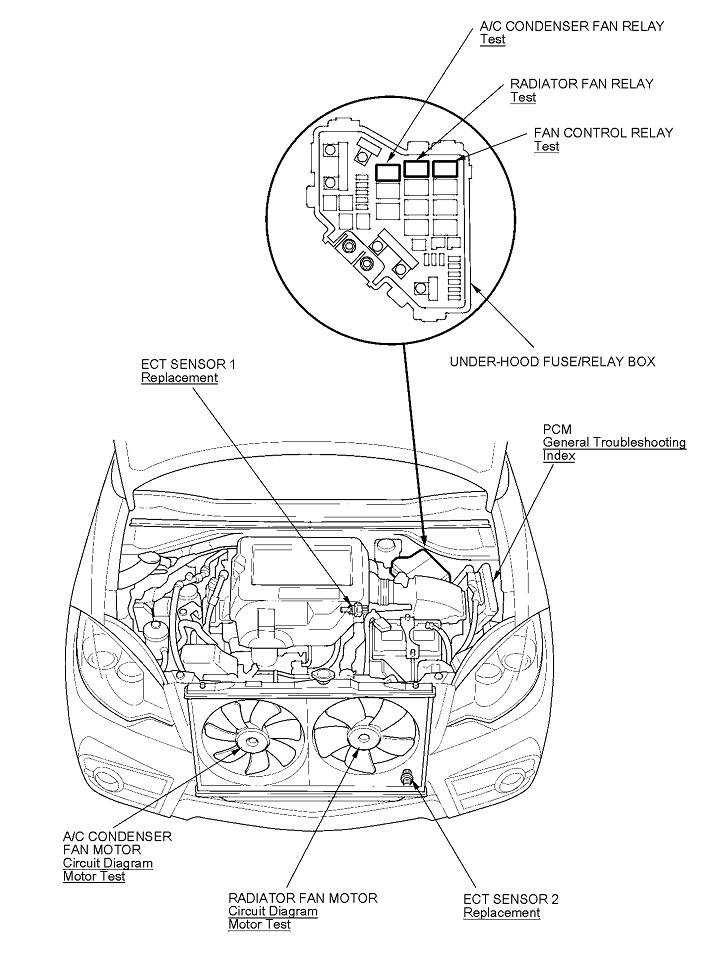
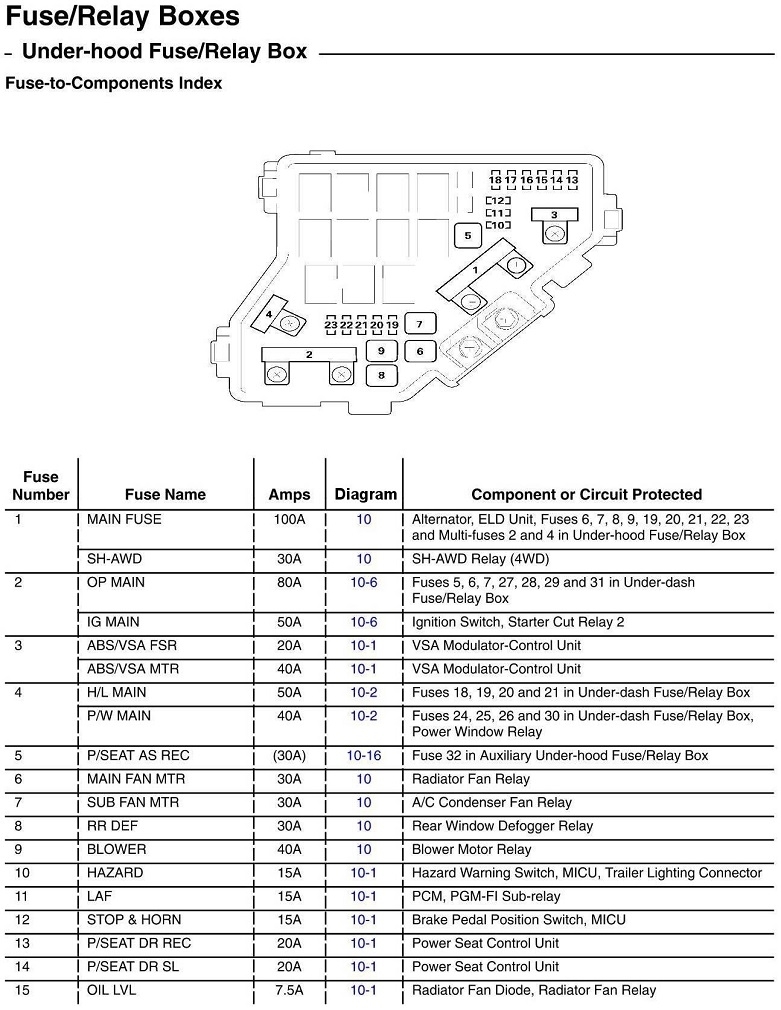
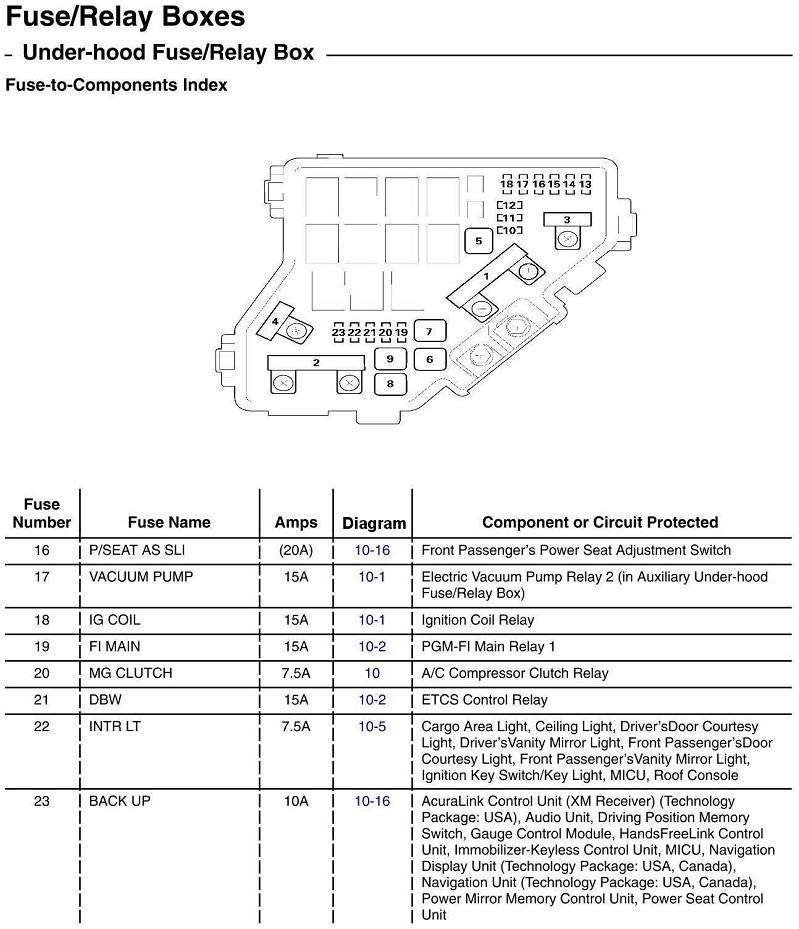
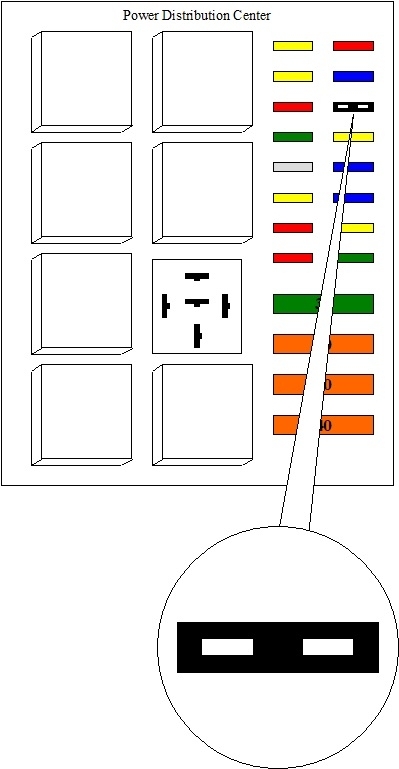
First of all, I just noticed in your title you said fuse # 12 under the hood. I posted the location for the fuse box under the dash. Here's the correct location for the benefit of others researching this topic. If these are too small to read, I like to copy and paste them into a typing program like MS Word where I can make them bigger.

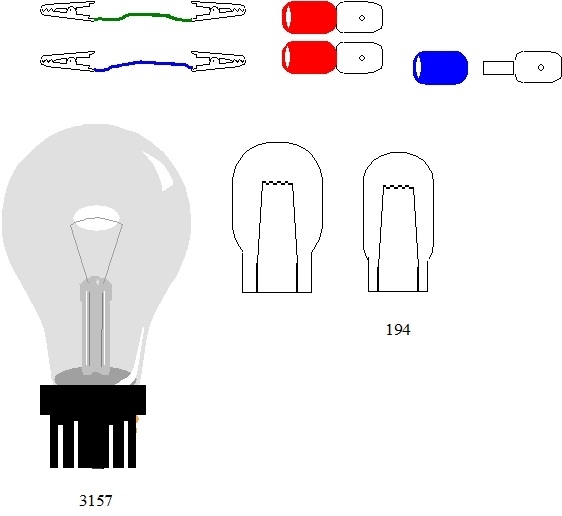
My light bulb trick has big drawbacks for very intermittent shorts in circuits like this, but now that the short is permanent, it works perfectly for locating the short without wasting a lot of fuses. Basically, all you're doing is replacing the blown fuse with a small light bulb. A common 3157 brake light bulb works well. At most, it will allow only one amp of current to flow, so nothing in the circuits will be overloaded or damaged.

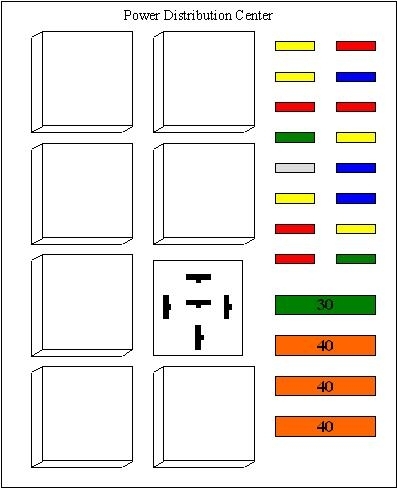
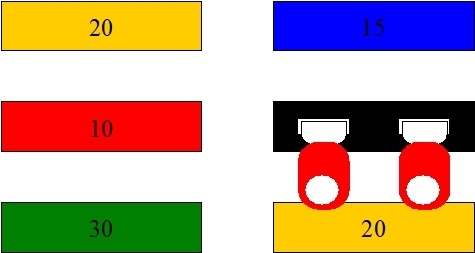
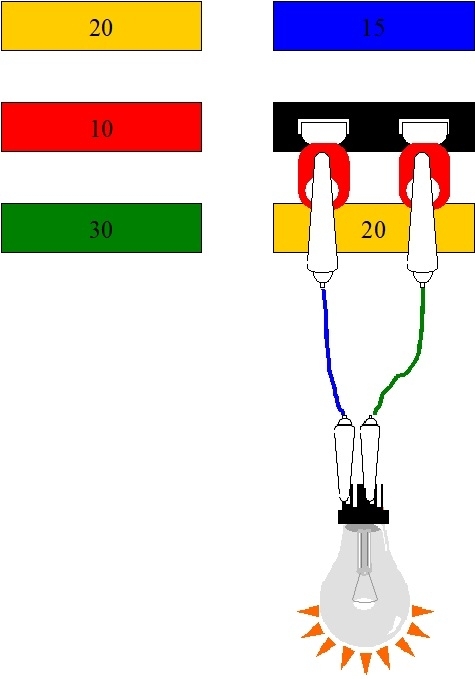
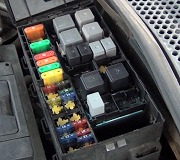
The fourth drawing shows a typical fuse box. In the fifth drawing, the blown fuse has been removed. You'll need a way to connect small jumper wires to the terminals in the box. When you have a large cartridge-type fuse, the box may have two male terminals sticking up. Connect the clip leads right to those terminals. If you have the more common spade-type fuse, you'll need a pair of universal crimp-type terminals. They normally come in a box of a dozen or more. Rather than buying way more than you'll ever need, consider asking a friendly mechanic if he has a couple extra in his toolbox. We all normally do.

Those universal terminals are shown at the top right of the sixth drawing. The two red ones are as they come with those insulators pressed onto them. Those can make it difficult to connect jumper wires to, so the blue one is shown after twisting and pulling to remove that insulator. You may need a pair of pliers to tug them off. Two clip leads are shown at the upper left. Harbor Freight Tools is the best place to find them. They're roughly 15" long and come in a bag of ten for less than $4.00.

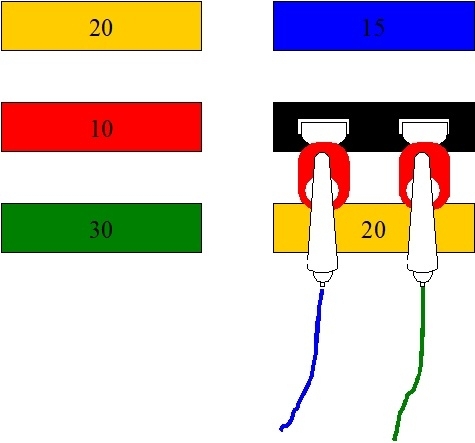
In my sad seventh drawing, the two terminals are poked into the terminals in the fuse box. In the eight drawing, the clip leads are connected to those terminals. Next, in the ninth drawing, the clip leads are connected to the light bulb. Now, when the short is present and the circuit is turned on, the bulb will light up full brightness and it will get hot, so be careful that it isn't laying on or against anything that can melt or burn.

A 3157 bulb has two filaments inside. The bigger one will allow one amp of current to flow. The smaller one will allow about 3/4 amp to flow. Depending on how the clip leads are connected to the bulb, maximum current will be 3/4 amp, one amp, or 1 3/4 amp. Regardless, current flow will be much lower than those circuits normally see. This same test can be done with different light bulbs, as needed. The little 194 "peanut" bulb, commonly used for side marker and license lamps, allows half an amp. If you're working in a high-current circuit, typical of fan and window motors, a plug-in 9004 headlight bulb works better. It allows five amps to flow when using the low-beam filament, or six amps with the high-beam. Any of these bulbs will work fine. The point of using different bulbs has to do with very subtle changes in brightness when the short is removed. Using the right bulb just makes that change easier to notice. Additionally, when the short is removed, the circuit is going to resume trying to work. At that point the bulb can limit current too much. In a power window motor circuit, for example, if a 9004 headlamp bulb is used, the motor will run, although slowly, when the short is gone.

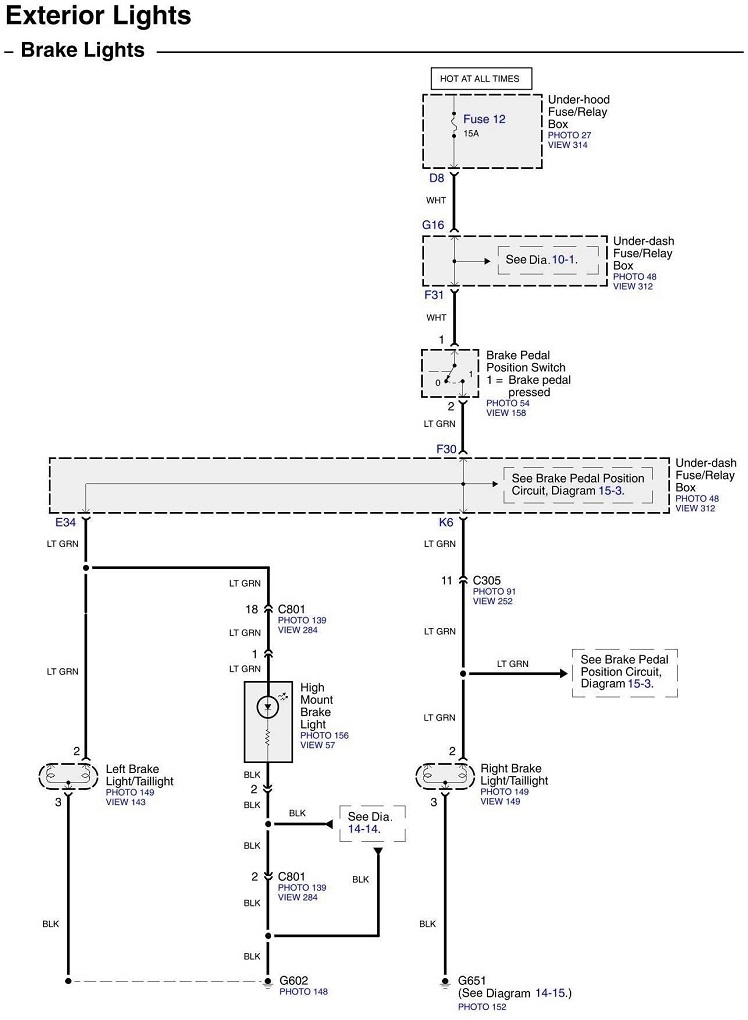
That was a lot of extra detail that you won't be tested on later. At this point, if you find the test bulb is bright, the short is present and the circuit is turned on. If the bulb is off or very dim, there is no short in the circuit right now. Now you do things to see what makes the short occur. When you do, the bulb will become full brightness. Press on the brake pedal. If the wiring to the brake light bulbs is shorted, the test bulb will become bright, but nothing will be overloaded or damaged. I like to place a stick between the driver's seat and the brake pedal to hold the pedal down, then run around the vehicle to see if you can do anything to make the short go away. When you do, the bulb will become dim. It will not go out completely because current has resumed flowing through the brake light bulbs. If you look closely, you may be able to see them glowing a little. Look for a chewed-up trailer wiring harness that got pinched under a trunk lid or lift gate, or was wrapped around the hitch and rubbed on the ground a few times. Back in the '90s, a real common cause of shorted brake lights was a trailer connector from U-Haul. They had three red LEDs on them, and something inside the connector commonly shorted.

I haven't looked at your turn signal circuit yet, but up until recently, the brake lights fed through the turn signal switch. If the short is present with the brake light switch on, see what happens when you turn the signal switch one way, then the other.

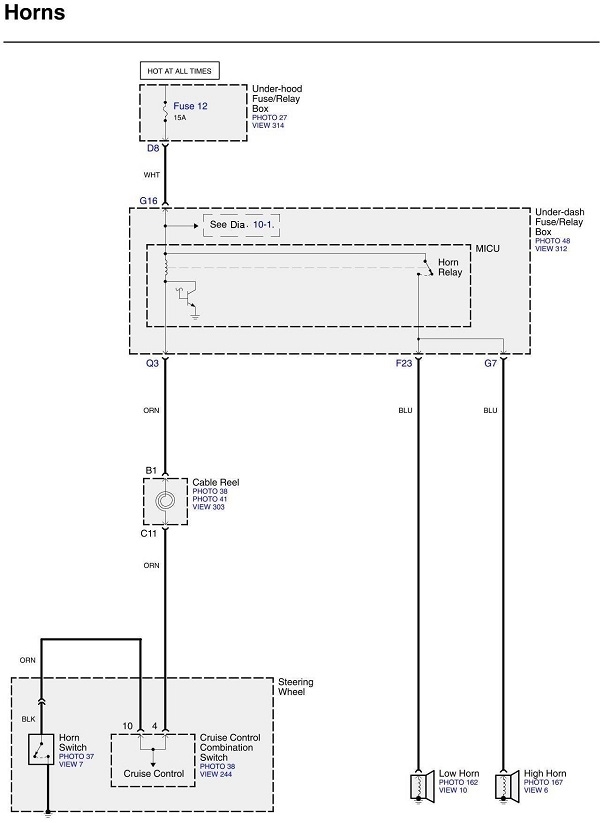
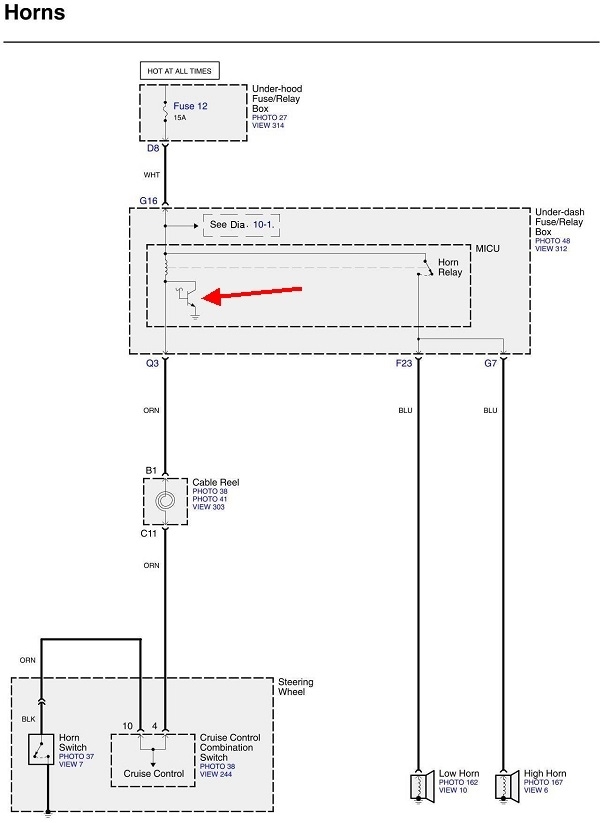
If the test bulb hasn't indicated a short yet up to this point, try using the horn. This test might get a little confusing. I suspect this is not the circuit with the short because there is only one wire running up the steering column that can be shorted. The horn relay and the horns, and a short, won't be powered up until the horn button is pressed. Before you turn on the ignition switch, try blowing the horn. The test bulb is likely to get almost full brightness because horns do draw a lot of current, but since the test bulb is limiting that current, expect the horns to sound rather sickly. The point is if they do try to sound, that circuit is not shorted. That furthers my suspicion the short is in the brake light circuit.

Remember, there is a transmission shifter interlock tied to the brake lights, so that's another item to consider. I haven't run into one of those solenoids shorted yet, but some other things I have solved with this test light setup include a mudflap screw run through a wire harness, a rear seat mounting bracket set on top of a wiring harness and crushing it, and an aftermarket trailer harness left-turn wire pinched under the lamp housing. I found the mudflap screw by going around the vehicle while banging on it with a rubber hammer. The shorted trailer harness wire showed up when I began to remove the left tail light housing. When I loosened the screws, the test bulb became dim and the brake lights started to glow just bright enough to see if you looked really close. The wire had folded under the screw, then the insulation rubbed through over time against the screw threads.

Another really common place to find shorts is right under the driver's foot area on GM vehicles. A huge clue is to find a large hole worn through the carpeting. Another common place to find shorted wires on almost any brand of vehicle is in the wiring harness between the door hinges. A dandy clue is the test bulb's brightness will flicker when opening and closing the door. That harness won't affect brake lights, but if you run into that, I have a suggested fix.

Once again, there's a lot to consider. I added a lot of extra detail for your viewing pleasure. Once you have the test bulb connected, see what it does and what you can do to make it get bright, dim, or go out, and let me know.
Was this
answer
helpful?
Yes
No
Friday, March 29th, 2024 AT 4:21 PM
Tiny
GMBRUSCA
  • MEMBER
  • 8 POSTS
Sorry for the late reply - I was out of town.
I don't think I can do your light bulb trick - it is a bit too in-depth for me. :)
I did think of something while on vacation, though: This car was involved in an accident
a year or two ago. It was rear ended. Eventually, the entire liftgate was replaced with a
new one. That seems like a reasonable guess for the culprit, no?
Is it easy to disconnect all or some of the break circuitry to isolate the problem?
I am not good at removing panels and such from the car.
And I do not mind blowing some fuses along the way.
Was this
answer
helpful?
Yes
No
Wednesday, April 17th, 2024 AT 5:48 PM
Tiny
CARADIODOC
  • MECHANIC
  • 33,743 POSTS
I strongly recommend the light bulb procedure. It's really very easy to do and takes less than a minute to put it together. I may have gone into way too much detail and ended up making it sound overly-complicated. We do this all the time at my friend's body / repair shop.

I looked back at the very first diagram I posted and see the brake lights are on that circuit and in back where you say crash damage occurred. If the short is back there, fuse 12 will blow only after you press the brake pedal. Two things come to mind. First, depending on the damage, if the rear lamp housings were removed, I did run into a wire that got pinched under one of the mounting screw holes. It took a couple of years worth of road vibration for the insulation and paint to wear through, then the short occurred when hitting bumps in the road. I found that by hanging my test bulb over the rear-view mirror so I could keep an eye on it, then running around banging on the vehicle with a rubber hammer. The bulb flickered bright each time I lightly tapped on the left rear housing.

A second suspect that I haven't run into myself, but I read about it quite often, is frayed or broken wires where they pass from the body into the lift gate. Breaking due to flexing is real common between driver's door hinges, and the same thing can happen on lift gates. The clue there is the test bulb will flicker between bright and off as you open and close the gate, but you have to have the circuit powered up while doing that. That means having a helper to push the brake pedal, or I use a stick from the driver's seat to hold the brake pedal down an inch or two. This applies if the center high-mount brake light is in the lift gate.

If you just rely on replacing blown fuses, you'll never know what you did to cause the short. Take my rubber hammer method, for example. I might have banged on the body a hundred times as I worked all the way around the car, then, when I got back to the fuse box and found the fuse blown, I'd have no idea when it blew or what I was doing or where I was pounding. With the test bulb, you'd know that the instant you did something to make the short come or go.
Was this
answer
helpful?
Yes
No
Wednesday, April 17th, 2024 AT 6:41 PM
Tiny
GMBRUSCA
  • MEMBER
  • 8 POSTS
Okay I still haven't done your lightbulb trick, but I have some new info.
I replaced the fuse and started the car without my foot on the brake.
The horn worked fine.
Then I hit the brakes. My wife said that the brake lights came on for a second,
Then went off again. I tried the horn, and it did not work.

So, I am extremely confident that the short is in the brake system - hitting the brakes.
Blew the fuse, which stopped the horn from working.
Are there brake relays that I can disconnect, then reconnect one at a time to find the culprit that is causing the short?
Was this
answer
helpful?
Yes
No
Saturday, April 20th, 2024 AT 3:34 PM
Tiny
CARADIODOC
  • MECHANIC
  • 33,743 POSTS
Dandy. I don't see a connector to isolate the left brake light. The right one goes through connector C305. Unplug that one if you can find it. Those wires are fixed and not likely to flex or break. Where I would start next is to open the lift gate, then see if a new fuse blows. If it doesn't, suspect the wires between the hinges.

The fact you see the lights come on for an instant suggests those left and right circuits are okay. Frayed wires between the hinges is a good suspect because that may not be a solid short, but rather, just bad enough to allow barely too much current that the fuse blows.

If the fuse doesn't blow with the gate open, keep the brakes applied while you slowly close it. If you see the lights flicker and the fuse blows when the gate is moved, you know that's where you need to look. Let me know what happens.
Was this
answer
helpful?
Yes
No
Saturday, April 20th, 2024 AT 6:48 PM
Tiny
GMBRUSCA
  • MEMBER
  • 8 POSTS
I don't understand. As soon as I apply the brakes, the fuse will blow.
So I can't slowly close the gate to see what happens.
Should I turn the car on with the gate already open?
Or should I turn the car on, then open the gate?
Either way, I cannot use the brakes.
Was this
answer
helpful?
Yes
No
Saturday, April 20th, 2024 AT 8:36 PM
Tiny
CARADIODOC
  • MECHANIC
  • 33,743 POSTS
Yes, open it first. Hopefully that will make the wires flex enough that the short is gone. Now have your helper apply the brakes. If the fuse doesn't blow, lower the gate while watching the lights. If the fuse blows as the gate is lowered, suspect the wires between the hinges.
Was this
answer
helpful?
Yes
No
Saturday, April 20th, 2024 AT 8:49 PM
Tiny
GMBRUSCA
  • MEMBER
  • 8 POSTS
Got it. Thank you.
I did that. The gate was open before I started the car.
The horn worked fine. As soon as my wife hit the brakes, I saw them flicker, and that was that. I did not move the gate. The application of the brakes caused the short.
Was this
answer
helpful?
Yes
No
Sunday, April 21st, 2024 AT 12:16 PM
Tiny
CARADIODOC
  • MECHANIC
  • 33,743 POSTS
Could you see if all three brake lights were flashing on for an instant? If they were, consider the solenoid that releases the shift lever might be shorted. I've never heard of that, but there's a lot of things that have happened I never heard about. See if you can find that and unplug it. If that's the culprit, you won't be able to shift out of park, but the brake lights will work properly without blowing more fuses.

If the fuse still blows, at this point I'm going to insist you use the light bulb in place of the fuse. The only other way to find the short is to use an ohm meter connected between the fuse socket and ground. It will show infinite or very high resistance until the brake pedal is pressed, then it will show close to 0 ohms, indicating the short is present. Now you have to tear the vehicle apart until the short is found. That could take the better part of the rest of your life, and leave you with a disaster to put back together.

Just remove the blown fuse, insert two universal terminals, or even two stretched-out paper clips. Use two pieces of wire to connect those paper clips / terminals to the bulb. Small jumper wires from Harbor Freight Tools makes that job very easy. I can't stress enough, once you have the parts at hand, installing this bulb takes just a few seconds. When I do this at my friend's shop, it takes longer to rifle through his tool box draws to find two good jumper wires than it takes to connect everything.

There is one more method that I've heard about but never tried. It's a tool called "The Fox and the Hound', or something like that. You plug one part into the fuse socket. That one limits current through the short to a safe value and it generates some type of pulsing signal, or current flow. Apply the brake pedal, now the second part of the tool is a receiver with a speaker. Any time you have current flowing through a wire, it sets up a magnetic field around that wire. The second part of the tool detects that magnetic field. In this case it responds to the pulsing current the first part of the tool generates. You move the receiver along the wire harness following that signal. When you lose the signal, you either have to move in a different direction, since these wire harnesses are hidden under carpet and trim panels, then, when you can't find where to keep going, you've come to the location of the short. That pulsing current is no longer traveling through the wire after the short, so the signal no longer occurs after that point. This way you at least know where to peel back the carpet, which trim panels to remove, or which item to unplug. Once you unplug or do something to remove the short, the signal will no longer be detected.

In the same way, when you do something to remove the short, my test bulb will go out or dim. Even if you have to run out and buy all the parts for my test bulb, you're looking at less then ten bucks, far cheaper and faster than buying the special tool. Keep in mind electrical problems have been my specialty since the mid 1970s, and I've never needed that special tool.
Was this
answer
helpful?
Yes
No
Monday, April 22nd, 2024 AT 12:20 AM

Please login or register to post a reply.

Sponsored links