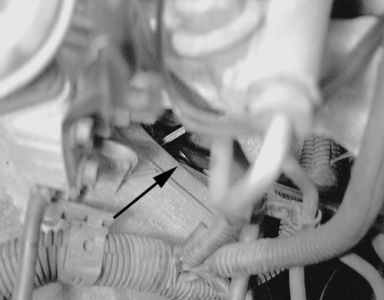
Replacement procedures are below. To gain access to top bolt, use the opening in the intake manifold support bracket (pictured below).
((ACCESSING TOP STARTER BOLT))
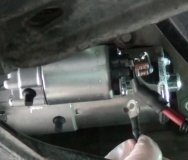
REMOVAL:
Disconnect the negative battery cable.
Raise and support the vehicle safely.
If equipped, remove the starter shield pin by pulling on it with pliers, then lift and release the shield from the solenoid.
Spray the solenoid electrical connection nuts and studs with penetrating oil, and allow it to seep in for a minute to loosen the connections. While the oil is soaking in, tag the solenoid electrical connectors for identification during assembly.
NOTE: It is very important that the solenoid electrical connection nuts and studs are sprayed with penetrating oil prior to removal to avoid damage to the solenoid end cap. A cracked cap will allow debris and moisture to enter and corrode the solenoid contacts.
Carefully loosen the bolts and detach the starter electrical connectors. Position the wires to the side and out of the way.
Remove the lower starter mounting bolt.
Using an obstruction wrench, remove the upper starter mounting bolt. If the upper starter mounting bolt cannot be reached from below the vehicle, it may be accessible from above, through the intake manifold support bracket opening.
If equipped, remove the bolt attaching the starter rear support bracket to the vehicle. Rotate the starter until the bracket misses the axle shaft support bracket.
Carefully support the starter, pulling it rearward and toward the left side of the vehicle to remove it.
INSTALLATION:
If equipped on the old starter, install the rear starter support bracket to the new starter. Tighten the bracket nuts to 7 ft. lbs. (9 Nm).
Guide the starter into the bell housing and rotate the assembly until the lower bolt hole in the starter aligns.
Verify that the bracket is properly aligned and loosely install the bracket bolt, then loosely install the starter mounting bolts. It may be necessary to raise or lower the vehicle for access to both the upper and lower bolts, but do not tighten any bolts until all of the mounting bolts have been started.
Tighten both upper and lower starter assembly attachment bolts to 27 ft. lbs. (37 Nm).
Reconnect the electrical wires and install the nuts. Be careful not to overtighten the nuts and crack the solenoid end cap. Route the wiring cable so it will not contact any rough surfaces. Tighten the starter positive terminal nut to 89 inch lbs. (10 Nm) and the solenoid terminal nut to 44 inch lbs. (5 Nm).
If equipped, install the starter shield and push pin, being careful that the pin is positioned for possible future removal.
Lower the vehicle.
Connect the negative battery cable and verify operation.
Thanks for using 2CarPros.com!
SPONSORED LINKS
Wednesday, January 21st, 2009 AT 9:04 PM