1999 Saturn SL1 L4-1.9L SOHC VIN 8
IMPORTANT:
Do not use a flexible extension socket to remove spark plugs. Damage could occur to the spark plug insulator.
Use only a spark plug socket that has a rubber insert to hold the spark plug in place.
Before removing the spark plugs, make sure water and other debris in the spark plug wells are blown out.
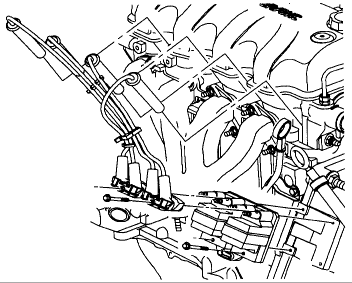
REMOVAL
1.Remove connector position assurance (CPA) hold down brackets.
2.Gently pull spark plug boots off of spark plugs. Twist boot during removal to break any bonding.
3.Remove spark plugs.
INSTALLATION
IMPORTANT:
Make sure the gasket is on the spark plug.
Do not bend over the electrodes on the spark plugs after removal. Spark plugs sent back for analysis must be in the original condition after removal from the engine.
Always coat spark plug threads with anti-seize compound before installation.
1.Set gap on spark plugs to 0.040 in.
2.Install spark plugs.
Torque: 27 NM (20 ft. lbs.)
3.Inspect spark plug wires. Replace any wire that is worn or chaffed.
IMPORTANT: If boot is torn or ripped a new wire must be installed. Do not repair leads from which the terminals have been pulled off. Replace the lead.
4.Install spark plug wires. Press boots onto spark plugs until click is heard or felt.
5.Install connector position assurance (CPA) hold down brackets.
Torque: 17 NM (151 in. lbs)
IMPORTANT: Install the spark plug wires on the correct spark plugs as indicated on each spark plug wire. Make sure routing of wire on engine is away from moving parts and exhaust.
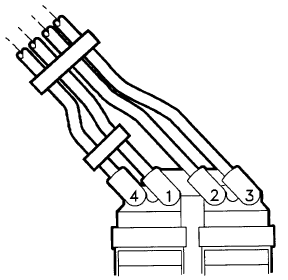
IMPORTANT: Orientation of the wires to the EI module is critical to the operation of both the module
and on-board diagnostics. The orientation from left to right is 4 1 2 3.
Jan 31, 2010 at 4:48 PM