Rear brake piston pops out

Tiny
RICHARD DAVIS2
  • MEMBER
  • 2002 SATURN L100
  • 2.2L
  • 4 CYL
  • 2WD
  • AUTOMATIC
  • 160,000 MILES
There is an existing thread on the same problem but I was unable to get it right using that info.
When I press the brake, with the drum on, the front piston pops out and leaks. I observed the tendency for the front shoe to get behind the piston but that did not happen this time. I also checked that the bottom of the shoes are fitted inside the plate at the bottom.
I replaced the cylinder with a known good one and the same results.
I successfully did this job a few months ago but must have left too much drag because the shoes on that side burned up. The soes are also nearly worn out and the drum is terrible.
I have new drums on the way and shoes to install but I don't want to use them until I get to the bottom of this problem, otherwise I will contaminate another set of shoes.
I am of course cursing Saturn for not providing slots in the pistons to securely hold the shoes, but that gives me no solution.
I know it was working fine until the original shoes wore down. There was no trouble other than grinding.
Anyone suffered through this can help me? I have worked on it for two whole days, trying everything but new shoes.
Notice, in the pictures the adjuster piece is not engaged as it should be, but this is not the problem.
Thursday, January 9th, 2020 AT 3:47 PM

17 Replies

Tiny
94 TRANSAM
  • MECHANIC
  • 680 POSTS
The travel on the pistons are designed to hit the end of their travel when the shoes are at their minimum. So when you run all the brake material off the shoe and then the metal on the shoe wears away the drum the travel increases because the drum diameter has gotten bigger. Make sense? Because the diameter got bigger the piston falls out.

You should be fine when you replace the drums and shoes.

Rich
Was this
answer
helpful?
Yes
No
Thursday, January 9th, 2020 AT 4:22 PM
Tiny
CARADIODOC
  • MECHANIC
  • 33,752 POSTS
The first thing to suspect is the drum is worn beyond the legal limit, especially if it was grinding. There is always a published maximum diameter the drum can be machined to, and another slightly larger diameter it can be allowed to wear to. Those are called the "machine to" spec. And the "discard" spec. You'll need a special drum micrometer to measure them accurately. Don't waste your money on buying one. Every auto parts store that offers drum and rotor machining will have one and they will check your drums for free. No reputable mechanic will machine a drum or rotor beyond the machine-to spec to try to save it. That can leave them open to a lawsuit or liability issues. For that reason, all independent repair shops that offer brake service will have this gauge too.

The second chart below is just a blown-up copy to make it easier to read. While it isn't listed this way, drums and rotors are measured to the thousandth of an inch. Yours started out at 9.050" when they were new, and they can be machined to 9.080", which is only 0.015" per side. That is a fairly standard amount although many larger drums can be machined quite a bit more. Your drums can be allowed to wear another 0.010" to a total of 9.090". Once they get bigger in diameter than that, the shoes' diameter will prevent them from making full contact until the center of the lining wears down a lot. That leaves you with a front-to-rear brake balance considerably different than what was carefully designed in.

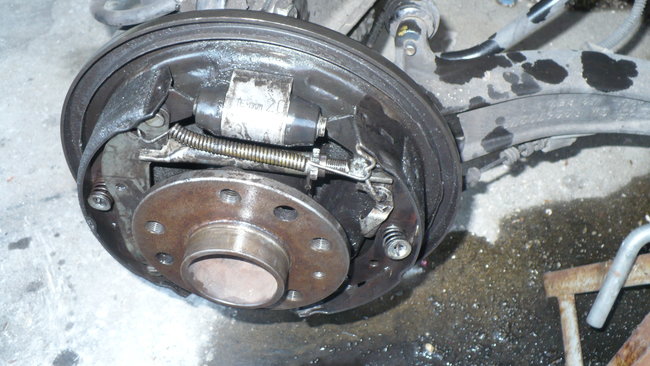
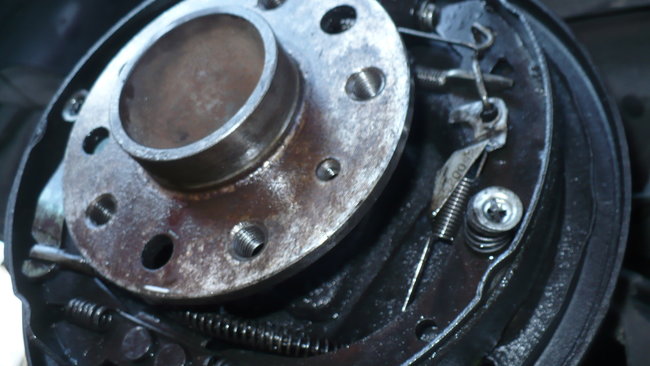
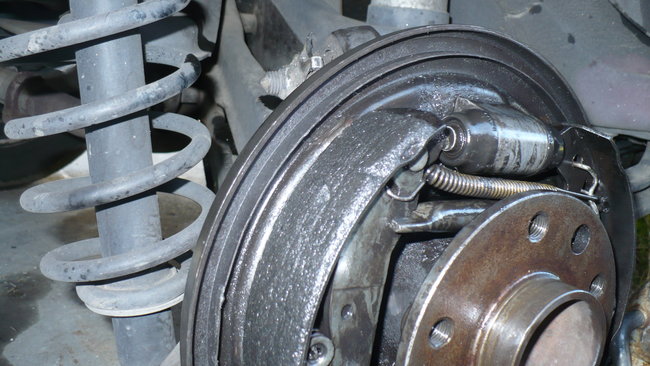
It takes a lot more wear on the drum to allow a piston to pop out of the wheel cylinder. A better suspect is the shoe frame is moving out far enough to let it drop down into the "labyrinth seal". That's the curved groove around the outer edge of the backing plate. The drum has a matching groove. When those are assembled, they form somewhat of a seal that prevents water from splashing in.

Look at where the piston is sitting in relation to the shoe. If the piston is away from the backing plate, meaning you can see it in front of the end of the shoe it's supposed to push on, the shoe has dropped into the groove and is allowing the piston to bypass it. If the piston is behind the shoe, the better suspects are worn shoe hold-down hardware or weak shoe return springs. All of those springs and hardware are available as a complete kit for the entire axle.

Your comment about the old shoes burning up concerns me. There's two things I would be looking for. The first is if a parking brake cable is stuck in the partially-applied position. Given the age of the vehicle, if you live in a northern climate like I do where they throw a pound of salt on an ounce of snow, rusted cables are pretty much a certainty unless they've been replaced previously. A stuck cable will also prevent the self-adjuster from operating. Over time, instead of adjusting closer to the drum, the shoes will have to move out with a longer stroke to reach the drum. With sufficient wheel cylinder wear, that can allow the piston to twist enough for the shoe to slip off the end. Once that happens, there's nothing to hold the piston from being pumped out when you press the brake pedal.

My worse fear is when the brake fluid is contaminated with a petroleum product such as engine oil, transmission fluid, power steering fluid, penetrating oil, or axle grease. Those will cause all rubber parts that contact the brake fluid to swell and become soft and mushy. The first thing that usually happens is the rubber lip seals in the master cylinder grow past the fluid return ports, then the brake fluid is trapped and can't release back into the reservoir. As the disc brake pads heat up from staying applied, the heat migrates into the brake fluid. The fluid expands, and since it can't get back to the reservoir, it applies the brakes harder and harder, and they get hotter and hotter. We customarily see this with overheating front brakes, and not so much with rear drum brakes, but it can affect both axles. I think you would have noticed other problems or symptoms before now.

Your self-adjuster works by spreading the tops of the shoes further apart as the linings wear. With this design, the pistons work their way out of the wheel cylinders, and that leaves them prone to problems caused by overly-worn drums and linings. If the new drums and shoes don't solve this, try to post some photos, then we'll see if we can figure out what is happening.

Be sure to use a click-type torque wrench on the lug nuts. Torque them all to 46 foot-pounds first, then to 92 foot-pounds. Please keep us updated on your progress.
Was this
answer
helpful?
Yes
No
Thursday, January 9th, 2020 AT 4:52 PM
Tiny
RICHARD DAVIS2
  • MEMBER
  • 7 POSTS
Thank you both. But I am inclined to think it is not just the wear, because it was together and not leaking after the original repair. When I opened it up, the piston was popper but the shoes was not out of place. Something about the setup is causing the shoes to shift forward. If there were no space then it couldn't pop out. Maybe it is the wear PLUS out of adjustment. Like I said, it is were adjusted it could not pop out no matter how worn the shoes, drum are. I think I need to concentrate on adjustment.
Tell me if I have this correct. It is a passenger side wheel. What I want to know is exactly how the self- adjuster works. It seems to dial the star wheel downwards to expand the drums But I am confused about this. Does it turn the star wheel down or up? If up, then no wonder I can't adjust it right. If up, then I must have the wrong side adjuster. I know that it is what was there originally because I did one side at a time. But maybe somehow it was set up with the wrong side adjuster yet worked.
Also, the adjuster does not reach the star wheel in all positions. Maybe because of she/drum wear, my self adjuster is out of range. Maybe by ignoring this and adjusting until tight, then loosening it until the wheel spins free, I will then have it so the piston does not pop out and the brakes "work" --if non adjusting. Only then will I have the confidence to put in the new drums and shoes when they arrive. I will also be able to drive the car in the meantime.
In addition to the correct direction of operation of the adjuster wheel, (down stroke or up stroke?) Another clue that would help me is where the self-adjuster trigger is supposed to be in range of the star wheel when working with new shoes and new drums? -If I can see that I will know I am on course.
I want to say something about aftermarket parts. The AcDelco cylinder I put in only a few months later the boots is torn on both pistons. I think now I was a sucker to think AcDelco would be quality. I have now reinstalled the old original brake cylinder, which I had replaced for preventive maintenance, the boots of which are immaculate. I think I got crappy parts. In this case it was not AcDelco quality. Maybe if I went for Centric I would do better. Maybe it was poor installation but the boot quality is definitely sub-OEM. I am starting to regret the idea of replacing parts preventatively if the aftermarket quality is too poor.
Was this
answer
helpful?
Yes
No
Thursday, January 9th, 2020 AT 6:23 PM
Tiny
94 TRANSAM
  • MECHANIC
  • 680 POSTS
First it is not the boot quality that is the issue. Brake fluid rapidly swells and destroys rubber. This rubber is a dust shield and was not designed to be wet with brake fluid so this one wasn't an AcDelco issue.

Next, Both adjusters work if you are under the car looking at the dust plate you want to rotate it top to bottom or in a down motion to tighten them. I personally do not recommend putting the drums on and adjusting them as it is too easy to over adjust them. If you adjust them and slide the drum on after it is much safer. To do it this way you want to keep adjusting them a bit at a time and keep sliding the drum on to check them. Keep doing it until the shoes drag on the drum as you put it on and once it all the way on you should feel it dragging just a bit if you rotate the drum. If the drum goes on stuff and then spins freely once on then you only need 2 to 3 clicks of adjustment from the back. You will have to do this when a groove is worn in the drum on the next set of shoes. With a new drum no back adjustment is required as there is no lip on the drum. You generally want to do it this way all the time anyway cause its much faster to spin the adjuster with your fingers than to do it from the back.

If the lever does not reach the adjuster then the adjuster is in backwards.

Rich
Was this
answer
helpful?
Yes
No
+1
Thursday, January 9th, 2020 AT 7:14 PM
Tiny
CARADIODOC
  • MECHANIC
  • 33,752 POSTS
There is also a gauge for adjusting the shoes, but the method just described by 94 TRANSAM is much better. With the gauge, you adjust it out to match the drum diameter, then you use the other side of the pair of fingers to set the shoes. I've never had good results with that tool.

Be aware that GM is one of the manufacturers that makes most of their pwn parts, as high as 80 percent, and they buy the rest. I would be suspicious that they buy their wheel cylinders since there are companies that specialize in that and do a perfectly fine job. With those dandy resources, it doesn't pay for GM to invest in making their own wheel cylinders. When you buy an aftermarket wheel cylinder or one from the dealer, there's a real good chance they both came from the same factory, just with different names on the boxes.

This is also true of Chrysler fuel pumps. When you buy an aftermarket replacement from Napa, it is a reboxed new part that came from the same supplier that sold them to Chrysler.

Given the unusual nature of the problem, it might be time to look for uncommon failures. For example, your car uses a fixed anchor on the bottom for the brake shoes. Could that be broken loose? Also, GM had a big problem in the '70s and '80s with wheel cylinders that just set in an hour-glass-shaped hole in the backing plate, then it was held on with a snap ring on the backside. Those holes commonly rusted out, then the wheel cylinder could rotate, the pistons popped out, and the brake pedal went to the floor. There were redesigned backing plates available, and you had to install the regular wheel cylinder with the two mounting bolts. That required removing the axle shaft.

Also related to GM, back in the '80s, I worked at a Sears Auto Center and I had one coworker who had the same work habits as I did, so we often teamed up on jobs. Both of us enjoyed rebuilding the first brake caliper, but we both got bored when doing the second one. Instead, we each worked on one side of the car, each rebuilding one caliper and one wheel cylinder.

Our brake kits came with shoes, all the hold-down hardware, return springs, and all the seals and dust boots to fit every possible size of caliper and wheel cylinder those models could have come with. One of the cars we worked on was a mid '70s Pontiac station wagon. The owner said the car had a left-hand brake pull since it was new, and the brakes had been replaced two times already, and now, due to high mileage, it was ready for the third service.

I rebuilt the left front caliper and assembled that brake, then moved to the left rear. To rebuild the wheel cylinder, the diameter of the lip seal is molded on it, so it was easy to select the right ones from the four sizes included in the kit. All of a sudden my coworker hollered to me that I used the wrong size from the kit. Turns out his rear wheel cylinder was 1/16" diameter different than mine, and that caused the brake pull for all those years. No one had figured that out since the car was new.

That's a perfect case of where someone grabbed the wrong part on the assembly line. Finding the shoe adjuster on one wheel is for the other side is not unheard of.
Was this
answer
helpful?
Yes
No
Friday, January 10th, 2020 AT 12:40 PM
Tiny
RICHARD DAVIS2
  • MEMBER
  • 7 POSTS
Thanks again. Today even though it was clear weather I just had to get away from the job. This afternoon I took advice and installed the new shoes onto the plate and spring at the bottom. I had a lot of trouble with the spring hold downs even though I have old style brake plier and hold down tool.. It took a long time to get that far, but that is the tougher part. I received notice one of the drums arrived today so tomorrow--if not rainy--I can go further.
I may--or may not--remove the old cylinder and use the new one with the old boots. The only reason for hesitation is my feeling that if the boots were cheap the whole thing might be junk. My goal now is to get it running right. I could always go back as the cylinder is easy to replace without upsetting everything.
Doc, I appreciate your story about the wrong parts. Mine is not the only example. I replaced the drive axles of a geo metro a month or two before the tranny went. It must have been 1000 miles. But one boot was cracked along the top of the fold. Same thing. Cheap rubber. We all know that there are materials which are practically indestructible. Here they make zero allowance for wear and tear. I touched up the crack with rtv until I see if I can get the car working well enough to consider replacement. But where to get a replacement? These were NAPA rebuilt, which I like for economy. But it is not good economy if the boots are fragile. Hum-bug, sir! I have been saying it since Christmas.
Was this
answer
helpful?
Yes
No
Friday, January 10th, 2020 AT 3:24 PM
Tiny
CARADIODOC
  • MECHANIC
  • 33,752 POSTS
Take them back. Don't accept damaged parts. As one manufacturer's trainer used to tell us, "we not only sell you new parts, we sell them to you pre-broken". Supposedly that was to save time, so you didn't have to wait for them to wear out again.

It doesn't cost any less to make rubber parts out of the wrong compounds or additives, so there's no reason for a manufacturer to intentionally use the wrong material. Part of the problem, as 94 TRANSAM mentioned, is any rubber part that contacts brake fluid has to be compatible with that fluid, and those parts will absolutely not be compatible with any type of petroleum product. One drop of engine oil, for example, in the master cylinder, or penetrating oil sneaking in when trying to loosen a rusted brake line nut, can contaminate the entire hydraulic system to include every rubber seal, o-rings, and flex hose.

Wheel cylinder dust boots, on the other hand, live where they are going to come in contact with axle grease or gear lube, and as such, they have to be compatible with those and other petroleum products. It's normal to see a little of what looks like brake fluid seepage, even with brand new wheel cylinders, but that is Brake Assembly Lube and is considered normal. That doesn't swell the dust boots, but it doesn't have all the characteristics of brake fluid either.

Regardless, dust boots are designed to do what their name suggests, ... Keep out dust. Most of us have seen Ford Escorts with the pistons rusted tight in the wheel cylinders, yet the dust boots were in perfect condition. It's also common to see mushy dust boots that can't be doing much good, yet the wheel cylinders are still working just fine. I consider the new pistons and seals, and the rust-free wheel cylinder to be the important parts I'm replacing, and for my own vehicles, I'd reuse the old dust boots if I had to rather than make a special trip back to the store. That's a different issue when the customer is paying for those new parts and they aren't exactly getting what they paid for. That's when we get on the phone to the store that supplied the parts to us.
Was this
answer
helpful?
Yes
No
Friday, January 10th, 2020 AT 4:23 PM
Tiny
RICHARD DAVIS2
  • MEMBER
  • 7 POSTS
Well-reasoned I suppose but nothing explains away the difference between the original and the replacement. I don't know if it was original. With 160k I guess it has had brake jobs. The PO may have gotten a first class job. I drove for 30k myself with braking perfection. It has been my reliable transportation.
It's a good car (I say out of guilt?) I like there approach to fluid capacities. Larger capacity probably pays off in longevity. They also do not build for amateur repairs--the lack of tranny dipstick says it all. Shows what dorks they are, really, but the message is to leave it to the pros. So this brake job is part of their object lesson. Which I resent. Great car, with neurotic inputs, seems to me, IMHO!
But in digesting what you had to say, it is possible those boots got zapped with PB Blaster, or certainly carb cleaner, but I did not remember specifically doing that.
Was this
answer
helpful?
Yes
No
Friday, January 10th, 2020 AT 5:08 PM
Tiny
CARADIODOC
  • MECHANIC
  • 33,752 POSTS
I don't think so. We hit them with Brake Parts Cleaner all the time, and we use special high-temperature brake grease on the six raised surfaces the shoe frames ride on. Gear lube doesn't hurt them. In fact, I don't know of any common chemical that will deteriorate them.

I used to do demonstrations for my students to show what happens when wheel cylinder lip seals get high with one drop of engine oil, but I never tried that with the dust boots.
Was this
answer
helpful?
Yes
No
Friday, January 10th, 2020 AT 7:28 PM
Tiny
94 TRANSAM
  • MECHANIC
  • 680 POSTS
Brake fluid will rapidly eat the type of rubber those are made of. I you are having issues with the pistons falling out it is very possible the pistons were on the edge and leaking for a while and given those dust seals are a tight fit at both ends they may have been full of fluid on the inside and you couldn, t even see it.

Rich
Was this
answer
helpful?
Yes
No
Friday, January 10th, 2020 AT 10:56 PM
Tiny
RICHARD DAVIS2
  • MEMBER
  • 7 POSTS
Well, success for far. I got it together. I see what Doc was talking about with the gutter groove. Rich was right I will be okay now that I have new shoes and drum. (The other side hasn't arrived yet but that side is functioning. ) I have so far only driven the car in the driveway but it seems good.
I tightened it up until the drum would not move then loosened it up but no amount a loosening would relieve a slight rub. All my life I adjusted brakes to be completely free but lately I have been reading a slight rub is okay. But it wasn't last time--if that's the reason my brakes burned up. This time I will monitor that wheel for heat.
I like working on the car but I don't like a ballox like this was. I have been working on cars since the 50's. My first job was front brakes on a 57 Ford. Very easy although I had no reason to rebuild the cylinders other than enthusiasm. Of course it was at that time only a 6 year old car.
Thanks guys. Couldn't have done it without you.
For the benefit of other similarly beset, I will have the drum checked and report back. I can tell you it has a ridge which I would judge about 3/32". I forgot to mention the job of installing the upper spring was made possible without it falling apart a million times, by using a bar clamp to hold the shoes together while installing them.
The old front shoe, which I will also photograph is in two months worn down to metal and after soaking with brake fluid, the brake spring tool dug a hole in it it is so weak and porous. I guess that without asbestos the engineers are up against it. Great car! (S.O.B.S).
Was this
answer
helpful?
Yes
No
Saturday, January 11th, 2020 AT 2:55 PM
Tiny
94 TRANSAM
  • MECHANIC
  • 680 POSTS
You are very welcome.

Rich
Was this
answer
helpful?
Yes
No
Saturday, January 11th, 2020 AT 3:22 PM
Tiny
CARADIODOC
  • MECHANIC
  • 33,752 POSTS
Be aware too that when you install new shoes with the old / resurfaced drum, that drum is going to be slightly larger in diameter, so the linings will only make contact in their center area. For the first few hundred miles until they wear down to match the drum, you won't have the normal amount of braking power in the rear that was designed in. The engineers designed them to have a carefully-balanced brake system, front-to-rear.

It is customary on the test-drive to hit the brakes pretty hard a few times to help speed up that matching process so the customer doesn't have to do that. It is also okay to have that slight drag on the drum when the shoes are adjusted up.

When you have these new drums and shoes, that drag isn't necessary because the shoes will match the drums in diameter. Even if you leave them with a 1/16" gap, you won't notice that in how far the brake pedal travels.

Sounds like you solved this. Please come back to see us again.
Was this
answer
helpful?
Yes
No
Saturday, January 11th, 2020 AT 3:40 PM
Tiny
RICHARD DAVIS2
  • MEMBER
  • 7 POSTS
That that side looks okay so far. I have taken it apart several times to check and re-adjust.
However now there is the driver's side. I am glad I checked it today because it was also falling apart, The self-adjuster and spring was at the bottom of the drum. Drum is similarly worn but these shoes are new two months ago. Adjuster bar was loose and soon to come out too.
Obviously what I need is the new drum which is now scheduled to arrive a few more weeks. (I ordered these drum on Dec 18. Very slow but a good deal price-wise.)
So what I have done is to adjust the brakes as best I could, disregarding the adjuster lever, which is now about 1/2" out or range of the star. So I am assuming I can go without the adjusting feature until the end of the month when the drum arrives, without the thing falling apart. Does it sound like I am okay?
Was this
answer
helpful?
Yes
No
Monday, January 13th, 2020 AT 2:33 PM
Tiny
94 TRANSAM
  • MECHANIC
  • 680 POSTS
You should have no problem leaving that adjuster out. All it will do is cause a delay for that side when the brake is applied because it will have to travel further not being adjusted out like the other.

Rich
Was this
answer
helpful?
Yes
No
Monday, January 13th, 2020 AT 3:28 PM
Tiny
RICHARD DAVIS2
  • MEMBER
  • 7 POSTS
That that side looks okay so far. I have taken it apart several times to check and re-adjust.
However now there is the driver's side. I am glad I checked it today because it was also falling apart, The self-adjuster and spring was hat the bottom of the drum. Drum is similarly worn but these shoes are new two months ago. Adjuster bar was loose and soon to come out too.
Obviously what I need is the new drum which is now scheduled to arrive a few more weeks. (I ordered these drum on December 18. Very slow but a good deal price-wise.)
So what I have done is to adjust the brakes as best I could, disregarding the adjuster lever, which is now about 1/2" out or range of the star. So I am assuming I can go without the adjusting feature until the end of the month when the drum arrives, without the thing falling apart. Does it sound like I am okay? Doc, your analysis of the problem with the gutter space is conformed by photo of front brake shoe wear. It went behind the cylinder alright.
Was this
answer
helpful?
Yes
No
Monday, January 13th, 2020 AT 3:35 PM
Tiny
CARADIODOC
  • MECHANIC
  • 33,752 POSTS
Dandy. Please keep us updated on your progress.
Was this
answer
helpful?
Yes
No
Monday, January 13th, 2020 AT 3:38 PM

Please login or register to post a reply.

Sponsored links