Hi,
You are very welcome. Listen, I have directions for removal and replacement, but it is part of an entire door overhaul. So, it starts with removal of the door panel and so on. I will stop at the end of the regulator removal. Before you purchase the regulator, remove the panel so you can see in where the door is attached to the regulator. There are two bolts that hold it to the regulator track. Make sure one hasn't come loose and is causing the window to jam.
____________________________________________________________
2009 Toyota Truck 4 Runner 2WD V6-4.0L (1GR-FE)
Disassembly
Vehicle Body and Frame Doors, Hood and Trunk Doors Front Door Service and Repair Overhaul Disassembly
DISASSEMBLY
ENGINE HOOD / DOOR: FRONT DOOR: DISASSEMBLY
DISASSEMBLY
HINT:
- Use the same procedures for the RH side and LH side.
- The procedures listed below are for the LH side.
- A bolt without a torque specification is shown in the standard bolt chart See: Dashboard / Instrument Panel > Removal and Replacement > Removal.
1. REMOVE FRONT DOOR LOWER FRAME BRACKET GARNISH LH
pic 1
(a)Using a screwdriver, remove the lower frame bracket garnish.
HINT: Tape the screwdriver tip before use.
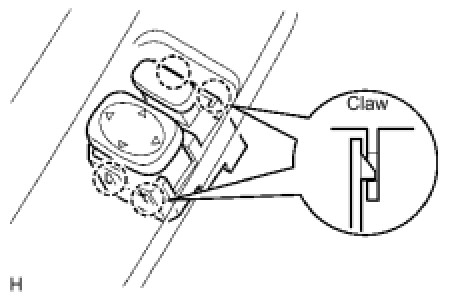
2. REMOVE FRONT DOOR INSIDE HANDLE BEZEL LH
pic 2
(a)Using a screwdriver, disengage the 3 claws, and remove the inside handle bezel.
HINT: Tape the screwdriver tip before use.
3. REMOVE FRONT ARMREST ASSEMBLY LH
pic 3
(a)Disengage the claws, and remove the armrest from the trim board.
HINT: Tape the screwdriver tip before use.
4. REMOVE FRONT DOOR TRIM BOARD SUB-ASSEMBLY LH
pic 4
(a)Remove the 2 cushion rubbers.
(b)Remove the 2 screws and clips.
(c)Using a clip remover, remove the 11 clips.
(d)Remove the trim board upward.
HINT: In order to prevent the door from being damaged, cover the parts indicated by arrow marks in the illustration with tape.
Pic 5
(e)Disconnect the 2 cables from the inside handle as shown in the illustration.
(f)Remove the inner weatherstrip.
(g)Remove the 3 screws and power window master switch.
Pic 6
(h)Using a screwdriver, disengage the 4 claws.
HINT: Tape the screwdriver tip before use.
(i)Remove the power mirror switch, as shown in the illustration.
5. REMOVE FRONT DOOR SERVICE HOLE COVER LH
pic 7
(a)Remove the front door service hole cover LH.
NOTE: Remove the remaining tape on the door side.
6. REMOVE OUTER REAR VIEW MIRROR ASSEMBLY LH
pic 8
(a)Disconnect the outer rear view mirror connector.
(b)Remove the 3 nuts and outer rear view mirror.
NOTE: When the nuts are removed, the outer rear view mirror might drop and be deformed.
7. REMOVE FRONT NO. 1 SPEAKER ASSEMBLY See: Speaker > Removal and Replacement > Removal
8. REMOVE FRONT NO. 2 SPEAKER ASSEMBLY
pic 9
(a)Disconnect the speaker connector.
(b)Remove the 2 bolts and No. 2 speaker.
(c)Remove the 2 bolts and speaker mounting No. 1 bracket.
9. REMOVE FRONT DOOR WINDOW FRAME MOULDING REAR LH See: Front Door Moulding / Trim > Removal and Replacement > Removal
10. REMOVE FRONT DOOR GLASS WEATHERSTRIP ASSEMBLY OUTER LH See: Front Door Window Glass Weatherstrip > Removal and Replacement > Removal
11. REMOVE FRONT DOOR GLASS SUB-ASSEMBLY LH
HINT: Insert a shop rag inside the door panel to prevent the glass from being scratched.
Pic 10
(a)Open the door glass until the bolts appear in the service holes.
(b)Remove the 2 bolts and holding the door glass.
Pic 11
(c)Remove the door glass, as shown in the illustration.
NOTICE:
- Do not damage the door glass.
- When the bolts are removed, the door glass might drop and be deformed.
(d)Remove the door glass run.
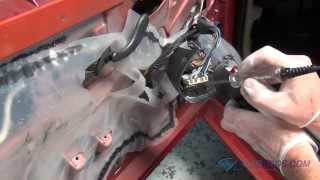
12. REMOVE FRONT DOOR WINDOW REGULATOR SUB-ASSEMBLY LH
pic 12
(a)Disconnect the window regulator connector.
(b)Remove the 6 bolts and window regulator.
NOTE: When the bolts are removed, the window regulator might drop and be deformed.
HINT: Remove the window regulator through the service hole.
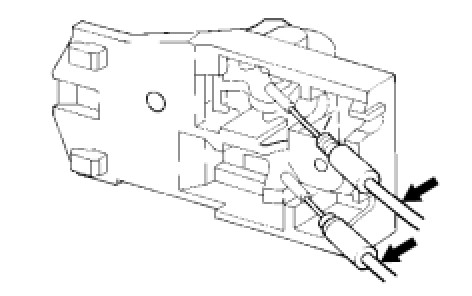
13. REMOVE POWER WINDOW REGULATOR MOTOR ASSEMBLY LH
(a)Place matchmarks on the window regulator motor gear and regulator gear.
(b)Using a "torx" driver (T25), remove the 3 screws and window regulator motor
________________________________________ Note that the number starts on 7. I bypassed removal of the door, wiring, exterior handle, and so on.
7. INSTALL POWER WINDOW REGULATOR MOTOR ASSEMBLY LH
(a)Align the matchmarks on the regulator motor gear and regulator gear.
(b)Using a "torx" driver (T25), install the door regulator motor with the 3 screws.
Torque: 5.4 Nm (55 kgf-cm, 48 in-lbf)
HINT: Never rotate the motor to the down direction until the window glass installation has done.
8. INSTALL FRONT DOOR WINDOW REGULATOR SUB-ASSEMBLY LH
pic 13
(a)Apply MP grease to the sliding and rotating parts of the window regulator.
NOTE: Do not apply grease to the spring of the window regulator.
Pic 14
(b)Install the window regulator with the 6 bolts.
Torque: 8.0 Nm (82 kgf-cm, 71 in-lbf)
(c)Connect the window regulator connector.
NOTE: Be careful not drop and deform the door window regulator.
9. INSTALL FRONT DOOR GLASS SUB-ASSEMBLY LH
NOTE: Do not damage the door glass.
Pic 15
(a)Install the glass run.
(b)Insert the door glass into the door panel along the glass run, as shown in the illustration.
Pic 16
(c)Install the door glass to the window regulator with the 2 bolts.
Torque: 8.0 Nm (82 kgf-cm, 71 in-lbf)
(d)Inspect operation of the power window.
HINT: When the installation point of the door glass does not match, adjust the regulator position in the manual operation.
(1)Connect the power window switch to the wire harness and turn the ignition switch ON.
(2)Repeat UP and DOWN operation several times in the manual operation.
10. INSTALL FRONT NO. 2 SPEAKER ASSEMBLY
pic 17
(a)Install the No. 1 speaker bracket with the 2 bolts.
Torque: 8.0 Nm (82 kgf-cm, 71 in-lbf)
(b)Connect the speaker connector.
(c)Install the No. 2 speaker with the 2 bolts.
Torque: 8.0 Nm (82 kgf-cm, 71 in-lbf)
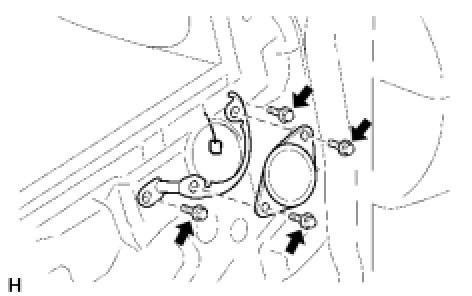
11. INSTALL OUTER REAR VIEW MIRROR ASSEMBLY LH
pic 18
(a)Install the outer rear view mirror with the 3 nuts.
Torque: 8.0 Nm (82 kgf-cm, 71 in-lbf)
(b)Connect the outer rear view mirror connector.
12. INSTALL FRONT DOOR SERVICE HOLE COVER LH
pic 19
(a)Apply butyl tape to the door, as shown in the illustration.
Adhesive:
Part No. 08850-00065, Butyl Tape Set or equivalent
(b)Install the service hole cover.
Standard dimension:
pic 20
HINT:
- When installing the service hole cover, pull out the links and connectors through the service hole cover.
- There should be no wrinkles or folds after attaching the service hole cover.
- After attaching the service hole cover, check the sealing condition.
______________________________
I hope this helps. Let me know how things work out or if you need help. Remember, before purchasing a new regulator, make sure none of the track has come loose causing the glass to bind.
Take care,
Joe
Images (Click to make bigger)
Saturday, November 30th, 2019 AT 9:15 PM