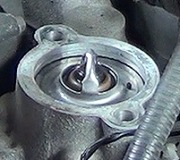
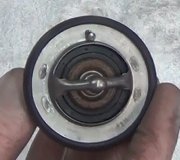
The easiest way to do this is to locate the top radiater hose follow it back to the motor, where the hose hooks up to the motor is where the thermostat is located. There are 2 bolts they are either 1/2" or 9/16. 1)Unscrew bolts to take off thermostat housing. 2)Pull housing off, you will then see thermostat, (there will be a gasket) 3)Remove old gasket around the thermostat and the thermostat housing, using a wire brush, (the reason for old gasket removal so it will not leak. 4)Put new thermostat in pointy side up. 5)Put the gasket that you recived w/thermostat on the housing. 6)Put the bolts back through the housing and the gasket. 7)Carefully place housing, bolts and gasket over the thermostat. 8)Make sure gasket is in place and tighten the bolts finger tight. 9)Then just go ahead and tighten the bolts the rest of the way w/socket or wrench.
NOTE-becareful taking off thermostat housing you will loose some antifreeze.
Then thermostat is on the back of the engine which is the end opposite to the end with the pulleys and (1)belt.
It is attached to the intake manifold, and its housing has the top radiator hose attached to it.
You need to remove the rubber engine air intake duct which also includes the MAP and VAP sensor's housing, and those in turn are attached to the aircleaner housing and the thottlebody.
You need to drain the radiator, so that its coolant level is below the level of the thermostat.
Begin;
Remove the hose from the overflow tank, then remove the overflow tank itself.
Remove the radaitor cap and drain rad. The drain plug is a while nylon fitting that ideally takes a special tool, but I have losened it with pliers. You can check the level of the coolant by looking inside the rad.
Disconnect wire connectors and small hoses that connect to MAP and VAP sensor housing. Loosen the clamps on the rubber air duct, and remove that assembly from the aircleaner housing and the throttle housing.
Remove the top rad hose from the thermostat housig and tie it back out of you way.
It is recommended that you remove the exhaust crossover pipe, but I find that you don't need to. It is a little more difficult to get at the bolts, but you don't have to be conserned with the extra time it takes.
Remove the two bolts that hold the housing in place, then you may have to tap on the housing to break it loose.
Pull the thermostat and its gasket out of the hole in the engine, and clean up any scale that may be there. Put the gasket on the new thermostat, and hold the thermostat housing against the engine while you put the bolts in.
It is critical to make sure that the housing sits flat against the engine while tightening the bolts, because people have actually broken the housing.
Rreplace the top rad hose, close off the rad drain, and refill the rad while allowing the coolant to settle, and then top it up again.
Reconnect the entire airduct assembly, with its hoses and wires,
Start the engine and let it run for a minute or so the shut it off again before the coolant rizes up in the rad.
Stop the engine and you should see that the coolant is now lower then when before you started the engine.
Top up the coolant again, replace the rad cap and start the engine again.
Replace the overflow tank and its hose that goes to rad cap.
Fill the coolant overflow tank about half full.
Begin checking for possible leaks, while the engine warm up to operating temperature.
Shut off the engine and let it cool down, while watching to make sure that the coolant doesn't drain out of the tank completely.
When the engine is cool, you can add enough coolant to the tank to get its level to the proper level.
SPONSORED LINKS
Sunday, September 20th, 2009 AT 12:58 PM


