Removal
1.Raise vehicle on hoist and remove right front wheel. Remove right inner splash panel. Remove accessory drive belts. Remove crankshaft vibration damper.
2.Remove generator drive belt idler pulley. Remove lower timing belt cover. Lower vehicle, and remove upper timing belt cover.
3.Place floor jack under vehicle to support weight of engine and transaxle assembly. Remove purge duty solenoid and wiring harness from right engine mount bracket (timing belt end of engine).
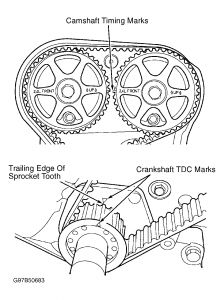
4.Remove 2 right engine mount vertical bolts from frame rail. Remove the one horizontal fastener. DO NOT remove large nut from center bolt of insulator rubber. Remove horizontal and vertical fasteners from engine side of mount. Remove right engine mount assembly. Rotate crankshaft to align timing marks on camshafts and oil pump housing. See Fig. 1.
CAUTION:Crankshaft sprocket mark must be located on trailing edge of sprocket tooth. Failure to align trailing edge of sprocket tooth with oil pump housing mark will cause camshaft marks to be misaligned.
5.On 1996 models equipped with hydraulic tensioner, remove hydraulic tensioner bolts and remove tensioner. Place hydraulic tensioner in vise, and SLOWLY compress tensioner plunger. Align holes in tensioner body and plunger, and insert a pin through body and plunger to lock plunger in place. Skip next step.
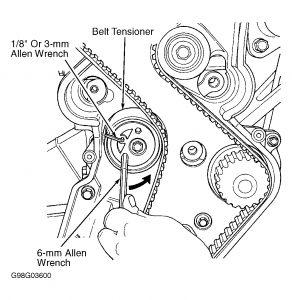
6.On models with a mechanical timing belt tensioner, insert a 6-mm Allen wrench into tensioner. Insert long end of 3-mm Allen wrench into pin hole on front of tensioner. While rotating the tensioner counterclockwise, push in lightly on the 3-mm Allen wrench until it can be pushed into locking hole. See Fig. 2.
7.On all models, if reusing old timing belt, mark belt with arrow to indicate original direction of rotation. Remove timing belt.
good luck
Oct 9, 2008 at 9:34 PM
