Hello
POWER WINDOW MOTOR
Removal
1. Remove door trim panel. See DOOR TRIM PANEL . Remove watershield. Tape window in its existing position. Cut and discard window motor tie wrap. Disconnect window motor connector. Remove window motor mounting screws/nuts.
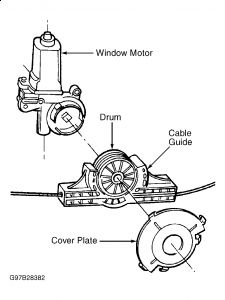
2. Remove window motor and cables from door as an assembly. Remove drum cover plate from faulty window motor. See Fig. 3 . Lift cable guide, drum and cables from motor.
CAUTION: DO NOT allow drum to separate from cable guide, by dropping drum or letting cables unwind.
Installation
1. Install NEW window motor. Tighten screws/nuts to 30-40 INCH lbs. (3.4-4.5 N.m). Install cable guide and drum into window motor. To install drum onto window motor shaft, a slight rotation of drum may be necessary.
2. Using needle nose pliers, rotate drum. If drum still does not align with motor shaft, with aid of an assistant, lower window glass 1-2 inches. Drum will rotate when glass is lowered.
3. Install cover plate onto window motor. Connect window motor connector. Remove tape holding window in place. Test window operation. To complete installation, reverse removal procedure.
DOOR TRIM PANEL
Removal & Installation
1. Using a trim stick, pry courtesy light from door trim. Disconnect courtesy light connector. Remove door assist handle (if equipped). Remove door pull cup (if equipped). Using a trim stick, remove screw cover from switch panel.
2. Remove screws securing switch panel to door trim and remove panel. Using a trim stick, remove seat/mirror memory switch (if equipped). Remove screw securing door trim to door panel from behind inside latch release handle.
3. Disengage clips holding door trim to door frame around perimeter of panel. Tilt top of trim panel away from door to gain access to latch linkage. Disengage clip holding linkage rod to inside latch release handle. Separate linkage rod from latch handle. Remove door trim panel. To install, reverse install removal procedure.
Oct 9, 2009 at 5:12 PM