REMOVAL & INSTALLATION
TIMING BELT
Removal
Disconnect negative battery cable. Remove all accessory drive belts. If necessary, remove alternator, mounting brackets, and A/C compressor (if equipped). DO NOT disconnect refrigerant lines. Remove A/C belt idler pulley.
Raise and support vehicle. Remove right inner splash shield. Remove water pump and crankshaft pulleys. Remove upper and lower timing belt covers. See Fig. 1 . Support engine using a jack.
NOTE:If timing belt is to be reused, mark direction of rotation for reassembly reference.
Remove right engine mount bolt, and raise engine slightly. Loosen the timing belt tensioner, and remove timing belt. See Fig. 2 .
Installation
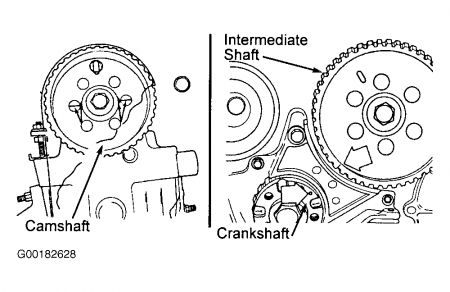
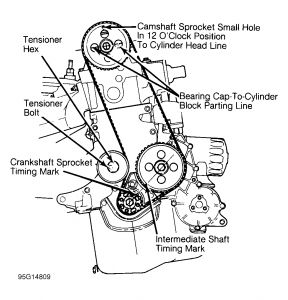
Remove spark plugs. Place cylinder No. 1 on TDC. Align timing marks on crankshaft and intermediate shaft sprockets. See Fig. 3 . Rotate camshaft sprocket until 2 marked arrows on sprocket hub align with camshaft bearing cap-to-cylinder head parting line. Small hole in camshaft sprocket must be at 12 o'clock relative to cylinder head line. See Fig. 4 .
Install timing belt. Ensure timing belt is installed in original direction of rotation. Install Timing Belt Tensioner (C-4703) horizontally on large hex of belt tensioner pulley. Loosen tensioner lock nut (if necessary) to reset belt tensioner to within a 15-degree axis of horizontal position of tool. Tighten lock nut.
CAUTION:DO NOT rotate crankshaft counterclockwise. DO NOT rotate engine using camshaft or intermediate shaft sprocket bolts.
Rotate crankshaft clockwise 2 complete revolutions to TDC. Tighten tensioner retaining bolt to specification while holding belt tensioner wrench in position. See TORQUE SPECIFICATIONS . Check all timing marks for proper alignment. To complete installation, reverse removal procedure. Adjust drive belts to proper tension.
Fig. 3: Aligning Crankshaft, Intermediate Shaft & Camshaft Timing Marks
Courtesy of CHRYSLER CORP.
Fig. 4: Aligning Timing Marks
Courtesy of CHRYSLER CORP.
Dec 16, 2008 at 9:09 PM
