1999 Nissan Altima Altima dies while driving

Tiny
JOHNCLAY84
  • MEMBER
  • 1999 NISSAN ALTIMA
Electrical problem
1999 Nissan Altima 4 cyl Front Wheel Drive Automatic 108k miles

Hello,

Last week my car died while driving to work. At the time I was going about 40mph. The power went out, the engine died, and all the dash lights came on. I pulled over and the engine restarted and ran fine. That afternoon I changed out the spark plug wires, distributor cap, and rotor button.

Two days later my car died again while leaving work. I was going about 65mph and the power quickly died and came back on. The engine did not turn off, and I continued driving. It died again on the same drive, while I was going about 45mph. This time the engine did die, and I had to restart, which it restarted fine. The last two times the A/C was on for sure, but I don't remember about the first time.

I took the car into a repair shop. They found some stored codes for the knock sensor and nothing else. I had them go ahead and replace the knock sensor.

The car drove fine for about 3 days until yesterday. I was sitting at a stop sign, and I turned the A/C on. Immediately upon pressing the button, the car died. It then restarted once more fine.

Since then I have been driving around with the A/C off and it has not died. The car has not sputtered. There is no sound from the fuel pump. There is no rough idle. The engine runs fine otherwise. Please help.

Clay
Wednesday, March 24th, 2010 AT 5:50 PM

17 Replies

Tiny
MERLIN2021
  • MECHANIC
  • 17,250 POSTS
I don't know if this is your problem, but it could be, check the PCM for moisture!
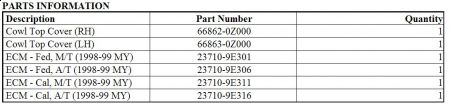
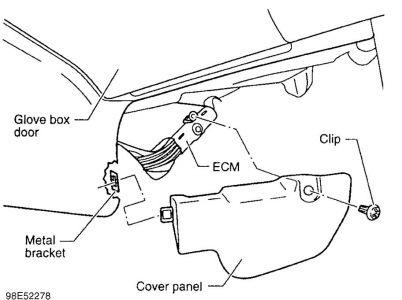
Reference Number(s): NTB99-006, Â Date of Issue: Â March 15, 1999 Related Ref Number(s): NTB99-006 ARTICLE BEGINNING 1998-99 ALTIMA, MIL 'ON' AND/OR POOR DRIVEABILITY DUE TO A/C EVAPORATOR CONDENSATION LEAKING ON ECM Model(s): 1998-99 Nissan Altima Classification: HA989-005 Section: Heater & Air Conditioner Bulletin No.: NTB99-006 Date: March 15, 1999 APPLIED VEHICLES All 1998-99 Nissan Altima (L30) SERVICE INFORMATION If a 1998-99 Nissan Altima exhibits a MIL 'ON' and/or poor driveability such as engine hesitation or no starting, the cause may be air conditioning (A/C) evaporator condensation leaking onto the engine control module (ECM). Air conditioning condensation can accumulate and leak onto the ECM if the A/C evaporator drain tube becomes blocked by debris such as leaves, insect nests, etc. Such debris can enter the A/C air intake duct through openings in the cowl top cover. To prevent debris from entering the A/C system, new cowl top covers are now available. The new cowl top covers have foam seals (mounted on their underside) that keep debris away from the A/C air intake duct. SERVICE PROCEDURE 1. Check for moisture and/or mildew on the passenger side carpeting around the ECM area and check the ECM for signs of water damage, See Fig. 2 CM location. A. If the carpeting is dry and mildew-free around the area of the ECM and there are no signs of water damage (wetness, water spots, corrosion, etc.) to the ECM, use the service manual to diagnose the incident DTCs. B. If the carpeting is wet and/or mildew is present around the ECM and the ECM has signs of water damage (wetness, water spots, corrosion, etc.), proceed with step 2. 2. Discharge the A/C system using the procedure on pages HA-61 and HA-62 of the 1998 Altima Service Manual or pages HA-62 and HA-63 of the 1999 Altima Service Manual. 3. Remove the A/C evaporator assembly. 4. Using a wet/dry vacuum cleaner, remove all debris inside the evaporator including any debris that may be blocking the drain tube. Make sure the drain tube is free and clear of any debris and flashing that was created when the evaporator case was initially manufactured. 5. Using a wet/dry vacuum cleaner remove all debris inside the intake blower unit. Remove the intake blower unit if necessary. 6. Dry the carpeting using the following steps. A. With a large towel, soak up as much water as possible from the top surface of the carpet. B. Pull back the wet sections of the carpet until the underside of the wet section is exposed . C. Using a wet/dry vacuum cleaner, remove as much water as possible from the underside of the carpet. D. Spray the wet areas of the carpet with a household disinfectant to eliminate mold or mildew odors and prevent further growth. E. Allow the carpet to dry. 7. Install the new cowl top covers as follows: A. Remove the windshield wiper arms (two M10 nuts). B. Remove the weather-strip seal, Fig. 1 C. Remove and discard the old cowl top covers. Save the two securing clips, Fig. 1 D. Using a wet/dry vacuum cleaner, remove all debris in the cowl and A/C intake areas. E. Install the new cowl top covers. F. Re-install the weather-strip seal. 8. Reinstall the windshield wiper arms and the attachment nuts. 9. Reinstall the A/C evaporator assembly. 10. Replace the water damaged ECM with the correct service part number. See Fig. 2 11. Evacuate and recharge the A/C system with 0.70-0.80 kg (1.54-1.76 Ib) of HFC-134a. CAUTION: Immediately after removing the evaporator assembly, seal the open ends of the refrigerant lines (both on the evaporator and on the vehicle) to prevent moisture from entering the A/C system. NOTE: Use a fan to shorten the drying time. IMPORTANT: When re-installing the wiper arms, use the procedure on page EL-110 of the 1998 Altima Service Manual or page EL-116 of the 1999 Altima Service Manual to properly position the wiper arms. Once correctly positioned, tighten the wiper arm mounting nuts to 17-23 N-m (1.7-2.3 kg-m,12-17 ft-lb). NOTE: When installing the evaporator assembly, make sure the drain tube is correctly positioned and the carpeting/insulation does not get caught between the drain tube foam seal and the engine room wall. 12. Conduct a leak check to confirm there are no refrigerant leaks. Refer to the leak check procedure on pages HA-58 through HA-60 of the 1998 Altima Service Manual or pages HA-59 through HA-61 of the 1999 Altima Service Manual. Fig. 1: Removal of Old Cowl Top Covers Fig. 2: Location of ECM PARTS INFORMATION PARTS INFORMATION


http://www.2carpros.com/forum/automotive_pictures/62217_1_74.jpg


http://www.2carpros.com/forum/automotive_pictures/62217_PCM_9.jpg

Was this
answer
helpful?
Yes
No
Thursday, March 25th, 2010 AT 4:13 PM
Tiny
JOHNCLAY84
  • MEMBER
  • 8 POSTS
I have not found any moisture or sign of moisture on the passenger side.
Was this
answer
helpful?
Yes
No
Friday, March 26th, 2010 AT 5:09 PM
Tiny
MERLIN2021
  • MECHANIC
  • 17,250 POSTS
Did you check the computer? Remove the cover and see if any moisture is in the harness and connector that plugs into the computer. I only give this TSB because your symptoms are worse with A/C on?
Was this
answer
helpful?
Yes
No
Saturday, March 27th, 2010 AT 7:05 AM
Tiny
JOHNCLAY84
  • MEMBER
  • 8 POSTS
I removed the panel and checked the computer. There was no moisture and no signs of any either. Also, it died today with the A/C off. It should be noted that the Check Engine light has not come on.
Was this
answer
helpful?
Yes
No
+1
Saturday, March 27th, 2010 AT 10:16 AM
Tiny
MERLIN2021
  • MECHANIC
  • 17,250 POSTS
Check the ECM ground at the cylinder head, remove and clean the connection area and strap.


http://www.2carpros.com/forum/automotive_pictures/62217_1_75.jpg


http://www.2carpros.com/forum/automotive_pictures/62217_2_58.jpg

Was this
answer
helpful?
Yes
No
Saturday, March 27th, 2010 AT 11:06 AM
Tiny
JOHNCLAY84
  • MEMBER
  • 8 POSTS
I talked to a guy at the service desk at the local Nissan dealer. He was pretty sure it was the Crank Sensor. I'm not exactly sure where that is located on my car though or if I would be able to get to and replace easily. From my understanding, it is on the rear driver side of the engine and somewhat difficult to reach.
Was this
answer
helpful?
Yes
No
-1
Saturday, March 27th, 2010 AT 3:10 PM
Tiny
MERLIN2021
  • MECHANIC
  • 17,250 POSTS
I can tell you that on 2000-2003 there is a recall for three sensors, crank, cam and tps. I dont know if yours would fit in, it would depend on the VIN and production date. Crank sensor would cause a no spark condition. The sensor is at the left front of the transaxle housing. So at least it's at the front side!
Was this
answer
helpful?
Yes
No
-1
Saturday, March 27th, 2010 AT 3:23 PM
Tiny
JOHNCLAY84
  • MEMBER
  • 8 POSTS
Okay, thanks for your speedy replies by the way. On the front side of the engine, just below the thermostat housing (relatively), is the cam sensor, or so I think. I was informed by the guy at Nissan earlier that this looks identical to the crank sensor. However, the crank sensor is a bit more difficult to find and would have to be changed "blindly" but wasn't too hard to reach. He also mentioned that people often mistake these two (and replace the cam sensor when the code is for the crank sensor). As of yet I have been unable to locate the crank sensor. Do you happen to have a diagram or maybe a more detailed description? Thanks.

Also I haven't been able to upload any pics on here otherwise I would.
Was this
answer
helpful?
Yes
No
Saturday, March 27th, 2010 AT 4:11 PM
Tiny
MERLIN2021
  • MECHANIC
  • 17,250 POSTS
I did look but my Mitchell manual only tell what I posted.
Look where the engine and transaxle are bolted together, it's right in that area towards the front of the car.
Was this
answer
helpful?
Yes
No
-1
Saturday, March 27th, 2010 AT 6:34 PM
Tiny
JOHNCLAY84
  • MEMBER
  • 8 POSTS
By that description, the sensor I am looking at is the crank sensor, as it is bolted to the front of the transaxle right where it is bolted to the engine. Doing a quick internet search it does appear both the cam and crank sensors look exactly the same, and I have only found one so far that matches the pics I've seen. Does the manual by chance say where the cam sensor is located?
Was this
answer
helpful?
Yes
No
Saturday, March 27th, 2010 AT 7:35 PM
Tiny
MERLIN2021
  • MECHANIC
  • 17,250 POSTS
On the cylinder head, so it can read the cam gear.
Was this
answer
helpful?
Yes
No
-1
Saturday, March 27th, 2010 AT 8:26 PM
Tiny
JOHNCLAY84
  • MEMBER
  • 8 POSTS
Okay, so I changed the crank sensor this morning. It still has not fixed the problem. I ran it for a whle and got it to die twice. It seems to be losing power right when the fans kick on causing it to die. Also, both times after it died, the car had no electrical power whatsoever, turn the key. Nothing. The power only came back when pressing the brake and turning the key into the third position.
Was this
answer
helpful?
Yes
No
+1
Sunday, March 28th, 2010 AT 11:36 AM
Tiny
MERLIN2021
  • MECHANIC
  • 17,250 POSTS
If the crank or cam sensor where the problem, you wouldn't loose electrical power, re check grounds. Especially the ground from the negative post to the engine block, I suggest you remove the battery, I think the negative cable runs under it, and it tends to corrode thru at the bare spot. Replace the negative cable, and check the links at the posts.
Was this
answer
helpful?
Yes
No
Monday, March 29th, 2010 AT 12:58 PM
Tiny
JOHNCLAY84
  • MEMBER
  • 8 POSTS
I figured I'd give it a shot since the sensor is pretty cheap and it was also suggested by my uncle, who's worked at the smyrna plant for many years, as a common problem. The problem is that I've checked every ground and connection I can find or get to. I don't have a lift or jack stands. The only corrosion problem I've had was on the positive terminal a couple years ago, which I replaced. The car really hasn't behaved like what I normally see when there is a short. It is always full power or none at all, no dimming or low power situations. Anyways I took it in to the dealer this afternoon, so I will post what they find. Thanks for your help.
Was this
answer
helpful?
Yes
No
Monday, March 29th, 2010 AT 7:14 PM
Tiny
MERLIN2021
  • MECHANIC
  • 17,250 POSTS
Ok let me know, You id remove the battery? These Nissans ground the neg cable under the battery, and on the engine, the weak point is the ground under the Battery. They break off there.
Was this
answer
helpful?
Yes
No
Tuesday, March 30th, 2010 AT 1:47 PM
Tiny
JOHNCLAY84
  • MEMBER
  • 8 POSTS
As it turns out, the technician who installed the knock sensor did so incorrectly leaving a positive connection loose causing the sensor to fail repeatedly and the car to die. My car finally works now though.
Was this
answer
helpful?
Yes
No
+1
Friday, April 2nd, 2010 AT 11:35 AM
Tiny
2 LINSEY
  • MECHANIC
  • 287 POSTS
Hi johnclay84,

Wow! A loose connection is all it takes sometimes, we are glad you got it all figured out. Thank you for using 2CarPros. Com. We appreciate your donation and look forward to helping you in the future.

Have a great weekend!
Was this
answer
helpful?
Yes
No
+1
Friday, April 2nd, 2010 AT 11:46 AM

Please login or register to post a reply.

Sponsored links