Welcome to 2CarPros.
Here are the tensioner spring specs:
TIMING BELT TENSIONER
Tension Spring:
Free Length. 46.0 mm (1.811 inch)
Installed Tension:
At 50.5 mm (1.988 inch). 32 - 37 N (7.2 - 8.3 lbs.)
__________________________________
The only thing I can think of is the belt isn't tight enough, there is some type of interference causing the cam to stop, or if you are turning the crank counter clockwise, this can happen.
You should only turn it clockwise
I am going to provide the directions for belt install for you to review. See if there is anything you have done differently that may be causing the issue. The attached pictures correlate with the directions.
_________________________________
1998 Toyota Camry CE Sedan L4-2164cc 2.2L DOHC MFI
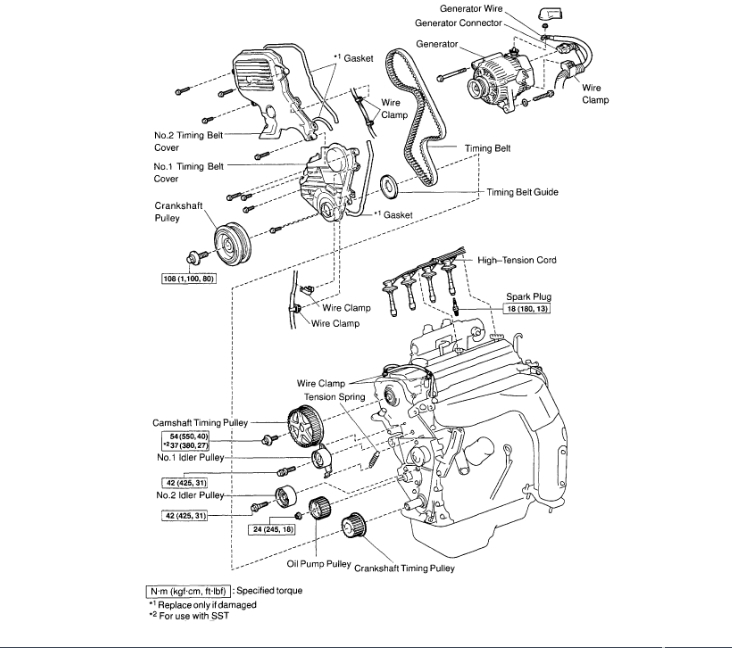
Timing Belt Installation
Vehicle Engine, Cooling and Exhaust Engine Timing Components Timing Belt Service and Repair Procedures Timing Belt Replace Timing Belt Installation
TIMING BELT INSTALLATION
pic 1
pic 2
INSTALLATION
1. Install oil pump pulley.
A. Align the cutouts of the pulley and shaft, and slide on the pulley.
Pic 3
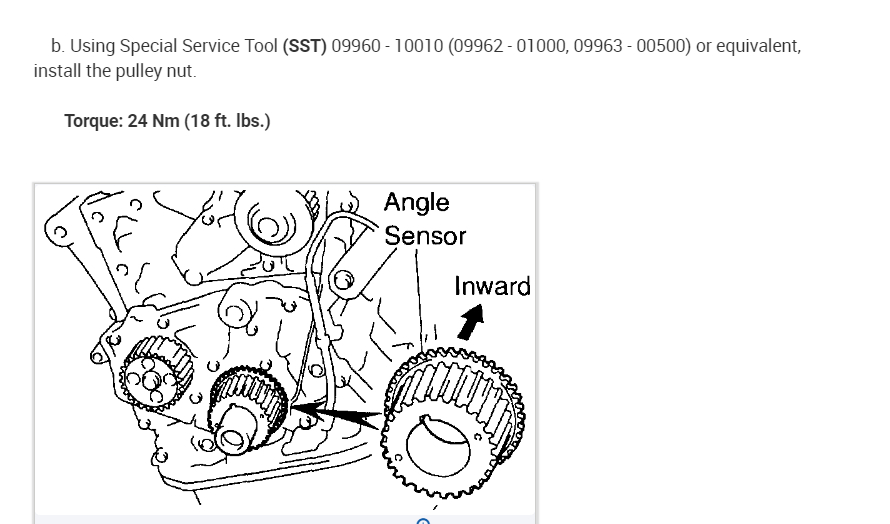
b. Using Special Service Tool (SST) 09960 - 10010 (09962 - 01000, 09963 - 00500) or equivalent, install the pulley nut.
Torque: 24 Nm (18 ft. Lbs.)
pic 4
2. Install crankshaft timing pulley.
A. Align the timing pulley set key with the key groove of the pulley.
B. Slide on the timing pulley, facing the angle sensor inward.
NOTICE: Do not scratch the angle sensor of the timing pulley.
Pic 5
3. Install No.2 idler pulley.
A. Install the pulley with the bolt.
Torque: 42 Nm (31 ft. Lbs.)
HINT: Use the 35 mm (1.38 inch) long bolt.
B. Check that the idler pulley moves smoothly.
Pic 6
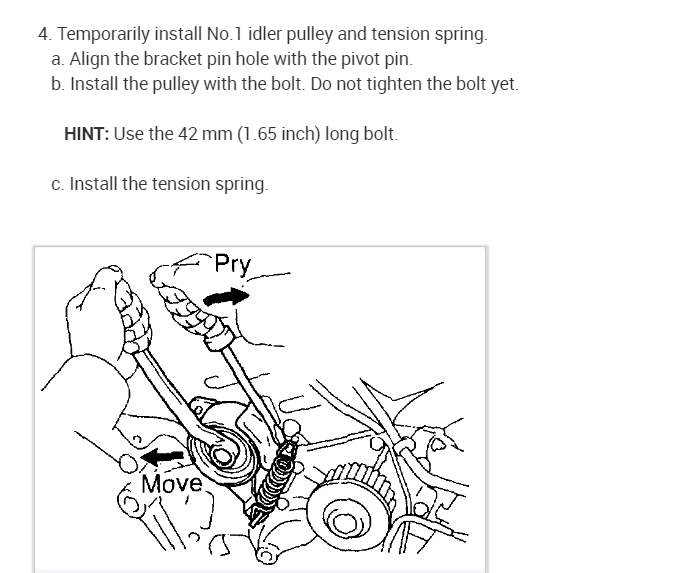
4. Temporarily install No.1 idler pulley and tension spring.
A. Align the bracket pin hole with the pivot pin.
B. Install the pulley with the bolt. Do not tighten the bolt yet.
HINT: Use the 42 mm (1.65 inch) long bolt.
C. Install the tension spring.
Pic 7
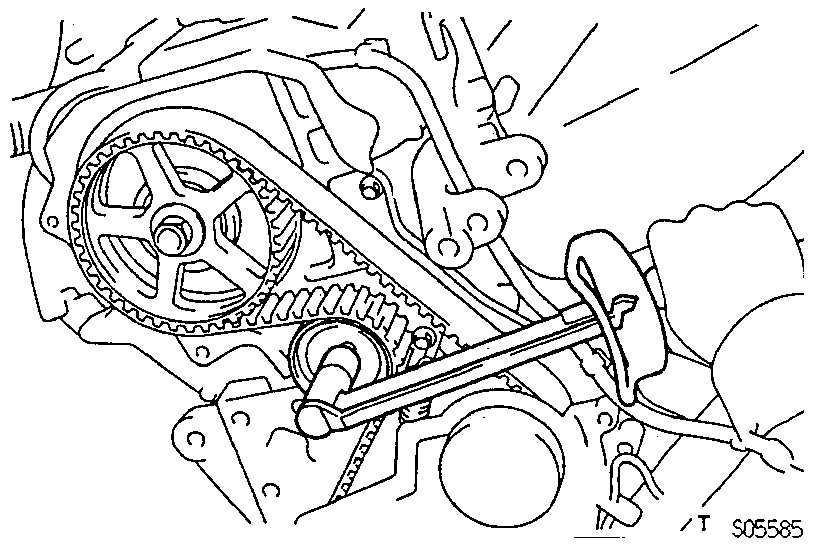
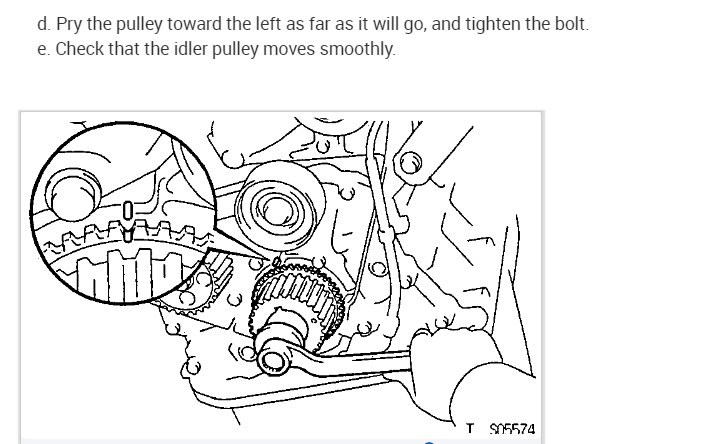
d. Pry the pulley toward the left as far as it will go, and tighten the bolt.
E. Check that the idler pulley moves smoothly.
Pic 8
5. Temporarily install timing belt.
NOTICE: The engine should be cold.
A. Using the crankshaft pulley bolt, turn the crankshaft and align the timing marks of the crankshaft timing pulley and oil pump body.
Pic 9
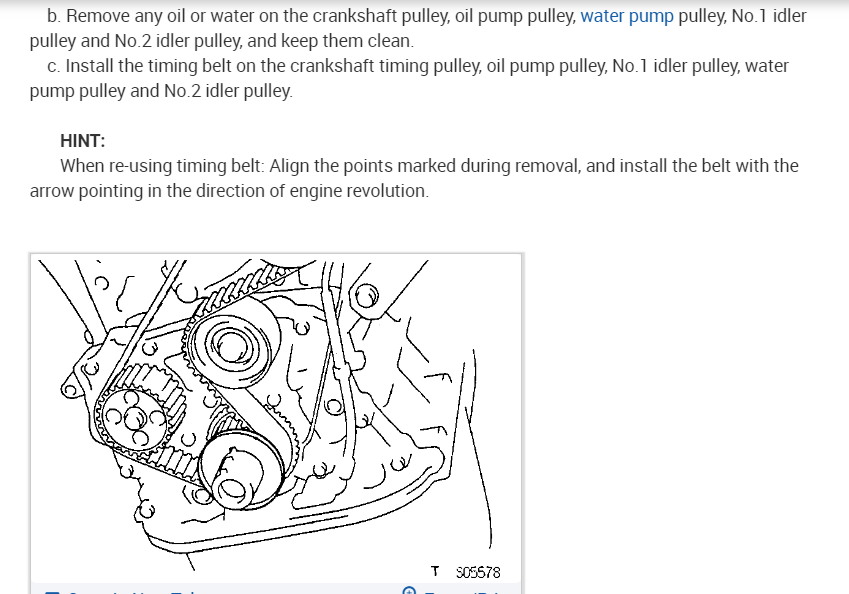
b. Remove any oil or water on the crankshaft pulley, oil pump pulley, water pump pulley, No.1 idler pulley and No.2 idler pulley, and keep them clean.
C. Install the timing belt on the crankshaft timing pulley, oil pump pulley, No.1 idler pulley, water pump pulley and No.2 idler pulley.
HINT:
When re-using timing belt: Align the points marked during removal, and install the belt with the arrow pointing in the direction of engine revolution.
Pic 10
6. Install timing belt guide.
Install the guide, facing the cup side outward.
Pic 11
7. Install No.1 timing belt cover.
A. Check that the timing belt cover gasket has no cracks or peeling, etc.
If the gasket has cracks or peeling, etc, replace it using these steps:
1) Using a screwdriver and gasket scraper, remove all the old gasket material.
2) Thoroughly clean all components to remove all the loose material.
3) Remove the backing paper from a new gasket and install the gasket evenly to the part of the timing belt cover shaded black in the illustration.
4) After installing the gasket, press down on it so that the adhesive firmly sticks to the timing belt cover.
Pic 12
b. Install the timing belt cover with the 4 bolts.
C. Install the clamp of the crankshaft position sensor wire to the timing belt cover.
D. Install the crankshaft position sensor wire to the clamp on the timing belt cover.
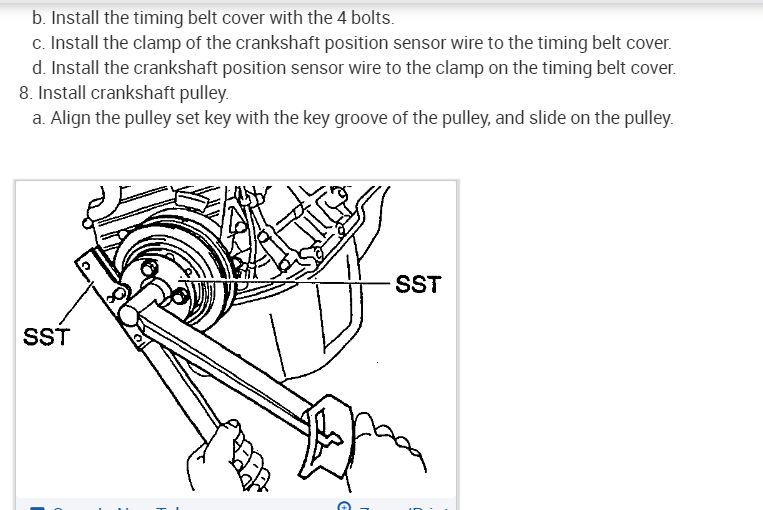
8. Install crankshaft pulley.
A. Align the pulley set key with the key groove of the pulley, and slide on the pulley.
Pic 13
b. Using (SST) 09213 - 54015 (91651 - 60855), 09330 - 00021 (and bolt), install the pulley bolt.
Torque: 108 Nm (80 ft. Lbs.)
HINT: Either of 2 types of pulley may be used, each with its own bolt size, type A and type B.
9. Install camshaft timing pulley.
A. Align the camshaft knock pin with the knock pin groove of the pulley, and slide on the timing pulley.
Pic 14
b. Using (SST) 09249 - 63010, 09960 - 10010 (09962 -01000, 09963 - 01000), install the pulley bolt.
Torque: 54 Nm (40 ft. Lbs.) 37 Nm (27 ft. Lbs.) For use with SST
HINT: Use a torque wrench with a fulcrum length of 340 mm (13.39 inch).
10. Set No.1 cylinder to Top Dead Center(TDC)/Compression.
Pic 15
a. Turn the crankshaft pulley, and align its groove with timing mark "0" of the No.1 timing belt cover.
Pic 16
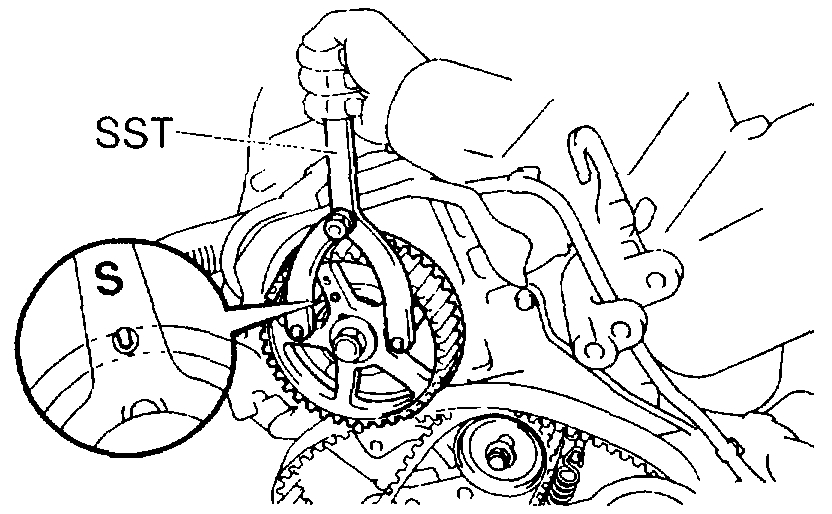
b. Using (SST) 09960 - 10010 (09962 - 01000, 09963 - 01000) turn the camshaft, and align the hole of the camshaft timing pulley with the timing mark of the bearing cap.
11. Connect timing belt to camshaft timing pulley.
Pic 17
HINT:
When re-using timing belt: Check that the matching marks of the timing belt and the No.1 timing belt cover meet.
If the matchmark does not align, shift the meshing of the timing belt and crankshaft timing pulley until they align.
Pic 18
When re-using timing belt: Align the matchmarks of the timing belt and camshaft timing pulley.
Pic 19
a. Remove any oil or water on the camshaft timing pulley, and keep it clean.
B. Connect the timing belt to the camshaft timing pulley, and checking the tension between the crankshaft timing pulley and camshaft timing pulley.
12. Check valve timing.
Pic 20
a. Loosen the No.1 idler pulley bolt 1/2 turn.
B. Slowly turn the crankshaft pulley 2 revolutions TDC to TDC.
Pic 21
NOTICE: Always turn the crankshaft pulley clockwise.
Pic 22
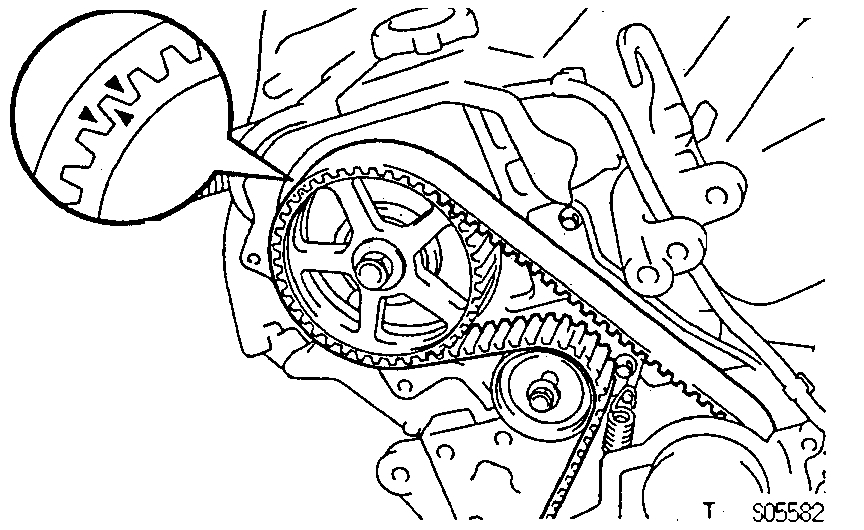
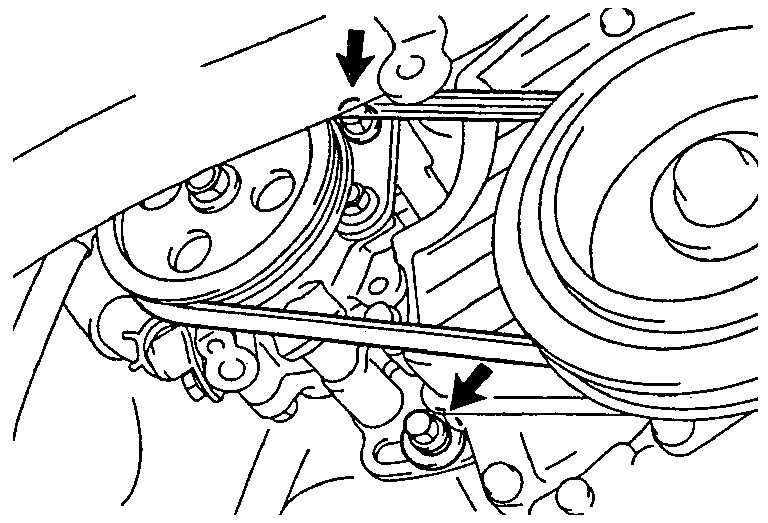
c. Check that each pulley aligns with the timing marks as shown in the illustration.
If the timing marks do not align, remove the timing belt and reinstall it.
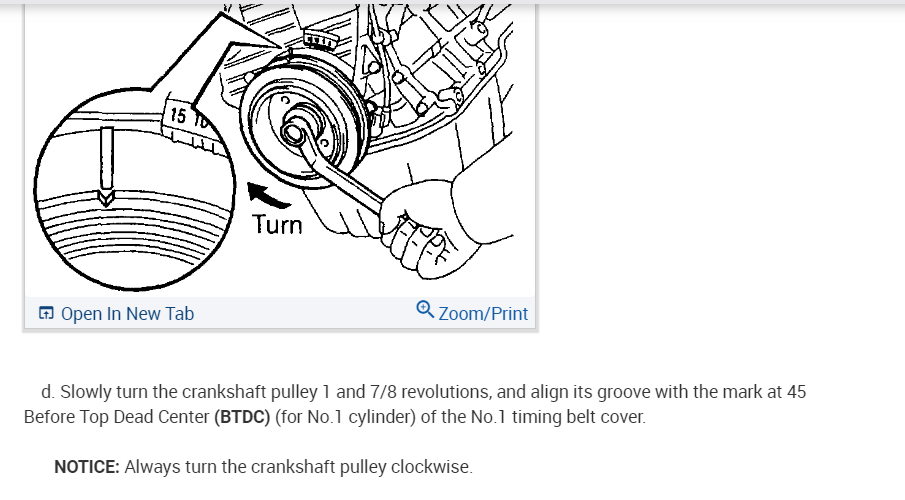
Pic 23
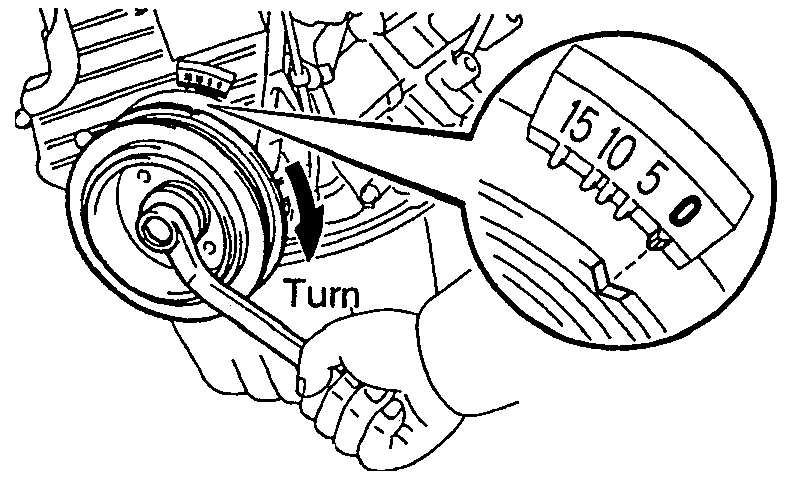
d. Slowly turn the crankshaft pulley 1 and 7/8 revolutions, and align its groove with the mark at 45 Before Top Dead Center (BTDC) (for No.1 cylinder) of the No.1 timing belt cover.
NOTICE: Always turn the crankshaft pulley clockwise.
Pic 24
e. Tighten the mounting bolt of the No.1 idler pulley.
Torque: 42 Nm (31 ft. Lbs.)
pic 25
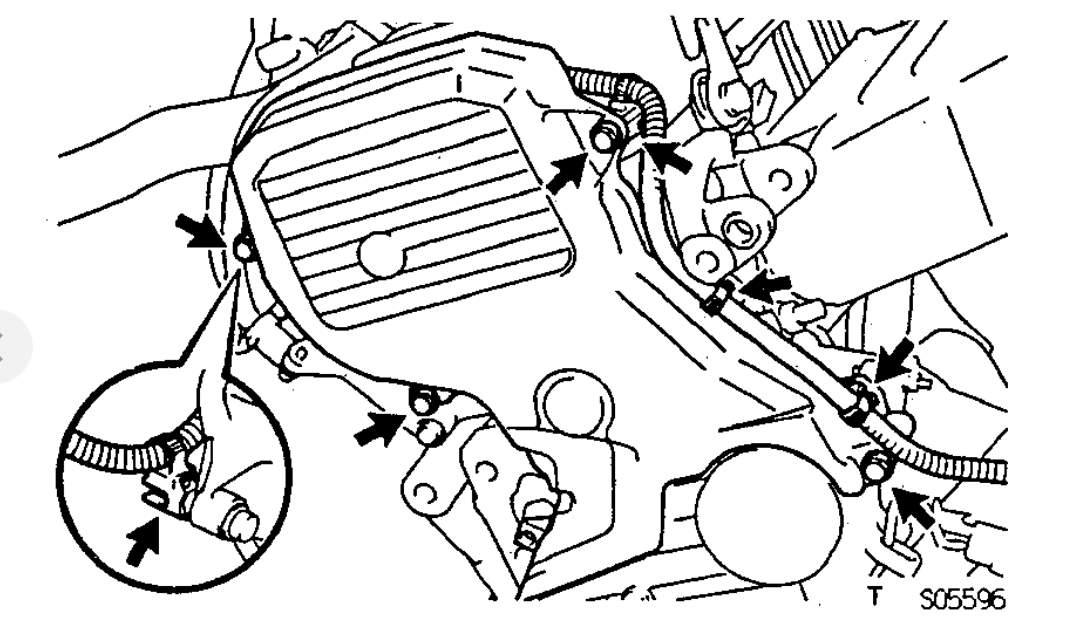
13. Install No.2 timing belt cover.
A. Check that the timing belt cover gaskets have no cracks or peeling; etc.
If the gasket has cracks or peeling, etc, replace it using these steps:
1) Using a screwdriver and gasket scraper, remove all the old gasket material.
2) Thoroughly clean all components to remove all the loose material.
3) Remove the backing paper from a new gasket and install the gasket evenly to the part of the timing belt cover shaded black in the illustration.
4) After installing the gasket, press down on it so that the adhesive firmly sticks to the timing belt cover.
Pic 26
b. Install the belt cover with the 4 bolts.
C. Install the engine wire clamp.
14. Install spark plugs.
A. Install the 4 spark plugs.
B. Connect the 4 high-tension cords to the spark plugs.
C. Install the 4 high-tension cords to the clamps on the cylinder head cover.
15. Install No.2 RH engine mounting bracket.
Pic 27
a. Install the mounting bracket with the 3 bolts.
B. Alternately tighten the 3 bolts in several passes.
Torque: 52 Nm (38 ft. Lbs.)
16. Install engine moving control rod.
Pic 28
a. Temporarily install the control rod with the 3 bolt.
B. Alternately tighten the 3 bolts in several passes.
Torque: 64 Nm (47 ft. Lbs.)
17. Connect ground strap connector.
18. Install PS pump drive belt.
Pic 29
Install the drive belt with the 2 bolts.
19. Install RH front fender apron seal.
20. Install RH front wheel.
21. Install generator.
__________________________________
Let me know if any of this helps or if you have other questions.
Take care,
Joe
Images (Click to make bigger)
SPONSORED LINKS
Monday, July 29th, 2019 AT 8:53 PM